
Crafting has seen a joyful resurgence, especially in the realm of small, wearable art. Among the most charming and accessible projects are resin fruit keychains—colorful, lightweight, and full of personality. These tiny accessories combine creativity with practicality, making them perfect for personal use or thoughtful handmade gifts. With just a few supplies and a bit of patience, you can create a collection of fruity charms that reflect your style. This guide walks you through every step, from gathering materials to demolding your finished pieces, ensuring even beginners achieve polished results.
Why Resin Fruit Keychains Are Perfect for Beginners
Resin crafting often intimidates newcomers with concerns about bubbles, curing times, or complex molds. However, fruit-shaped keychains simplify the process. Their small size reduces material waste and shortens curing time. Most designs require only one or two pours, minimizing the risk of errors. Plus, imperfections like minor bubbles or color shifts add character rather than ruin the piece.
Fruit themes are also forgiving. A slightly off-center strawberry seed or an uneven lemon slice still reads as playful and whimsical. The bright colors and familiar shapes make them universally appealing. Whether you're drawn to cherries, watermelons, or pineapples, the creative freedom is endless.
Materials You’ll Need
Gathering the right supplies ensures a smooth crafting session. Here’s what you’ll need to get started:
- Epoxy resin and hardener (preferably clear, slow-cure for beginners)
- Silicone fruit molds (available online in various styles)
- Plastic mixing cups (measured in milliliters)
- Wooden stir sticks or silicone spatulas
- Pigment powders or liquid dyes (non-water-based)
- Fine glitter or mica powder for shimmer effects
- Small drying rack or foam block with pins
- Isopropyl alcohol (90% or higher) and cotton swabs
- Disposable gloves and a well-ventilated workspace
- Keychain rings or lobster clasps
Choose quality resin labeled for jewelry use—it cures clearer and is less prone to yellowing. Avoid using food coloring; it can react poorly with resin and cause cloudiness.
Step-by-Step Guide to Making Your First Resin Fruit Keychain
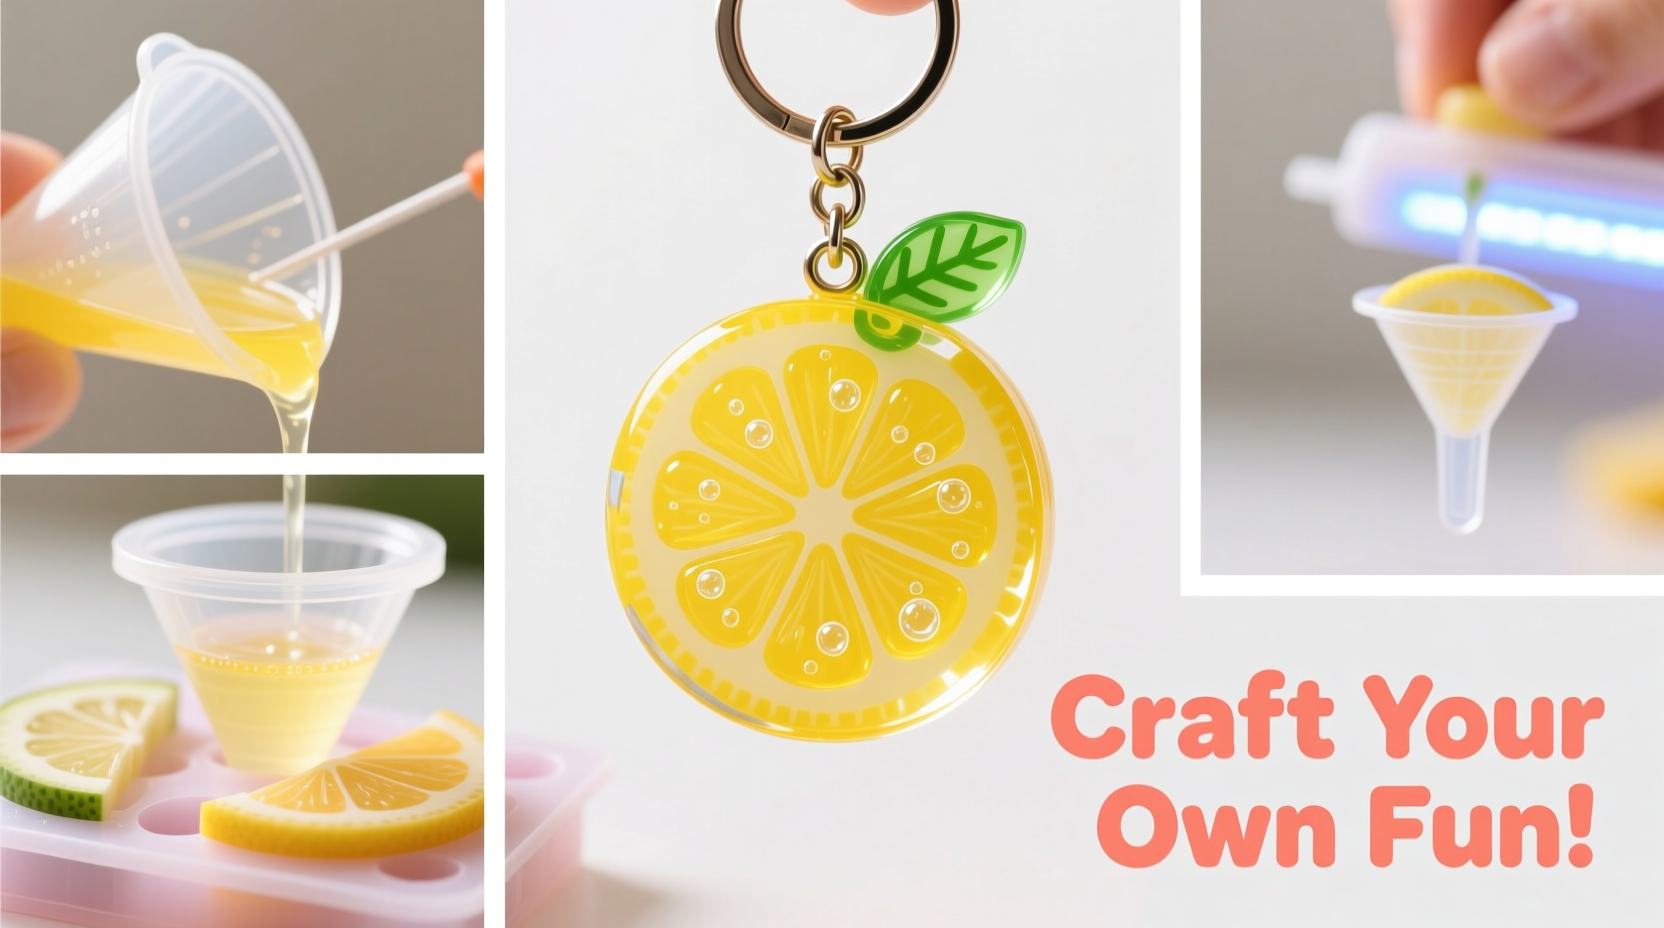
- Prepare your workspace. Cover surfaces with wax paper or silicone mats. Ensure good airflow—open windows or use a fan. Wear gloves and avoid distractions.
- Mix the resin. Follow the manufacturer’s ratio (usually 1:1 or 2:1). Pour both parts into a clean cup and stir slowly for 2–3 minutes, scraping the sides to ensure thorough blending.
- Add color. Mix in pigment gradually. For a strawberry, use red with a touch of white for softness. Use green for leaves, brown for seeds. Stir thoroughly to avoid streaks.
- Fill the mold. Pour colored resin into the fruit cavity. For watermelon, pour pink first, let it set slightly, then add a thin green layer on top. Tap the mold gently on the table to release air bubbles.
- Pop bubbles. Use a toothpick or a quick burst of isopropyl alcohol from a spray bottle to break surface tension and eliminate bubbles.
- Cure undisturbed. Let molds sit flat for 12–24 hours depending on resin type. Avoid moving or touching them during this phase.
- Demold carefully. Once fully cured, flex the silicone mold gently to release the piece. Trim any flash with nail files or fine sandpaper.
- Attach hardware. Insert a jump ring through the molded loop or drill a tiny hole if needed. Secure a keychain ring or charm clip.
Design Ideas and Creative Variations
Once you’ve mastered the basics, experiment with textures and layers. Try these ideas:
- Lemon slices: Add tiny black specks (using a pin dipped in black resin) to mimic seeds.
- Strawberries: Sprinkle red microbeads before curing for a textured surface.
- Watermelon: Embed real sesame seeds in the rind layer for authentic detail.
- Pineapple: Use vertical mold lines or carve texture into cured pieces for grooves.
- Mini citrus zest: Swirl yellow and green resin for a marbled effect.
You can also embed tiny dried flowers or holographic flakes for a magical touch. Just ensure they’re completely dry and sealed to prevent moisture issues.
“Resin allows crafters to freeze a moment in time—whether it’s a summer fruit or a sparkly dream. The key is patience and precision.” — Lila Tran, Resin Artist & Workshop Instructor
Common Mistakes and How to Avoid Them
Even experienced crafters encounter hiccups. Here’s a comparison of frequent errors and their solutions:
| Issue | Causes | Prevention & Fixes |
|---|---|---|
| Sticky or tacky surface | Incorrect mixing ratio, cold environment | Re-measure precisely; cure in room above 70°F (21°C) |
| Bubbles in final piece | Pouring too fast, trapped air | Stir slowly, tap mold, use alcohol mist |
| Cloudy or hazy resin | Moisture contamination, low-quality pigments | Work in dry area; use resin-safe dyes |
| Resin won’t cure | Expired product, incomplete mixing | Check expiration dates; stir for full 3 minutes |
| Color bleeding between layers | Adding second layer too soon | Wait until first layer is tacky but not wet (about 1–2 hours) |
Real Example: Maya’s First Craft Fair Success
Maya, a college student from Portland, started making resin keychains during winter break. She bought a $12 mold set online and practiced with leftover resin from a friend’s project. Her first attempts had bubbles and uneven colors, but by her third batch, she was producing glossy cherries and sunny lemons.
She packaged them with mini thank-you cards and sold 27 at a local farmers’ market craft corner. “People loved how cheerful they were,” she said. “A woman bought six—one for each grandchild. That made my week.” Within two months, Maya turned her hobby into a small Etsy shop, reinvesting profits into new molds and UV resin for faster turnaround.
FAQ: Your Resin Keychain Questions Answered
Can I use regular glue instead of resin?
No. Craft glue doesn’t achieve the same glass-like finish or durability. It may yellow, crack, or remain sticky. Epoxy resin is specifically designed for clarity and strength in small decorative items.
How long do resin keychains last?
With proper care, they can last years. Avoid prolonged sun exposure to prevent fading. Store in a pouch when not in use to minimize scratches.
Are resin fumes dangerous?
Fresh resin emits fumes that can irritate eyes and lungs. Always work in a ventilated space, wear a mask if sensitive, and keep pets and children away during curing.
Final Checklist Before You Begin
- ✅ Workspace Ready?
- Clean, covered, ventilated, clutter-free.
- ✅ Materials Gathered?
- Resin, mold, pigments, stir sticks, gloves, keychain rings.
- ✅ Mold Secured?
- Place on a level surface or use a mold-holding tray.
- ✅ Time Allocated?
- Allow 15–30 minutes active time plus 12+ hours curing.
- ✅ Safety First?
- Gloves on, no eating/drinking nearby, cleanup plan ready.
Start Crafting Today—Your Unique Style Awaits
Resin fruit keychains are more than just accessories—they’re tiny celebrations of color, summer, and self-expression. What began as a pandemic pastime has blossomed into a global craft movement, and you’re invited to join. With minimal investment and maximum creativity, you can design pieces that spark joy every time you reach for your keys.


 浙公网安备
33010002000092号
浙公网安备
33010002000092号 浙B2-20120091-4
Comments
No comments yet. Why don't you start the discussion?