
Merging data from multiple Excel files is a common challenge in business, finance, research, and administration. Whether you're consolidating monthly sales reports, combining survey results, or aggregating departmental budgets, manually copying and pasting data is inefficient and error-prone. Fortunately, there are several straightforward ways to merge Excel workbooks into a single, well-organized spreadsheet—without writing complex code or relying on third-party software.
The key is choosing the right method based on your technical comfort level, file volume, and need for automation. From built-in Excel features to Power Query and simple VBA scripts, this guide walks through practical, tested approaches that deliver clean, consistent results every time.
Why Combine Excel Files?
Working with scattered data across multiple files creates redundancy, inconsistency, and wasted time. Consolidating spreadsheets streamlines reporting, enables cross-file analysis, and reduces manual errors. For example, if each regional office submits a separate sales report in Excel format, merging them allows leadership to view total performance at a glance, identify trends, and generate accurate forecasts.
A unified spreadsheet also simplifies version control. Instead of tracking dozens of files with similar names like “Sales_Report_Jan_Final_v2.xlsx,” you maintain one master file updated regularly. This improves collaboration and ensures everyone works from the same dataset.
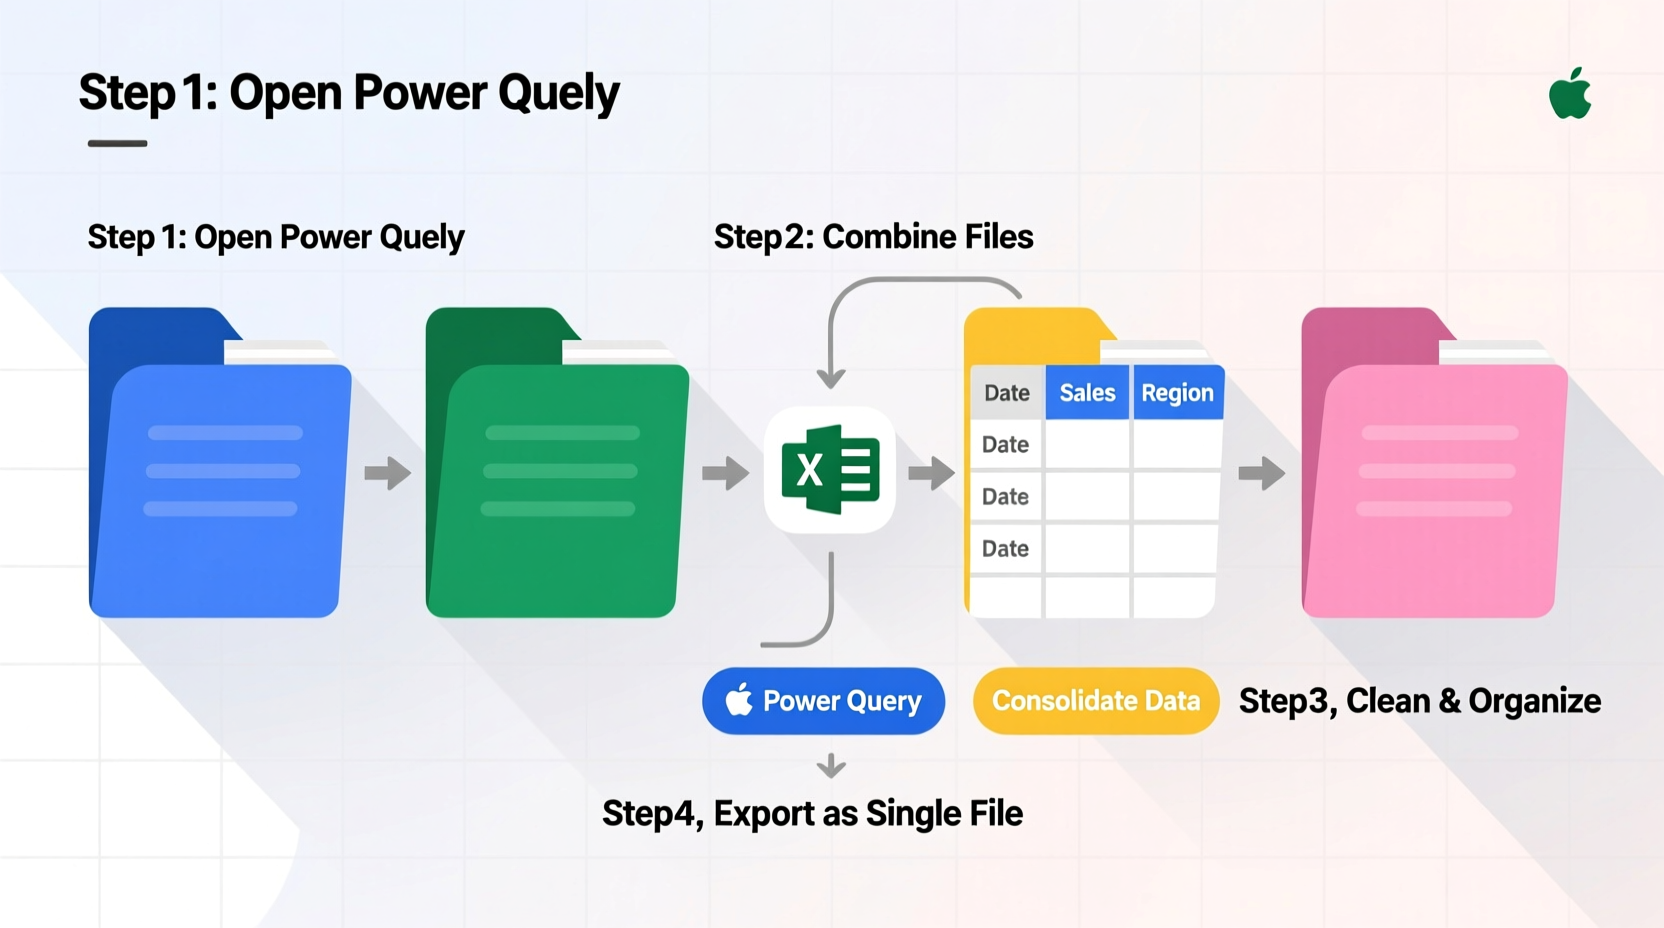
Method 1: Using Power Query (Recommended for Most Users)
Power Query is Excel’s built-in data transformation tool, available in Excel 2016 and later (including Microsoft 365). It’s ideal for combining multiple files with identical structures—such as monthly reports with the same column headers.
Step-by-Step Guide to Merging Files with Power Query
- Place all Excel files you want to combine into a single folder. Do not open them.
- In a new Excel workbook, go to Data > Get Data > From File > From Folder.
- Browse to the folder containing your files and click Open.
- Excel will list all files in the folder. Click the Combine button and select Combine & Load.
- Choose the worksheet that contains your data (e.g., “Sheet1”) and confirm.
- Click OK. Excel automatically appends all matching tables into one consolidated table.
- Review the merged data in a new worksheet. You can now sort, filter, and analyze it as a single dataset.
Power Query preserves the original formatting and adds a “Source.Name” column so you know which file each row came from. You can remove or rename this column as needed. Once set up, you can refresh the query anytime new files are added to the folder—making this method highly scalable.
Method 2: Copy-Paste with Formatting Control
If you only need to merge a few files occasionally, manual copy-pasting remains a viable option—especially when layouts vary slightly.
Best Practices for Manual Merging
- Open each file and ensure data starts in the same column (e.g., Column A).
- Select the entire data range excluding headers (to avoid duplicating column titles).
- Paste into the master sheet below existing data.
- Use Paste Special > Values to prevent formula conflicts.
- Manually add a “Month” or “Region” column to track the origin of each dataset.
This method lacks automation but gives full control over formatting and structure. It’s best suited for one-time merges or when dealing with irregularly formatted files.
Method 3: Using VBA Macro for Full Automation
For users comfortable with basic scripting, a VBA (Visual Basic for Applications) macro can automate the entire process—even across hundreds of files.
Simple VBA Script to Merge Workbooks
Press Alt + F11 to open the VBA editor. Insert a new module and paste the following code:
Sub CombineExcelFiles()
    Dim FolderPath As String
    Dim Filename As String
    Dim WorkbookCount As Integer
    Dim wb As Workbook

    FolderPath = \"C:\\YourFolder\\\" ' Change to your folder path
    Filename = Dir(FolderPath & \"*.xlsx\")

    WorkbookCount = 0

    Application.ScreenUpdating = False

    Do While Filename <> \"\"
        Set wb = Workbooks.Open(FolderPath & Filename)
        With wb.Sheets(1)
            .UsedRange.Copy Destination:=ThisWorkbook.Sheets(1).Cells(Rows.Count, 1).End(xlUp).Offset(1, 0)
        End With
        wb.Close SaveChanges:=False
        Filename = Dir()
        WorkbookCount = WorkbookCount + 1
    Loop

    Application.ScreenUpdating = True
    MsgBox \"Combined \" & WorkbookCount & \" files successfully!\"
End Sub
Replace C:\\YourFolder\\ with the actual path to your files. Run the macro, and all data from the first sheet of each .xlsx file will be appended below the previous entry. The script skips header rows after the first file, ensuring clean consolidation.
“We use a modified VBA script to pull daily inventory reports from 12 stores. What used to take two hours now finishes in under a minute.” — Daniel Reyes, Operations Manager at RetailFlow Inc.
Method 4: Third-Party Tools and Add-ins
While native Excel tools are sufficient for most needs, specialized add-ins like Kutools for Excel or Ablebits offer one-click merging options with advanced features such as automatic deduplication, field mapping, and conditional inclusion.
Kutools, for instance, includes a “Combine Worksheets” wizard that guides users through selecting files, choosing sheets, and handling headers. These tools are especially helpful for non-technical teams who perform frequent merges but lack access to Power Query or IT support.
Comparison Table: Methods Overview
| Method | Best For | Automation | Learning Curve | File Limit |
|---|---|---|---|---|
| Power Query | Regular merges, structured data | High (refreshable) | Low-Medium | Thousands |
| Copy-Paste | One-off tasks, small datasets | None | Very Low | Manual effort scales poorly |
| VBA Macro | Large-scale automation | Full | High | Limited by system resources |
| Third-Party Tools | Teams needing simplicity | Medium-High | Low | Varies by tool |
Mini Case Study: Streamlining Quarterly Reporting
A mid-sized marketing agency previously spent 14–18 hours each quarter compiling client campaign results from 27 separate Excel files. Each team lead submitted their own report with slight variations in layout and naming conventions. An analyst manually copied data into a summary sheet, often introducing typos or misalignments.
After implementing Power Query, the team standardized file templates and stored submissions in a shared folder. With a single click, the master report refreshed, pulling in all new data. The process now takes less than five minutes, freeing up over 60 hours annually for higher-value analysis.
Frequently Asked Questions
Can I combine files with different column orders?
Yes, but it's better to standardize the structure first. If columns differ, Power Query may misalign data. Pre-sort your source files to match the same column sequence and names for reliable merging.
What if my files contain formulas?
When merging, values are typically copied—not formulas. This prevents broken references. If you need formulas preserved, consider linking instead of combining, or reapply them in the final sheet.
Is there a limit to how many files Excel can merge?
Technically, no hard limit exists, but performance depends on your computer’s RAM and file size. Excel handles thousands of rows efficiently, but extremely large datasets (>1 million rows) may require database tools like Access or Power BI.
Final Checklist Before Merging
- ✅ All files are saved in the same folder
- ✅ Data is in tables or consistent ranges
- ✅ Column headers are identical across files
- ✅ No merged cells or blank rows within data
- ✅ Backup copies exist before automation
Take Control of Your Data Today
Combining multiple Excel files doesn’t have to be tedious or risky. By leveraging Power Query, macros, or even careful manual techniques, you can turn fragmented spreadsheets into a powerful, centralized resource. Start small—try merging two files using Power Query—and build confidence from there. The time you save will quickly compound, giving you more room to focus on insights, not data entry.


 浙公网安备
33010002000092号
浙公网安备
33010002000092号 浙B2-20120091-4
Comments
No comments yet. Why don't you start the discussion?