
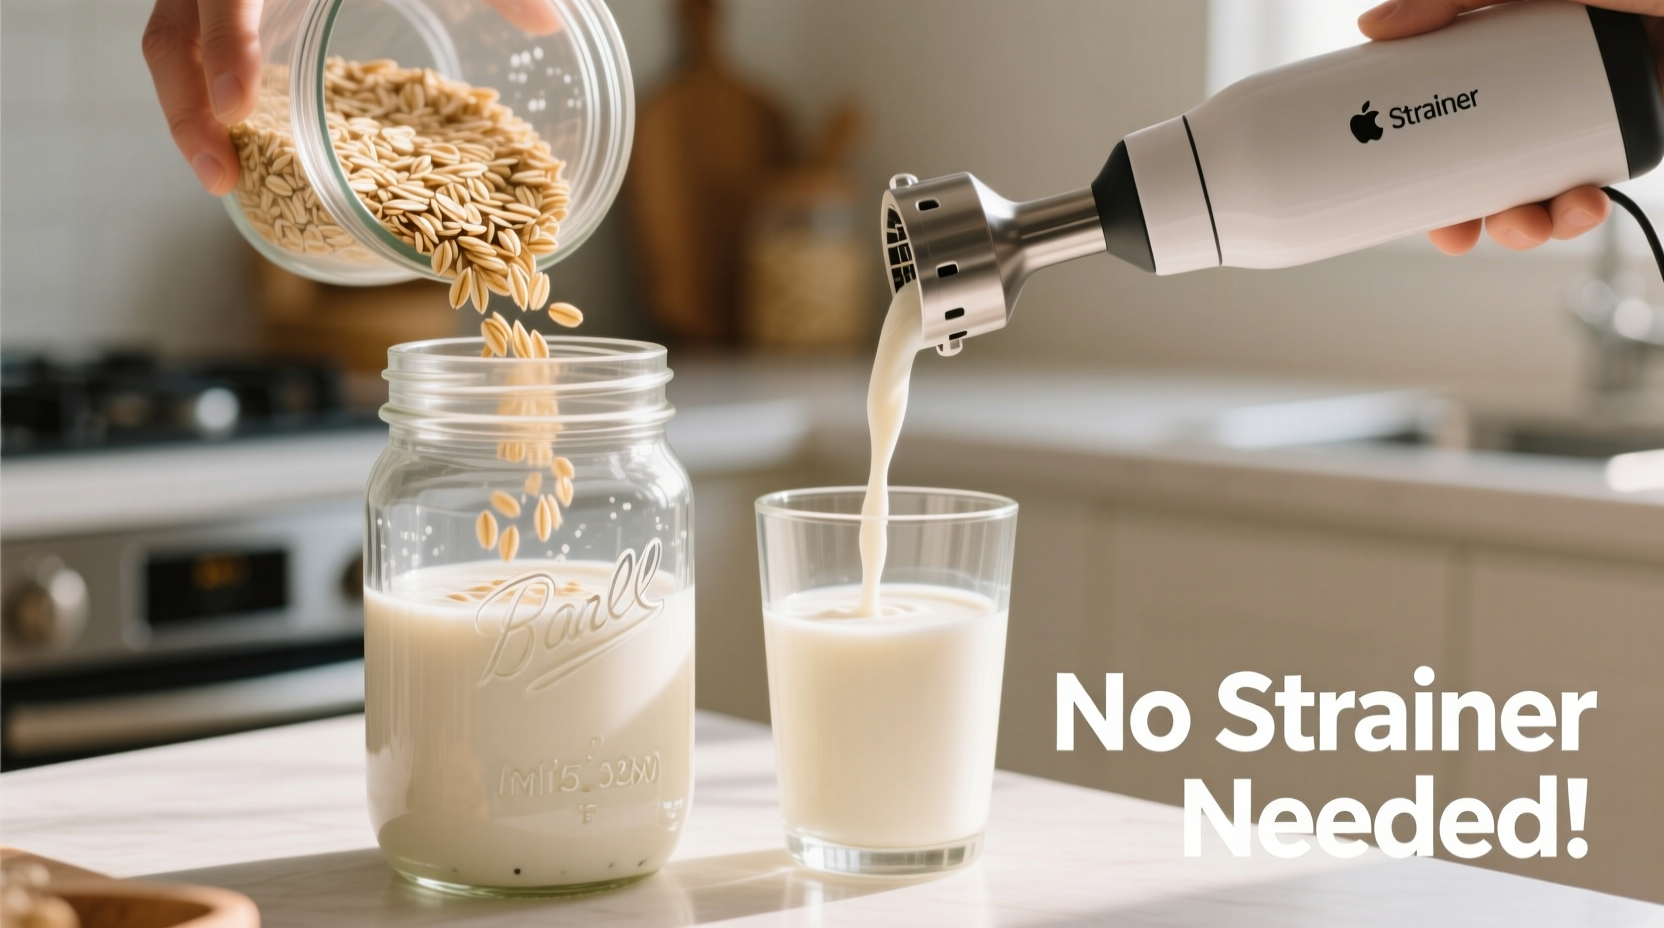
Making your own oat milk at home has become a popular choice for those seeking a sustainable, additive-free alternative to store-bought versions. But many DIY recipes require cheesecloths, nut milk bags, or fine-mesh strainers—tools not everyone keeps in their kitchen. The good news? You don’t need any of them. With a high-speed blender and the right technique, you can create silky, rich oat milk without ever touching a strainer.
This method eliminates the mess, saves time, and produces a consistently smooth result. Whether you're new to plant-based milks or looking to simplify your routine, this guide walks you through every step, explains why skipping the strainer works, and shares tips to avoid common pitfalls like sliminess or bitterness.
The Science Behind No-Strain Oat Milk
Oats are naturally starchy, and when blended with water, they release beta-glucans—a soluble fiber that gives oat milk its signature creaminess. Traditional methods strain out the solids to prevent a gritty texture, but modern blenders can pulverize oats into such fine particles that they remain suspended in the liquid, creating a smooth mouthfeel without separation.
The key is controlling variables: blend time, water-to-oat ratio, and soaking duration. Over-blending increases starch extraction, which can lead to a slimy texture. Under-blending leaves coarse bits behind. Getting the balance right means you can skip filtering entirely and still enjoy a drinkable, pourable milk ideal for coffee, cereal, or baking.
“With today’s high-performance blenders, mechanical filtration is often unnecessary. The finest particles stay dispersed, mimicking commercial homogenization.” — Dr. Lena Torres, Food Scientist & Plant-Based Nutrition Researcher
Step-by-Step Guide: How to Make No-Strain Oat Milk
This method takes under 10 minutes from start to finish and uses only three basic ingredients. Follow these steps carefully to ensure optimal texture and flavor.
- Gather Your Ingredients and Tools
- 1/2 cup rolled oats (old-fashioned, not instant)
- 4 cups cold filtered water (plus extra for rinsing)
- Pinch of sea salt (optional, enhances flavor)
- Blender with a lid (preferably high-speed)
- Fine-mesh sieve or colander (only for initial rinse, not straining)
- Rinse the Oats Thoroughly
Place the oats in a bowl and cover with cold water. Swirl gently and drain through a sieve. Repeat once. Rinsing removes excess surface starch and dust, reducing the risk of sliminess.
- Add Ingredients to Blender
Transfer rinsed oats to the blender. Add 4 cups of fresh cold water and a pinch of salt. Avoid warm or hot water—it activates more starch and increases gumminess.
- Blend for Exactly 30 Seconds
Start on low speed, then increase to high. Blend for no longer than 30 seconds. This short burst breaks down the oats sufficiently without over-releasing sticky fibers. Stop immediately after.
- Pour Directly Into a Storage Container
Without straining, pour the mixture directly from the blender into a clean glass jar or bottle with a lid. A funnel helps prevent spills.
- Let It Sit for 2 Minutes, Then Shake
Allow the milk to rest briefly so larger particles sink slightly. Then cap and shake vigorously. This distributes the micro-particles evenly and improves consistency.
- Refrigerate and Use Within 4 Days
Store in the refrigerator. Shake well before each use. The milk will thicken slightly when chilled.
Flavor Variations Without Extra Equipment
Once you’ve mastered the base recipe, customize your oat milk with natural flavors—all without requiring additional straining.
- Vanilla Sweetened: Add 1 tsp vanilla extract and 1–2 pitted dates during blending.
- Chocolate: Blend in 1 tbsp unsweetened cocoa powder and 1 date.
- Coffee Creamer Style: Include 1/2 tsp cinnamon and 1 tbsp maple syrup.
- Unsweetened Plain: Stick to just oats, water, and salt for maximum versatility.
Why This Method Works—and When It Doesn’t
The success of no-strain oat milk hinges on precision. While convenient, it’s not foolproof. Below is a comparison of best practices versus common mistakes.
| Do’s | Don’ts |
|---|---|
| Use cold water | Use warm or hot water |
| Blend for 20–30 seconds max | Blend for more than 45 seconds |
| Rinse oats before blending | Skip rinsing altogether |
| Use old-fashioned rolled oats | Use instant or steel-cut oats |
| Shake well before use | Assume the milk won’t separate |
Separation is normal. Unlike commercial oat milks with emulsifiers and stabilizers, homemade versions lack preservatives. Simply shaking reintegrates the liquid. However, if your milk develops a sour smell, mold, or thick gel-like texture, discard it immediately.
Avoiding Sliminess: The Cold Water Rule
Sliminess is the most common complaint with homemade oat milk. It occurs when excessive blending or warm water causes starch to gelatinize—essentially turning your milk into a thin paste. The solution lies in temperature control and timing.
Cold water inhibits starch activation. Blending quickly prevents heat buildup. Together, they allow mechanical breakdown without triggering unwanted viscosity. Think of it like making a roux: cold ingredients react differently than heated ones. By respecting this principle, you maintain drinkability.
Real Example: Sarah’s Morning Routine Upgrade
Sarah, a freelance designer from Portland, used to buy flavored oat milk weekly. At $5 per carton, it added up fast—and she disliked the additives like sunflower lecithin and preservatives. After reading about no-strain methods, she tried the 30-second cold-blend technique.
She started with plain oats and water, then gradually added dates and vanilla. Now, she makes a batch every Sunday that lasts her the week. “I pour it over granola, blend it into smoothies, and even use it in my morning matcha,” she says. “The best part? No straining means cleanup is just a quick rinse of the blender jar.”
Her biggest lesson? Skipping the rinse led to a gummy second batch. Once she incorporated that step, texture improved dramatically. “It’s literally five seconds of effort for a much better result,” she notes.
Checklist: Making Perfect No-Strain Oat Milk
Follow this checklist each time you make a batch to ensure consistent quality:
- ☐ Use 1/2 cup rolled oats (not instant or steel-cut)
- ☐ Rinse oats under cold water and drain
- ☐ Measure 4 cups cold filtered water
- ☐ Add pinch of salt (and optional flavorings)
- ☐ Blend on high for exactly 30 seconds
- ☐ Pour directly into storage bottle (no straining)
- ☐ Let sit 2 minutes, then shake well
- ☐ Label with date and refrigerate
- ☐ Shake before every use
- ☐ Consume within 4 days
Frequently Asked Questions
Can I use a food processor instead of a blender?
No, food processors typically don’t generate enough speed or vortex action to break down oats finely enough. You’ll likely end up with a gritty, uneven texture. A high-speed blender is essential for achieving smoothness without straining.
Why does my oat milk taste bitter?
Bitterness usually comes from over-blending. When oats are processed too long, enzymes release compounds that create a sharp aftertaste. Sticking to 30 seconds and using cold water minimizes this. Also, ensure your oats aren’t stale or rancid—store them in an airtight container away from heat and light.
Can I freeze no-strain oat milk?
Yes, but texture changes upon thawing. Freezing causes separation and can make the milk grainier. If freezing, do so in ice cube trays for use in smoothies or cooking, where texture matters less. Thaw in the refrigerator and blend briefly to recombine.
Maximizing Shelf Life and Safety
Homemade oat milk lacks preservatives, so proper handling extends freshness and prevents spoilage. Always use clean equipment and sanitized containers. Glass jars with tight-sealing lids work best—they’re non-reactive and easy to wash thoroughly.
Label your container with the preparation date. Most batches last 3–5 days in the fridge. Signs of spoilage include:
- Foul or sour odor
- Visible mold spots
- Excessive clumping or slimy film
If in doubt, throw it out. While waste is frustrating, consuming spoiled plant milk can cause digestive discomfort.
Environmental and Economic Benefits
Beyond convenience, making oat milk at home reduces plastic waste and carbon footprint. A single 32-oz carton generates one piece of packaging, often lined with aluminum or plastic that’s hard to recycle. Producing your own cuts packaging entirely if you reuse bottles.
Cost-wise, a 1-pound bag of rolled oats costs around $3–$4 and yields approximately eight batches. That’s less than $0.50 per quart compared to $4–$6 for premium brands. Over a year, this could save over $200 for a daily user.
Additionally, you control ingredient quality. No gums, oils, or artificial flavors. Just pure, simple nourishment.
Final Thoughts: Simplicity Meets Sustainability
Making oat milk at home without a strainer isn’t just possible—it’s practical. With minimal effort, you gain a fresher, cleaner product tailored to your taste. The method respects both your time and kitchen limitations, proving that sustainability doesn’t require complexity.
Every small shift toward self-sufficiency adds up. Whether you’re motivated by health, cost, or environmental impact, this technique offers a realistic entry point into homemade plant milks. No special gear. No mess. Just oats, water, and intention.


 浙公网安备
33010002000092号
浙公网安备
33010002000092号 浙B2-20120091-4
Comments
No comments yet. Why don't you start the discussion?