
The Freestyle Libre 3 sensor has revolutionized glucose monitoring with its small size, real-time data, and minimal invasiveness. However, after 14 days of continuous wear, the time comes to remove it—and for many users, this step can feel uncertain or uncomfortable. While the device is designed for easy application, removal requires care to avoid skin irritation, adhesive residue, or unnecessary pain. With the right approach, removing your Freestyle Libre 3 can be a seamless, nearly painless experience. This guide outlines proven, gentle methods backed by user experience and healthcare professionals to help you remove your sensor safely and comfortably.
Understanding the Freestyle Libre 3 Adhesive
The Freestyle Libre 3 uses a medical-grade adhesive that bonds securely to the skin to ensure accurate readings over two weeks. This adhesive is strong enough to withstand sweat, water, and daily movement but is also formulated to be safe for most skin types. However, prolonged exposure can cause the glue to bond more tightly, especially in warm or humid conditions. The key to pain-free removal lies not in force, but in technique—specifically, breaking the adhesive seal gently while minimizing tension on the skin.
Skin sensitivity varies from person to person. Some may peel the sensor off with little discomfort, while others—especially those with sensitive skin, eczema, or frequent sensor use—may experience redness or minor irritation if improper methods are used. Understanding how the adhesive works helps inform smarter removal strategies.
Step-by-Step Guide to Safe Sensor Removal
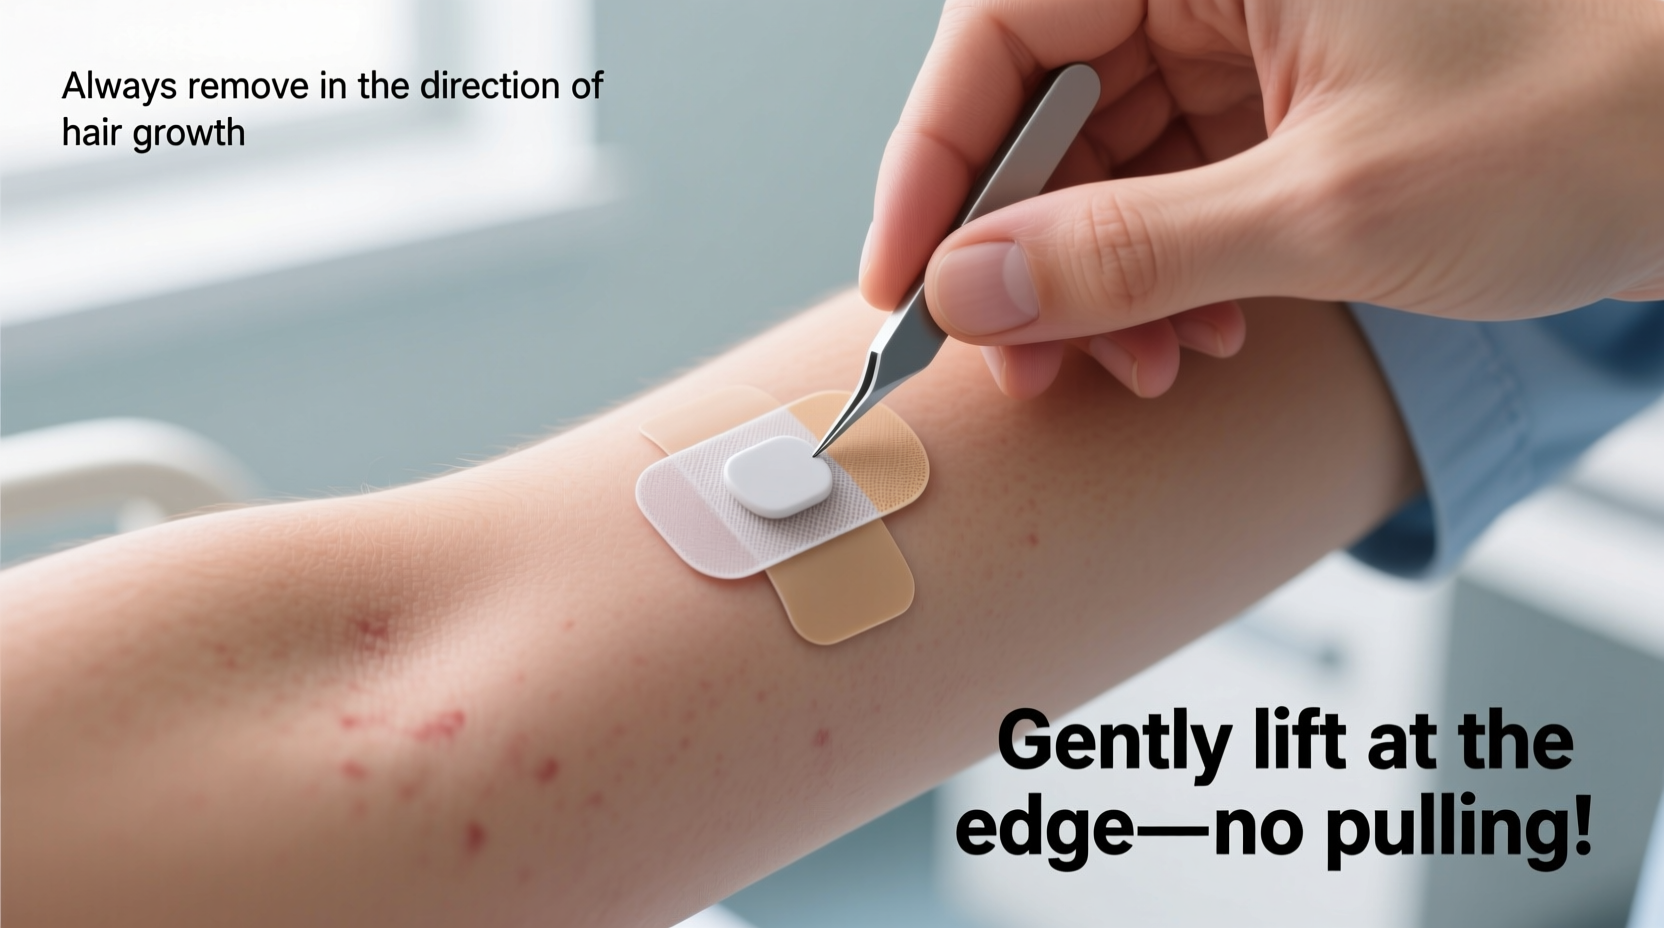
Removing your Freestyle Libre 3 doesn’t have to be stressful. Follow this detailed sequence to minimize discomfort and protect your skin.
- Wash your hands – Clean hands prevent introducing bacteria to the skin post-removal, especially if minor redness occurs.
- Gently clean around the sensor – Use a soft cloth dampened with lukewarm water to wipe the area. Avoid scrubbing. This removes surface oils and debris that can increase grip.
- Apply an oil-based product – Use a small amount of baby oil, olive oil, or specialized adhesive remover on and around the edges of the sensor. Let it sit for 30–60 seconds to penetrate the adhesive.
- Peel slowly at a low angle – Using your fingernail or a corner of a soft card, lift one edge of the sensor. Gently pull it back across the skin (like peeling tape), keeping the angle as flat as possible.
- Remove residue – After removal, apply more oil or use an alcohol wipe to clean off any leftover adhesive.
- Clean and moisturize the area – Wash with mild soap and water, then apply fragrance-free moisturizer to soothe the skin.
This method reduces shear stress on the epidermis, lowering the chance of micro-tears or peeling skin—a common issue when sensors are removed too quickly or at the wrong angle.
Do’s and Don’ts of Sensor Removal
| Do’s | Don’ts |
|---|---|
| Use oil or adhesive remover before peeling | Pull the sensor straight up from the skin |
| Peel slowly and parallel to the skin | Rush the removal process |
| Clean the site afterward with mild soap | Use harsh solvents like acetone or nail polish remover |
| Let the skin breathe for several hours before reapplying | Apply a new sensor immediately on irritated skin |
| Rotate application sites to prevent irritation | Always place the sensor in the exact same spot |
Expert Insight: What Healthcare Providers Recommend
Dermatological integrity is a priority when managing long-term wearable devices. Medical professionals emphasize gentle handling to avoid compromising skin health—especially for individuals with diabetes who rely on consistent sensor use.
“Patients using CGMs regularly should treat their skin like a long-term investment. Aggressive removal leads to inflammation, delayed healing, and reduced adhesion for future sensors. A slow, lubricated peel is always safer than a quick tug.” — Dr. Lena Patel, Endocrinology Nurse Practitioner, Diabetes Care Center of Boston
This advice underscores the importance of patience. Rushing may seem efficient, but it risks skin damage that could disrupt your monitoring routine. Taking an extra minute to prepare and remove properly supports both comfort and continuity of care.
Real-World Example: Sarah’s Smooth Transition
Sarah, a 42-year-old teacher with Type 1 diabetes, initially dreaded her biweekly sensor changes. “The first few times, I’d yank it off fast, thinking it would hurt less,” she recalls. “But I often ended up with red patches or even tiny scabs.” After a nurse suggested using baby oil and peeling slowly during a clinic visit, Sarah changed her approach. She now applies a drop of oil, waits a minute, and peels the sensor like a sticker—low and slow. “It’s night and day,” she says. “No more redness, no stinging. I barely feel it anymore.” Her experience reflects what many users discover: technique matters far more than speed.
Alternative Removal Methods That Work
While oil is the most widely recommended aid, some users find success with other safe alternatives:
- Warm compress – Applying a warm, damp cloth for 1–2 minutes softens the adhesive and relaxes the skin, making removal gentler.
- Hairdryer on low heat – Holding a hairdryer at a safe distance (12+ inches) for 20–30 seconds warms the adhesive, reducing its grip. Do not overheat the skin.
- Commercial adhesive removers – Products like Smith & Nephew Adaptic or 3M Cavilon No Sting Barrier Film are designed for medical adhesives and are safe for sensitive skin.
Avoid petroleum jelly (Vaseline) directly under the sensor during wear, as it can interfere with adhesion. However, it's excellent for post-removal soothing.
Frequently Asked Questions
Can I shower before removing my Freestyle Libre 3?
Yes—and it’s actually beneficial. Warm water and steam help loosen the adhesive naturally. Remove the sensor shortly after showering while the skin is still warm and hydrated for an easier peel.
What if the adhesive leaves residue on my skin?
Residue is common but harmless. Dab a small amount of oil, lotion, or rubbing alcohol on a cotton pad and gently wipe the area. Avoid scratching or picking at the leftover glue.
Is it normal for the site to be red after removal?
Mild redness or slight pinkness is normal and should fade within a few hours. If redness persists beyond 24 hours, becomes painful, or shows signs of infection (swelling, pus), consult a healthcare provider.
Final Checklist for Painless Removal
- Wash hands thoroughly
- Apply baby oil, olive oil, or adhesive remover around sensor edges
- Wait 30–60 seconds for penetration
- Peel slowly at a low angle (parallel to skin)
- Clean the area with mild soap and water
- Moisturize with fragrance-free cream
- Allow skin to rest before applying a new sensor
- Rotate placement sites (e.g., alternate arms or upper body locations)
Conclusion
Removing your Freestyle Libre 3 doesn’t have to be an uncomfortable or anxiety-inducing task. With the right tools and technique—oil, patience, and a low-angle peel—you can take it off safely and almost painlessly. Protecting your skin ensures better adhesion for future sensors and supports long-term comfort in your glucose monitoring routine. Small habits make a big difference. Try these methods at your next sensor change and experience the relief of a smooth, irritation-free removal.


 浙公网安备
33010002000092号
浙公网安备
33010002000092号 浙B2-20120091-4
Comments
No comments yet. Why don't you start the discussion?