
Ticks are more than just a nuisance—they’re vectors for serious diseases like Lyme disease, Rocky Mountain spotted fever, and anaplasmosis. Whether you're hiking in the woods, walking your dog through tall grass, or gardening in your backyard, exposure to ticks is a real risk. The key to minimizing health threats lies not in avoiding outdoor activities, but in knowing how to respond quickly and correctly when a tick latches on. Removing a tick improperly can increase the risk of infection or leave behind mouthparts that lead to inflammation. This guide provides clear, science-backed methods for safely removing ticks from both humans and pets, backed by expert recommendations and practical tips.
Why Proper Tick Removal Matters
Improper removal—such as twisting, crushing, or using home remedies like petroleum jelly or heat—can cause the tick to regurgitate its stomach contents into the host. This increases the chance of transmitting pathogens. Ticks feed by embedding their barbed mouthparts deep into the skin, anchoring themselves securely. Yanking them out with fingers or tweezers haphazardly can break off the head, leaving it embedded and potentially leading to localized infection or prolonged irritation.
The goal is clean, complete removal with minimal tissue disruption. When done correctly, the risk of disease transmission drops significantly—especially if the tick has been attached for less than 24–36 hours.
“Prompt and proper tick removal is one of the most effective ways to prevent tick-borne illness.” — Dr. Sarah Thompson, Medical Entomologist, CDC Vector-Borne Diseases Division
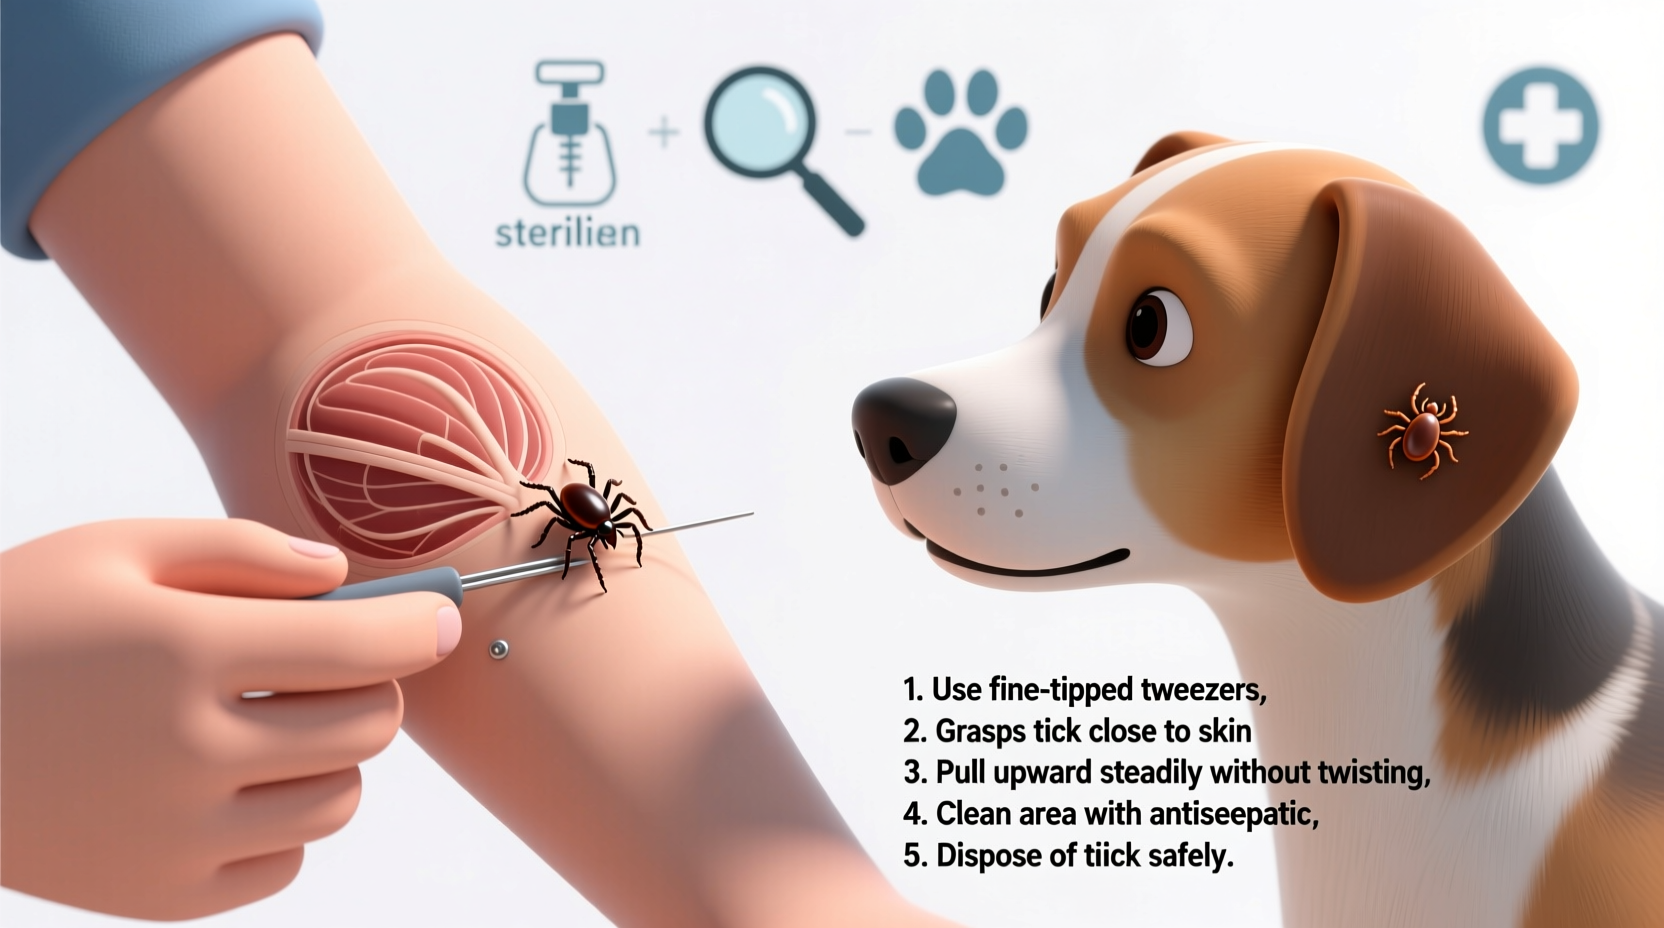
Step-by-Step: Safe Tick Removal for Humans
Follow this evidence-based procedure to remove a tick from human skin:
- Prepare your tools: Use fine-tipped tweezers. Avoid blunt or wide ones, which may squeeze the tick’s body.
- Grasp close to the skin: Position the tweezers as close to the skin's surface as possible, targeting the point where the tick’s head meets your skin.
- Pull upward steadily: Apply even, consistent pressure straight up. Do not twist or jerk, as this may cause the mouthparts to break off.
- Remove completely: Once free, place the tick in a sealed container or ziplock bag for potential identification later.
- Clean the bite area: Wash with soap and water, then apply antiseptic (e.g., rubbing alcohol or iodine).
- Monitor for symptoms: Watch for rash, fever, fatigue, or joint pain over the next 30 days. Note the date and location of the bite.
Safe Tick Removal for Pets
Dogs and cats are frequent targets of ticks due to their outdoor activity. While the basic principles are similar to human removal, pet owners must consider animal behavior, fur density, and post-removal care.
Use the same fine-tipped tweezers or a specialized tick remover tool designed for pets. Restrain your pet gently but firmly—have someone assist if needed. Follow the same vertical pull technique. If the tick is deeply embedded, do not force it. Seek veterinary help rather than risk injury.
After removal, monitor the site for redness, swelling, or discharge. Many veterinarians recommend saving the tick in a labeled container with the date and location of attachment, in case testing becomes necessary later.
Pet-Specific Considerations
- Check ears, between toes, under collars, and around the tail base—common tick hotspots.
- Avoid using human repellents or essential oils on pets; some are toxic to dogs and cats.
- Consider veterinarian-approved preventive treatments such as topical spot-ons, oral medications, or tick collars.
“We see far fewer cases of Lyme and ehrlichiosis in dogs that are on consistent tick prevention. But when ticks do get through, prompt removal remains critical.” — Dr. Linda Ruiz, DVM, Small Animal Practitioner
Do’s and Don’ts of Tick Removal
| Do’s | Don’ts |
|---|---|
| Use fine-tipped tweezers or a tick hook | Use fingers to pinch or crush the tick |
| Pull straight upward with steady pressure | Twist, jerk, or rock the tick back and forth |
| Clean the area before and after removal | Apply heat, alcohol, or petroleum jelly while the tick is attached |
| Save the tick in a sealed container | Flush it down the toilet without identification |
| Monitor for symptoms over the next month | Ignore a lingering rash or flu-like symptoms |
Tools and Alternatives: What Works Best?
Beyond standard tweezers, several tick removal tools are marketed for both humans and pets. Here’s a breakdown:
- Fine-tipped tweezers: Most accessible and recommended by the CDC. Effective when used correctly.
- Tick hooks (e.g., Ticked Off, Pro-Tick Remedy): Designed to slide under the tick and lift it straight out. Useful for pets with thick fur.
- Tick loops (lollipop-style removers): Work by creating a noose around the tick and pulling up. Minimize contact with bodily fluids.
No tool is foolproof—technique matters more than equipment. Regardless of what you use, the principle remains: lift vertically, avoid squeezing the body, and ensure full removal.
Real-World Example: A Hiker’s Close Call
Mark, an experienced hiker in New England, noticed a small bump behind his ear after a weekend trail run. Upon closer inspection, it was a deer tick—engorged and attached for at least two days. Using fine-tipped tweezers from his backpack first-aid kit, he carefully removed it following CDC guidelines. He saved the tick in a labeled bag and monitored himself closely. Ten days later, he developed a bullseye rash and mild fever. He visited his doctor, showed the tick, and received a diagnosis of early-stage Lyme disease. Thanks to prompt treatment with antibiotics, he recovered fully within weeks. His foresight in saving the tick helped confirm the diagnosis quickly.
This case underscores the importance of both proper removal and post-exposure vigilance.
Prevention Checklist
While removal is crucial, preventing tick bites in the first place is the best defense. Use this checklist to reduce risk:
- Wear long sleeves and pants when in wooded or grassy areas
- Tuck pant legs into socks to block access
- Use EPA-approved repellents containing DEET, picaridin, or permethrin (on clothing only)
- Treat pets monthly with vet-recommended tick preventives
- Perform thorough tick checks after outdoor activities
- Shower within two hours of coming indoors to wash off unattached ticks
- Keep lawns mowed and leaf litter cleared to reduce tick habitats
Frequently Asked Questions
What should I do if the tick’s head remains in the skin?
If part of the tick stays embedded, clean the area and let the body expel it naturally like a splinter. Do not dig into the skin with needles or pins—this increases infection risk. Monitor for signs of redness, pus, or worsening pain, and consult a healthcare provider if symptoms develop.
Can I test the tick for diseases?
Yes, some labs offer tick testing services. While a positive result doesn’t mean you’ve been infected, it can inform your doctor’s assessment. Negative results don’t rule out exposure, so symptom monitoring remains essential.
How soon after a tick bite should I seek medical help?
Seek medical advice if you develop a rash (especially a expanding “bullseye” rash), fever, chills, headache, or muscle aches within 30 days of a tick bite. Early treatment is highly effective for most tick-borne illnesses.
Conclusion: Stay Informed, Stay Protected
Knowing the effective and safe best tick removal method for you and your pets isn’t just a seasonal concern—it’s a year-round responsibility for anyone who spends time outdoors. With the right tools, knowledge, and habits, you can significantly reduce the risks associated with tick bites. Prevention starts with awareness, but preparedness ensures safety when encounters happen. Make tick checks part of your routine, keep a removal kit handy, and act swiftly and calmly when needed.


 浙公网安备
33010002000092号
浙公网安备
33010002000092号 浙B2-20120091-4
Comments
No comments yet. Why don't you start the discussion?