
Earwax is a natural substance produced by the body to protect the ear canal from dust, bacteria, and foreign particles. While it usually exits the ear on its own, excessive buildup can lead to discomfort, muffled hearing, or even infections. Many people turn to home remedies for relief, and one of the most commonly discussed solutions is using hydrogen peroxide. When used correctly, this method can help soften and remove stubborn earwax safely. However, improper use carries risks such as irritation, dizziness, or damage to sensitive ear tissues.
This guide outlines the science-backed, practical steps for using hydrogen peroxide to clean your ears at home. It includes preparation, application techniques, safety considerations, and real-world insights to ensure you achieve results without compromising ear health.
How Hydrogen Peroxide Works in Ear Cleaning
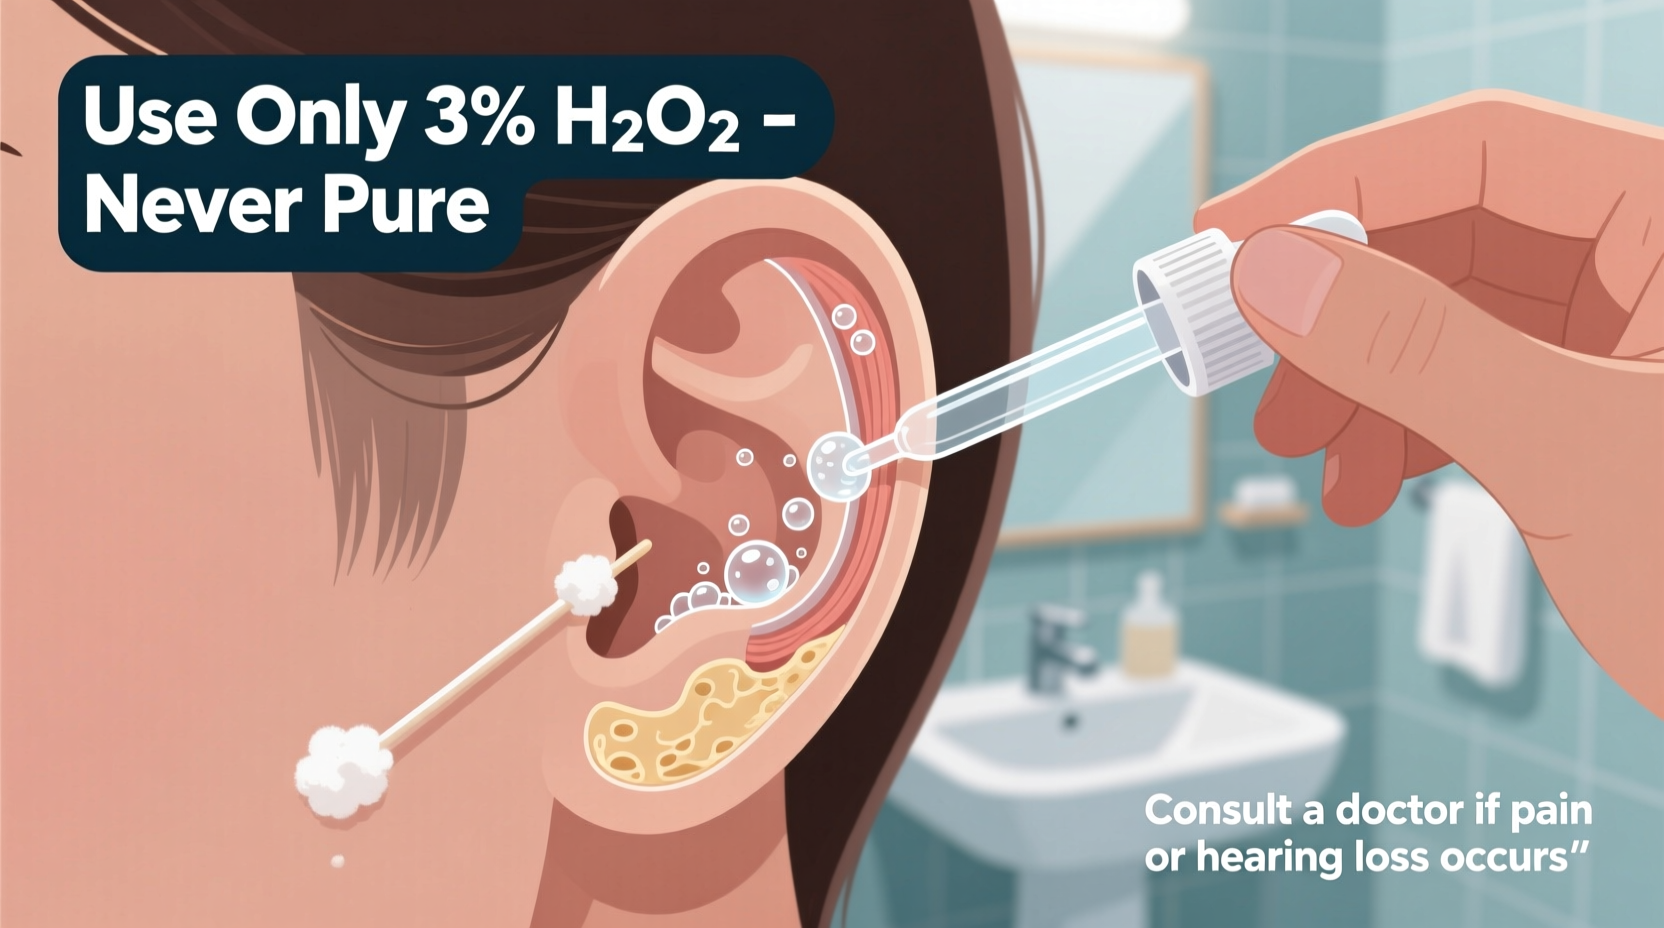
Hydrogen peroxide (typically in a 3% solution) acts as a cerumenolytic agent—meaning it breaks down earwax. Upon contact, it bubbles and foams due to the release of oxygen, which helps loosen compacted wax and debris inside the ear canal. This effervescence gently lifts wax away from the skin, making it easier to drain naturally or be flushed out.
The process is generally safe for occasional use, especially when dealing with mild to moderate wax buildup. However, it’s important to understand that not all ear issues are caused by wax. Pain, discharge, or sudden hearing loss may indicate infection or perforation, which require medical attention rather than home treatment.
“Hydrogen peroxide can be an effective tool for earwax management, but only when used appropriately. Overuse or incorrect concentration can disrupt the ear’s natural defenses.” — Dr. Lena Patel, Otolaryngologist
Step-by-Step Guide: Safe At-Home Application
Cleaning your ears with hydrogen peroxide requires careful attention to detail. Follow these steps to minimize risk and maximize effectiveness:
- Choose the right solution: Use pharmaceutical-grade 3% hydrogen peroxide. Avoid higher concentrations, which can irritate delicate skin.
- Warm the solution slightly: Cold liquid can cause dizziness. Place the bottle in a bowl of warm water for a few minutes—do not heat directly.
- Tilt your head sideways: Lie down or lean over a sink with the affected ear facing up.
- Apply 5–10 drops: Use a clean dropper to place the solution into the ear canal. Do not insert the dropper deeply.
- Wait 5–10 minutes: Keep your head still. You’ll feel bubbling—this is normal and indicates the peroxide is breaking down wax.
- Drain and rinse: Sit up and allow the fluid to drain into the sink. Flush the outer ear gently with warm water if needed.
- Dry thoroughly: Pat the outside of the ear with a soft towel. You may use a hairdryer on the lowest setting, held at least 30 cm away.
Do’s and Don’ts: Best Practices Table
| Do’s | Don’ts |
|---|---|
| Use 3% hydrogen peroxide from a sealed, unexpired bottle | Use undiluted or industrial-strength peroxide |
| Lie still during treatment to prevent dizziness | Insert cotton swabs, fingers, or tools after application |
| Repeat once daily for up to 4 days if wax persists | Use more than twice a week regularly |
| Follow up with warm water irrigation if needed | Use if you have a history of eardrum perforation |
| Stop immediately if pain, ringing, or dizziness occurs | Ignore signs of infection like pus or severe pain |
Real Example: Resolving Wax Buildup Without a Doctor Visit
Sarah, a 34-year-old teacher, noticed her right ear felt “plugged” after a week of wearing noise-canceling headphones. She had slight hearing muffling and a sensation of fullness but no pain or fever. Remembering a previous recommendation from her nurse practitioner, she decided to try hydrogen peroxide at home.
She applied five drops of 3% hydrogen peroxide each evening for three nights, lying on her side for ten minutes each time. By the third day, she noticed improved clarity in hearing. On the fourth morning, a small waxy clump drained out during her shower. No further treatment was needed, and symptoms resolved completely. Sarah emphasized patience and caution—she avoided inserting anything into her ear and stopped immediately when mild tingling occurred on the second night (which subsided quickly).
Her experience reflects how proper technique can yield safe, effective results—especially when symptoms are clearly linked to wax and not infection.
When to Avoid Hydrogen Peroxide: Contraindications
While helpful for many, hydrogen peroxide is not suitable for everyone. Avoid this method if you:
- Have a known or suspected perforated eardrum
- Are currently experiencing ear pain, discharge, or active infection
- Have ear tubes (tympanostomy tubes) implanted
- Experience frequent vertigo or balance issues
- Have sensitive skin conditions like eczema or psoriasis in the ear canal
In these cases, any liquid introduced into the ear could worsen the condition or lead to complications. Always consult a healthcare provider before attempting home treatments if you have underlying ear concerns.
Frequently Asked Questions
Can I mix hydrogen peroxide with other liquids like olive oil?
Yes, some people combine equal parts 3% hydrogen peroxide and olive or almond oil to enhance wax softening. The oil moisturizes while the peroxide breaks down the wax. However, do not use oil-based mixtures if you suspect an infection or have a perforated eardrum.
How often can I use hydrogen peroxide in my ears?
Limit use to once daily for no more than four consecutive days. Routine or long-term use can dry out the ear canal and disrupt its natural cleaning mechanism. For chronic wax issues, speak with a doctor about preventive strategies.
Is it normal to hear bubbling sounds?
Yes. The fizzing or bubbling sensation is a sign that the hydrogen peroxide is reacting with earwax and releasing oxygen. This is expected and harmless, though it may feel unusual at first.
Final Checklist Before You Begin
- Checklist:
- ☐ Confirm you’re using 3% hydrogen peroxide (not higher)
- ☐ Check expiration date on the bottle
- ☐ Warm the solution slightly before use
- ☐ Tilt head properly and remain still during treatment
- ☐ Have towels or tissues ready for drainage
- ☐ Avoid inserting objects into the ear afterward
- ☐ Monitor for adverse reactions and discontinue if pain occurs
Conclusion: Prioritize Safety and Moderation
Cleaning your ears with hydrogen peroxide can be a practical, low-cost solution for managing earwax buildup—when done correctly. Understanding the proper technique, recognizing warning signs, and knowing when to seek professional help are essential components of safe self-care. This method should never replace clinical evaluation when symptoms persist or worsen.
By following evidence-based steps and respecting your body’s limits, you can maintain ear comfort and clarity without unnecessary risk. If you’ve found success with this method—or learned from missteps—we invite you to share your experience below. Your story could help others make informed, confident decisions about their ear health.


 浙公网安备
33010002000092号
浙公网安备
33010002000092号 浙B2-20120091-4
Comments
No comments yet. Why don't you start the discussion?