
Safety buttons—those small, often plastic fasteners found on baby clothes, sleepers, and some medical garments—are designed to prevent accidental opening while minimizing choking hazards. While essential during early infancy, they eventually become unnecessary as children grow. Removing them safely is crucial to avoid damaging delicate fabrics or injuring yourself in the process. Many caregivers hesitate, fearing they’ll ruin a favorite onesie or create sharp edges. This guide provides practical, tested methods to remove safety buttons efficiently and safely, preserving both garment integrity and user confidence.
Understanding Safety Buttons and Why They’re Used
Safety buttons differ from standard snap buttons in design and function. Typically made of soft plastic or coated metal, they are engineered to stay securely closed under tension but release under strong, direct pressure—ideal for preventing infants from opening their clothing independently. These buttons are common in newborn layette sets, hospital gowns, and adaptive clothing for individuals with limited mobility.
Their structure usually consists of two interlocking parts: a male stud and a female receptacle, connected by a flexible bridge that allows controlled separation. Unlike traditional snaps, which require prying or twisting, safety buttons are meant to be pressed straight down to disengage. This unique mechanism demands a different removal approach—one that avoids excessive force or sharp tools that could tear fabric or cause injury.
“Many parents don’t realize that removing safety buttons improperly can compromise the structural integrity of a garment, especially knits and ribbed cottons commonly used in infant wear.” — Dr. Lena Patel, Pediatric Textile Safety Consultant
Step-by-Step Guide to Safely Remove Safety Buttons
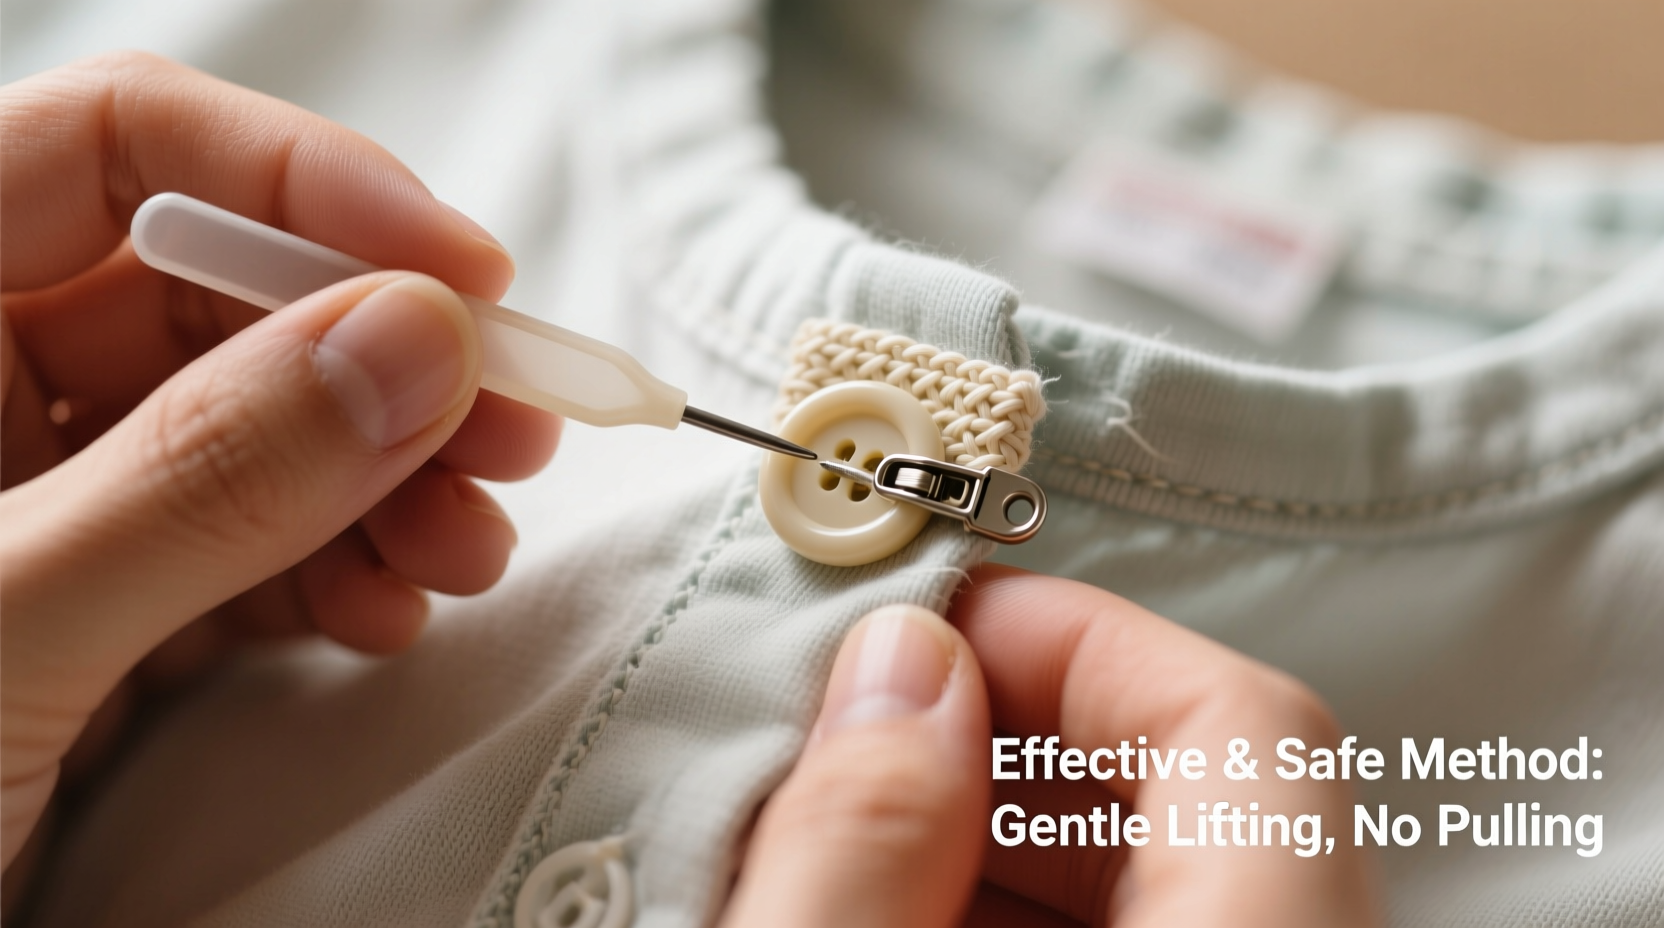
Removing safety buttons doesn’t require specialized tools or expertise, but it does require patience and precision. Follow this detailed sequence to ensure clean, damage-free removal.
- Assess the Button Type: Examine the button closely. Most safety buttons have a visible seam where the male and female components meet. Confirm it’s not sewn through multiple fabric layers.
- Gather Tools: Use a flat-head screwdriver (small), needle-nose pliers, tweezers, and a cutting mat or soft surface to protect the fabric.
- Disengage the Mechanism: Press down firmly on the center of the button using your thumb or a blunt tool. You should feel it click apart. If it doesn’t separate easily, do not force it.
- Expose the Shank: Once separated, inspect the backside. The shank—the stem connecting the button to the fabric—is typically riveted or stitched.
- Cut Stitching (if applicable): If the button is sewn on, use fine scissors or a seam ripper to carefully cut threads around the shank. Avoid slicing the fabric.
- Remove the Shank: Grip the shank with pliers and gently wiggle it side to side to loosen it from the fabric. Pull straight out once loose.
- Inspect and Smooth: Check the hole left behind. If any sharp plastic remains, trim carefully with nail clippers or file with an emery board.
Alternative Methods for Different Fabric Types
Not all garments respond the same way to button removal. Delicate knits, stretchy spandex blends, and tightly woven cottons each require slight modifications in technique.
| Fabric Type | Recommended Method | Avoid |
|---|---|---|
| Jersey Knit | Use tweezers to lift shank after cutting threads; minimal pressure | Pulling aggressively—can distort fabric |
| Fleece | Press button apart, then snip stitching with micro-scissors | Using pliers directly on fabric |
| Ribbed Cotton | Separate button, then gently rock shank out with flat tool | Twisting motion—can break fibers |
| Adaptive Wear (Heavy-Duty) | Use needle-nose pliers with rubber grip pads | Bare metal contact with fabric |
For ultra-thin or heirloom-quality fabrics, consider leaving the button base intact and covering it with a patch or decorative stitch if reusability is desired.
Common Mistakes and How to Avoid Them
Even well-intentioned attempts can go wrong. Here are frequent errors and how to prevent them:
- Using excessive force: Can stretch or tear fabric, especially in elastic materials.
- Skipping disengagement: Attempting to remove the button without pressing it apart first increases resistance and risk.
- Improper tool selection: Scissors meant for paper or kitchen use lack precision and may slip.
- Ignoring the backside: Not checking for double-layer stitching can lead to incomplete removal.
- Leaving sharp edges: Unfiled plastic remnants can scratch skin or snag other clothing.
Mini Case Study: Removing Buttons from a Hand-Me-Down Sleepsuit
Sarah, a new mother of twins, received a set of organic cotton sleepers from her sister. While in excellent condition, the safety buttons were stiff and difficult for her to open during nighttime changes. She wanted to replace them with regular snaps for easier access. Using a small flat-head screwdriver, she gently pressed the center of each button until it released. After confirming the shanks were only single-stitched, she used a seam ripper to cut the threads and removed the shanks with tweezers. By placing a folded cloth inside each sleeper, she avoided puncturing the lining. The entire process took under ten minutes per garment, and all sleepers remained fully usable—now even more functional.
Essential Checklist for Safe Button Removal
Before starting, ensure you have everything you need. Follow this checklist to minimize risks and maximize success:
- Identify the type of safety button and its attachment method
- Prepare a clean, well-lit workspace
- Gather tools: seam ripper, tweezers, small pliers, scissors, cutting mat
- Insert a protective barrier (cardboard or thick paper) inside the garment
- Disengage the button by pressing down on the center
- Cut any surrounding stitches carefully
- Remove the shank gently using pliers or tweezers
- Inspect the area for leftover fragments or rough edges
- Smooth any remaining plastic with a nail file
- Wash the garment before reuse to remove any debris
Frequently Asked Questions
Can I reuse the safety button after removal?
In most cases, no. The internal locking mechanism is often compromised during removal, making reattachment unreliable. It’s safer to discard and replace with new fasteners if needed.
Is it safe to wash clothing after removing the button?
Yes, but only after ensuring all remnants are removed and the fabric is intact. Washing helps eliminate any lint or tiny plastic particles left behind during removal.
Are there tools specifically designed for this task?
While no mass-market tool exists solely for safety button removal, jewelers’ screwdrivers, precision pliers, and seam rippers are ideal due to their fine control and compact size.
Final Thoughts and Actionable Next Steps
Removing safety buttons from clothing doesn’t have to be intimidating or destructive. With the right knowledge and tools, it becomes a simple maintenance task—similar to replacing a lost shirt button. Whether you're preparing hand-me-downs for a growing toddler, modifying adaptive clothing, or simply improving ease of use, these methods empower you to act confidently and safely.
Start small: choose one garment and practice the steps outlined here. Document your progress, note what works best for different fabrics, and refine your technique. Over time, you’ll develop a reliable system that preserves your clothing and saves money by extending garment life.


 浙公网安备
33010002000092号
浙公网安备
33010002000092号 浙B2-20120091-4
Comments
No comments yet. Why don't you start the discussion?