
A scratched smartphone screen is more than just an eyesore—it can affect visibility, reduce touch sensitivity, and diminish the overall value of your device. While professional repair services exist, not everyone wants to spend money or wait days for a fix. The good news is that many minor to moderate scratches can be addressed effectively at home using simple, accessible materials. With the right approach, you can restore clarity and smoothness to your screen without replacing it.
Understanding Screen Scratches: What You’re Dealing With
Before attempting any remedy, it’s important to understand the type of scratch you're working with. Scratches fall into three categories:
- Surface-level (micro-scratches): These are faint marks caused by dust, keys, or fabric. They don’t catch your fingernail and are often only visible under certain lighting.
- Moderate scratches: Slightly deeper, these may catch your nail and appear white or cloudy when light hits them.
- Deep gouges or cracks: These penetrate through protective layers and may compromise screen functionality. DIY fixes won't help here—professional replacement is necessary.
Determining the severity helps decide whether a DIY method will work. Most household remedies are best suited for surface and light-to-moderate scratches.
“While no DIY method can truly ‘heal’ glass like skin, polishing agents can fill micro-abrasions and diffuse reflected light, making scratches less noticeable.” — Dr. Alan Zhou, Materials Scientist specializing in consumer electronics
Step-by-Step Guide: Proven DIY Methods to Reduce Screen Scratches
The following methods use affordable, commonly available products. Always clean your screen thoroughly with a microfiber cloth before starting, and test each method on a small, inconspicuous area first.
1. Baking Soda Paste (Mild Abrasive Polishing)
Baking soda has fine granular texture that acts as a gentle abrasive, helping to buff out shallow scratches when mixed with water.
- Mix two parts baking soda with one part water to form a thick paste.
- Apply the paste to a soft, lint-free cloth (not directly on the screen).
- Gently rub the scratched area in small circular motions for 30–60 seconds.
- Wipe off residue with a clean, damp section of the cloth.
- Dry and inspect under bright light. Repeat once if needed.
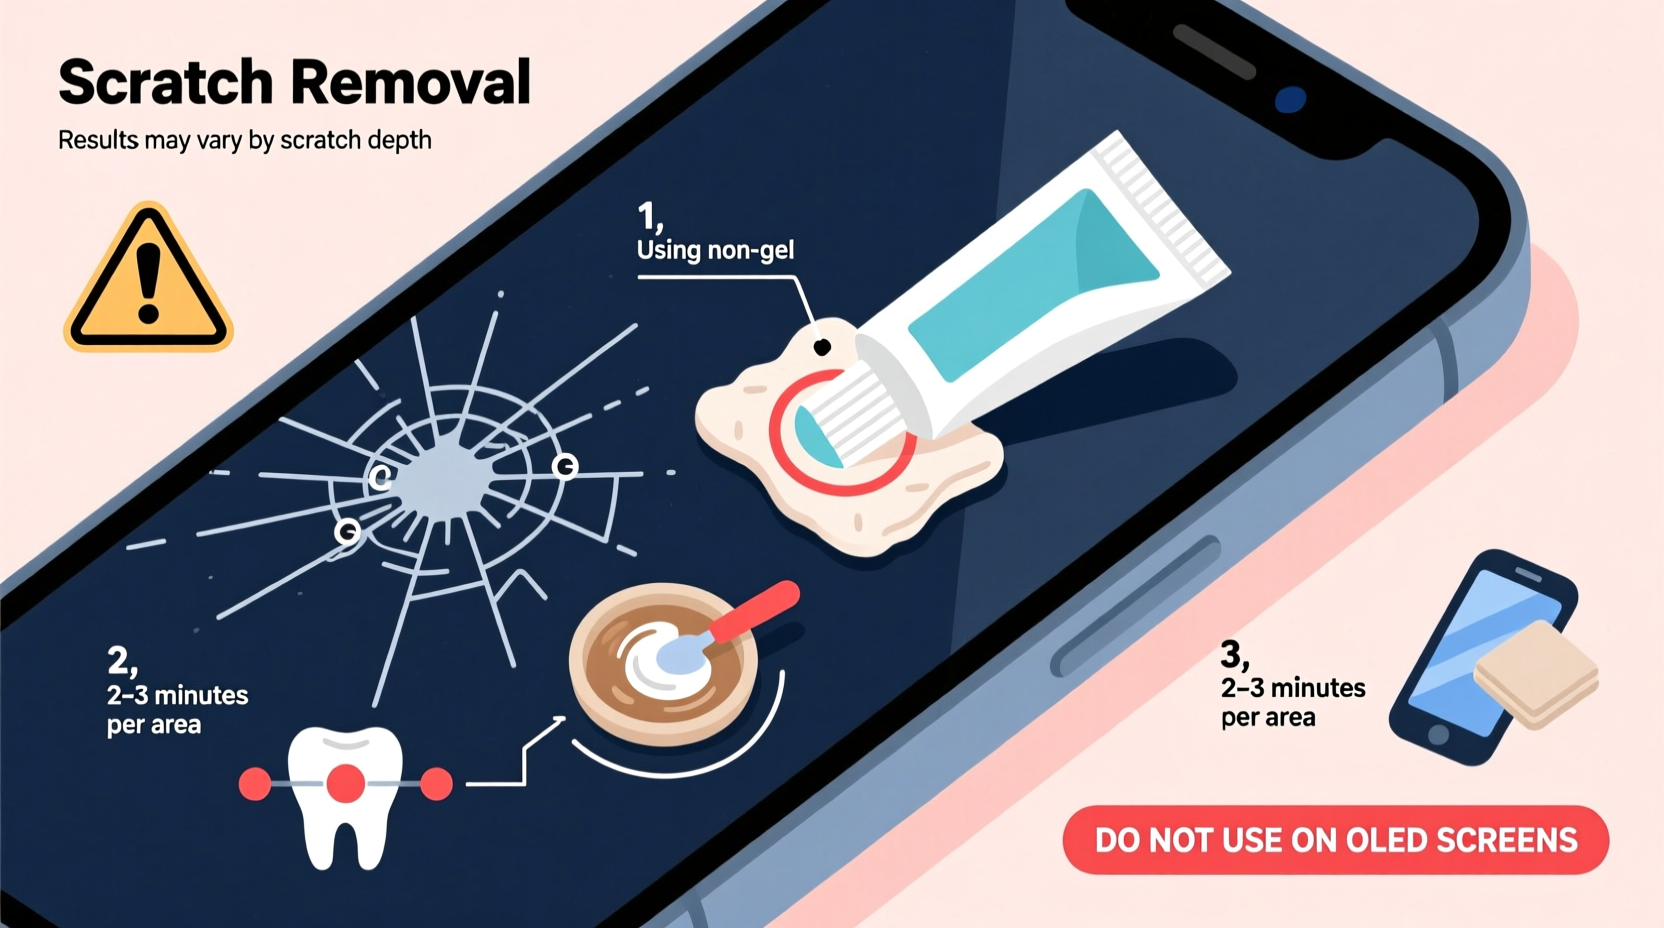
2. Toothpaste (Non-Gel, Whitening-Free)
Many people report success using regular white toothpaste, which contains mild silica abrasives that polish the surface.
- Choose a non-gel, non-whitening toothpaste (e.g., basic fluoride paste).
- Place a pea-sized amount on a microfiber cloth.
- Using gentle pressure, rub in circular motions over the scratch for 20–30 seconds.
- Wipe clean with a damp cloth, then dry thoroughly.
This method works best on plastic screens or tempered glass coatings but should be used cautiously on OLED displays.
3. Cerium Oxide Polish (Advanced Option)
Cerium oxide is a professional-grade glass polishing compound used in lens and screen restoration. Though not a kitchen staple, it's affordable and reusable.
- Apply a small drop of cerium oxide paste to a cotton pad or microfiber cloth.
- Buff the scratch using consistent circular motion for 1–2 minutes.
- Rinse the area carefully with distilled water or wipe with a slightly damp cloth.
- Dry completely and assess results.
This method offers the most dramatic improvement for moderate scratches but requires careful handling to avoid smearing.
Do’s and Don’ts: A Quick Reference Table
| Do’s | Don’ts |
|---|---|
| Use non-abrasive cloths like microfiber | Use paper towels or rough fabrics |
| Test methods on a small area first | Apply excessive pressure |
| Clean the screen before treatment | Use ammonia-based cleaners (like Windex) |
| Work in short intervals (20–60 sec) | Leave pastes on the screen for long periods |
| Repeat gently if needed | Use electric buffers or rotary tools |
Real Example: Reviving a Heavily Scratched Budget Phone
Samantha, a college student in Austin, dropped her phone daily into her backpack alongside keys and pens. Within six months, her screen was covered in fine web-like scratches. Fearing high repair costs, she tried the baking soda method after researching online. After two gentle applications spaced a day apart, about 70% of the visible haze disappeared. She followed up with a $10 screen protector to prevent recurrence. “It’s not perfect,” she said, “but now I can actually see my wallpaper again—and I saved $80 on a repair.”
This case illustrates that even heavily used devices can benefit from timely, thoughtful intervention—especially when prevention follows restoration.
Checklist: How to Safely Remove Scratches at Home
Follow this checklist to maximize effectiveness and minimize risk:
- ✅ Identify scratch depth (fingernail test)
- ✅ Power off the device
- ✅ Clean screen with microfiber cloth and isopropyl alcohol (optional)
- ✅ Select appropriate method based on material and scratch level
- ✅ Use minimal pressure and circular motions
- ✅ Wipe away all residue immediately
- ✅ Inspect results under natural and artificial light
- ✅ Apply a new screen protector afterward
Frequently Asked Questions
Can toothpaste really remove phone screen scratches?
Yes—but only for minor scratches on plastic or coated glass surfaces. The mild abrasives in traditional toothpaste can polish microscopic imperfections, reducing their visibility. However, gel or whitening toothpastes often contain harsh chemicals that may damage oleophobic coatings, so they should be avoided.
Will these methods work on Gorilla Glass or ceramic shields?
Limited success. Modern screens like Corning Gorilla Glass are highly durable but still susceptible to micro-scratches. DIY methods may slightly improve appearance but won’t repair deep structural flaws. Prevention via screen protectors remains the best strategy.
Is there a risk of damaging my phone further?
Potentially, yes. Using coarse materials, pressing too hard, or leaving pastes on too long can degrade anti-reflective or oil-repellent coatings. Always proceed cautiously and discontinue if you notice cloudiness, discoloration, or reduced touch sensitivity.
Conclusion: Restore, Protect, and Extend Your Phone’s Life
Removing scratches from your phone screen at home is entirely feasible for minor to moderate damage. Methods like baking soda paste, non-gel toothpaste, and cerium oxide offer practical, cost-effective solutions that preserve both function and aesthetics. Success depends not only on technique but also on understanding your screen’s limitations and acting early before scratches multiply.
Once restored, protect your investment: apply a quality screen protector, avoid storing your phone with sharp objects, and clean it regularly with safe materials. Small habits make a lasting difference. Don’t let a scratched screen dim your experience—take action today and give your device a renewed lease on life.


 浙公网安备
33010002000092号
浙公网安备
33010002000092号 浙B2-20120091-4
Comments
No comments yet. Why don't you start the discussion?