
When your iPhone stops working properly—whether the screen cracks, the battery drains too fast, or the device won’t turn on—it can feel like a crisis. But before you rush to an Apple Store or hand over hundreds for professional repair, consider this: many common iPhone issues can be resolved at home with the right tools, knowledge, and caution. With a bit of patience and precision, you can fix your iPhone yourself and restore its performance to near-new condition.
The key is knowing which problems are safe to tackle on your own and understanding the correct procedures to avoid further damage. This guide walks through proven DIY fixes that empower you to handle hardware glitches, software crashes, and performance slowdowns confidently—like a seasoned technician.
Assess the Damage Before You Begin
Not every iPhone issue requires disassembly. Start by identifying whether the problem is hardware-based (e.g., cracked screen, faulty charging port) or software-related (e.g., freezing, unresponsive apps). Misdiagnosing the root cause can lead to wasted effort or even irreversible damage.
For example, if your iPhone won’t power on, don’t assume the battery is dead. It could simply be stuck in recovery mode or suffering from corrupted firmware. Try a force restart first:
- iPhone 8 and later: Press and release Volume Up, then Volume Down, then hold the Side button until the Apple logo appears.
- iPhone 7/7 Plus: Hold Volume Down + Power buttons simultaneously for about 10 seconds.
- iPhone 6s and earlier: Hold Home + Power buttons until the screen flashes.
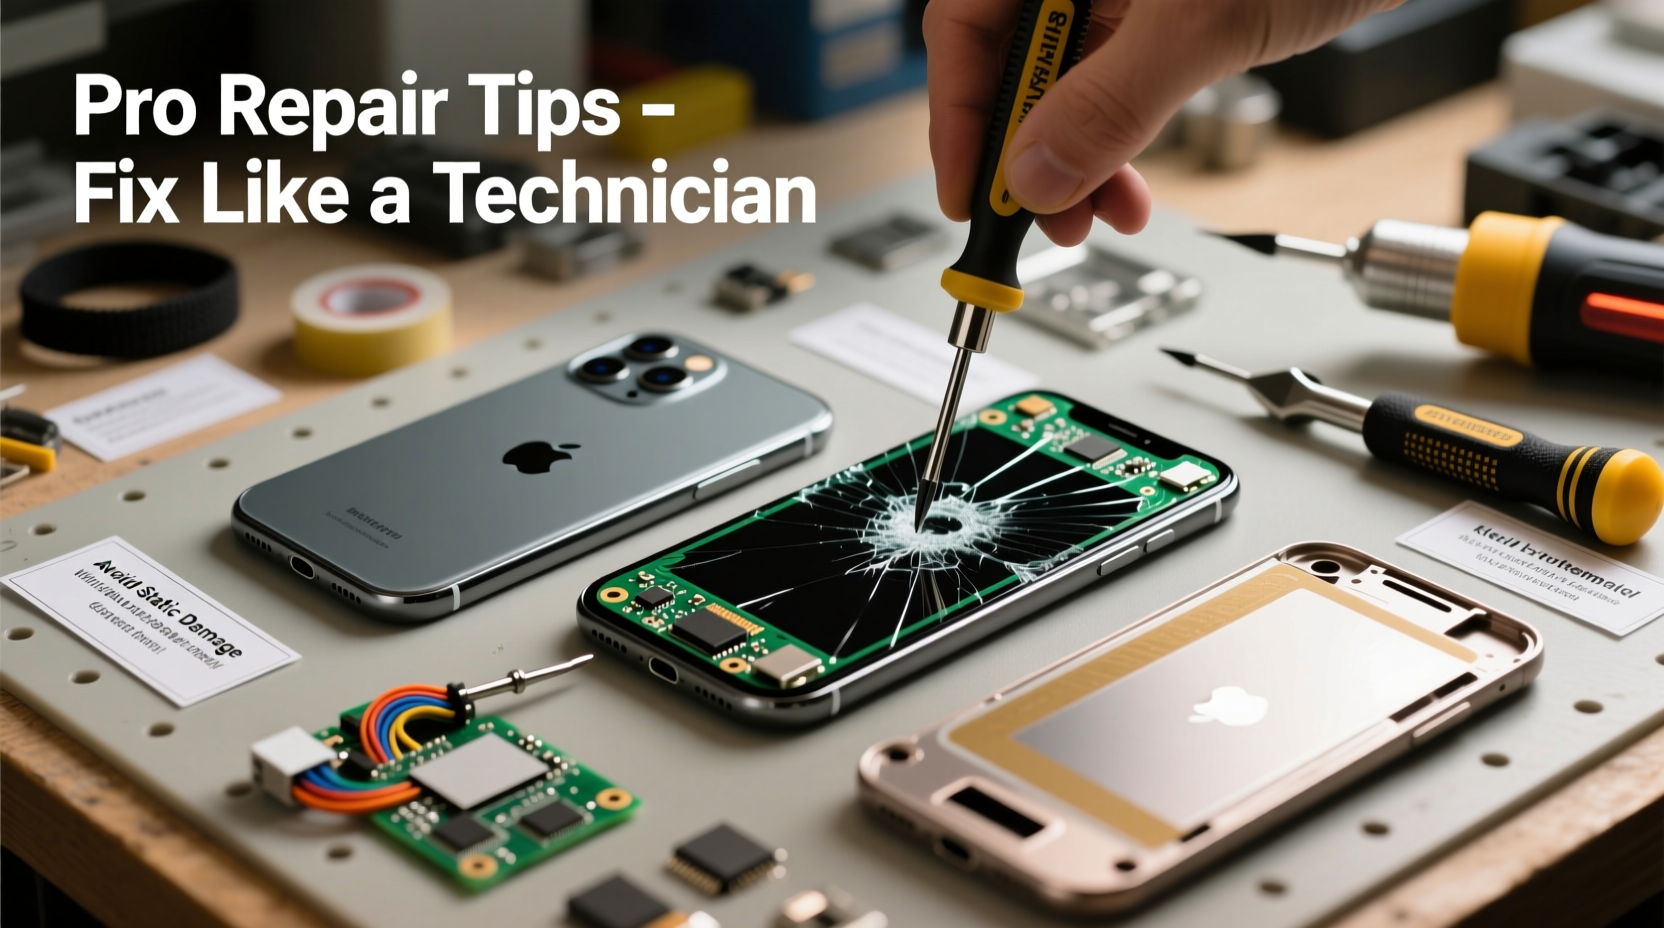
Fix Common Hardware Issues Safely
Some physical damages are more manageable than they seem. With proper tools—a pentalobe screwdriver, suction cup, spudger, and plastic opening tools—you can perform basic hardware repairs without voiding functionality entirely.
Replacing a Cracked Screen
A shattered display is one of the most frequent iPhone injuries. While newer models have fused displays making replacement trickier, kits are available online for models like iPhone 6 through iPhone 11. Follow these steps carefully:
- Power off the device completely.
- Remove the two pentalobe screws at the bottom near the charging port.
- Use a suction cup to gently lift the front panel, starting from the bottom edge.
- Insert a plastic tool to separate the adhesive along the edges.
- Disconnect the battery and display connectors using a spudger.
- Transfer components (earpiece, camera, sensors) to the new screen if needed.
- Reconnect everything, reassemble, and test before sealing.
Reviving a Failing Battery
If your iPhone dies quickly despite low usage, the battery may be degraded. Apple reports battery health under Settings > Battery > Battery Health. If maximum capacity is below 80%, replacement is recommended.
You can replace the battery yourself using a kit designed for your model. Key precautions:
- Always disconnect the battery before removing it.
- Use a heat gun or hairdryer to soften adhesive—don’t pry aggressively.
- Never puncture the battery; lithium-ion cells can ignite if damaged.
“DIY repairs save money, but require respect for electronics. One slip with metal tools can short-circuit the logic board.” — David Lin, Mobile Repair Technician with 12 years of experience
Software Restoration: When Your iPhone Freezes or Won’t Boot
Sometimes, the issue isn't physical. Corrupted updates, failed restores, or app conflicts can lock your device in a boot loop or recovery mode. Here’s how to regain control.
Enter Recovery Mode and Restore via iTunes/Finder
This method reinstalls iOS cleanly:
- Connect your iPhone to a computer with Finder (macOS Catalina+) or iTunes (older systems).
- Force restart as described earlier, but keep holding until you see the recovery mode screen (cable pointing to iTunes icon).
- Select “Restore” when prompted—not “Update,” which may preserve bugs.
- Wait while the software downloads and installs. Do not disconnect.
- Set up as new or restore from backup once complete.
Note: This erases all data unless restored from a prior backup.
Use Third-Party Tools for Targeted Fixes
If full restoration seems excessive, tools like iMazing, Tenorshare ReiBoot, or AnyFix offer targeted repair options. These can fix minor system errors without wiping your phone—ideal for resolving freezes, black screens, or update failures.
| Tool | Best For | Free Option? |
|---|---|---|
| Tenorshare ReiBoot | Exit recovery mode, fix boot loops | Yes (basic functions) |
| iMazing | Data extraction, selective restore | No (trial available) |
| AnyFix | Multisystem repair, DFU entry | Limited free scan |
Performance Boost: Make an Old iPhone Feel New Again
Even without visible damage, older iPhones slow down over time. Instead of upgrading, optimize what you have.
Clear Storage and Optimize Settings
- Delete unused apps and large media files.
- Turn off Background App Refresh for non-essential apps.
- Reduce Motion and Transparency effects under Accessibility settings.
- Reset All Settings (Settings > General > Transfer or Reset iPhone) to clear configuration clutter.
Update Strategically
While staying current with iOS improves security, some updates burden older devices. For instance, iOS 16 runs poorly on iPhone 8 and earlier. Consider delaying major updates if performance drops after installation.
Mini Case Study: Reviving a Water-Damaged iPhone SE
Mark, a photographer, dropped his iPhone SE in a sink full of soapy water. He retrieved it within seconds but found it unresponsive. Instead of panicking, he followed protocol:
- Immediately powered it off (didn’t try turning it on).
- Dried the exterior with a microfiber cloth.
- Placed it in a sealed container with silica gel packets for 48 hours.
- After drying, charged it cautiously—no signs of life.
- Took it apart at home, cleaned corrosion around the charging port with isopropyl alcohol, and replaced the battery (which had swollen slightly).
- Device booted successfully and has worked normally for six months since.
Had Mark used rice (a common myth), moisture absorption would’ve been far less effective. Silica gel or professional-grade desiccants work better—and disassembly allowed inspection of internal damage.
Frequently Asked Questions
Can I fix my iPhone myself without voiding future service eligibility?
Apple doesn’t void warranty solely due to user disassembly, but if damage occurs during DIY attempts, that specific issue won’t be covered. Original parts remain eligible for service.
Is it safe to use third-party chargers or batteries?
Only use MFi-certified (Made for iPhone) accessories. Non-certified chargers can overload circuits, and cheap batteries pose fire risks. Stick to reputable brands like Anker, Belkin, or iFixit-sourced OEM-equivalent parts.
What should I do if my iPhone still won’t charge after cleaning the port?
Try a different cable and power source first. If still unresponsive, inspect the charging port for bent pins. Gently straighten them with a non-conductive tool. If no improvement, the logic board may need attention—best left to professionals.
Final Thoughts: Take Control of Your Device’s Lifespan
Your iPhone doesn’t need to end up in a drawer just because it’s broken or sluggish. Many issues that seem terminal are actually solvable with careful diagnosis and hands-on repair. From replacing worn components to resetting software glitches, DIY fixes give you greater autonomy and can extend your device’s usable life by years.
Approach each repair with preparation, patience, and respect for electronics. Use quality tools, follow reliable guides, and never rush the process. Every successful fix builds confidence and skill—turning you from a passive user into a capable tech steward.


 浙公网安备
33010002000092号
浙公网安备
33010002000092号 浙B2-20120091-4
Comments
No comments yet. Why don't you start the discussion?