
Popcorn ceilings, once a staple of mid-century home design, remain in millions of homes across North America. While they effectively conceal imperfections and reduce noise, their textured surface traps dust, cobwebs, and even kitchen grease over time. Cleaning them improperly can lead to crumbling, discoloration, or irreversible texture loss. The key is using gentle, targeted methods that preserve the ceiling’s integrity while restoring its appearance. This guide outlines proven techniques, tools, and precautions to clean popcorn ceilings safely—without causing damage.
Understanding Popcorn Ceiling Risks and Composition
Before any cleaning begins, it's essential to understand what you're working with. Popcorn ceilings, also known as acoustic or stipple ceilings, are made from a mixture of drywall compound and either polystyrene or vermiculite. In homes built before 1978, there's a significant chance these ceilings contain asbestos—a hazardous material when disturbed. Asbestos fibers become dangerous when airborne, so disturbing the texture through aggressive scrubbing or sanding can pose serious health risks.
The texture itself is fragile. Unlike smooth drywall, popcorn ceilings are porous and loosely adhered. Excess moisture or pressure can cause sections to soften, sag, or flake off entirely. Therefore, cleaning must be dry or minimally damp, always approached with caution.
“Never assume an older popcorn ceiling is safe to clean without testing for asbestos first. A small sample test can prevent major health risks.” — Dr. Linda Reeves, Indoor Air Quality Specialist
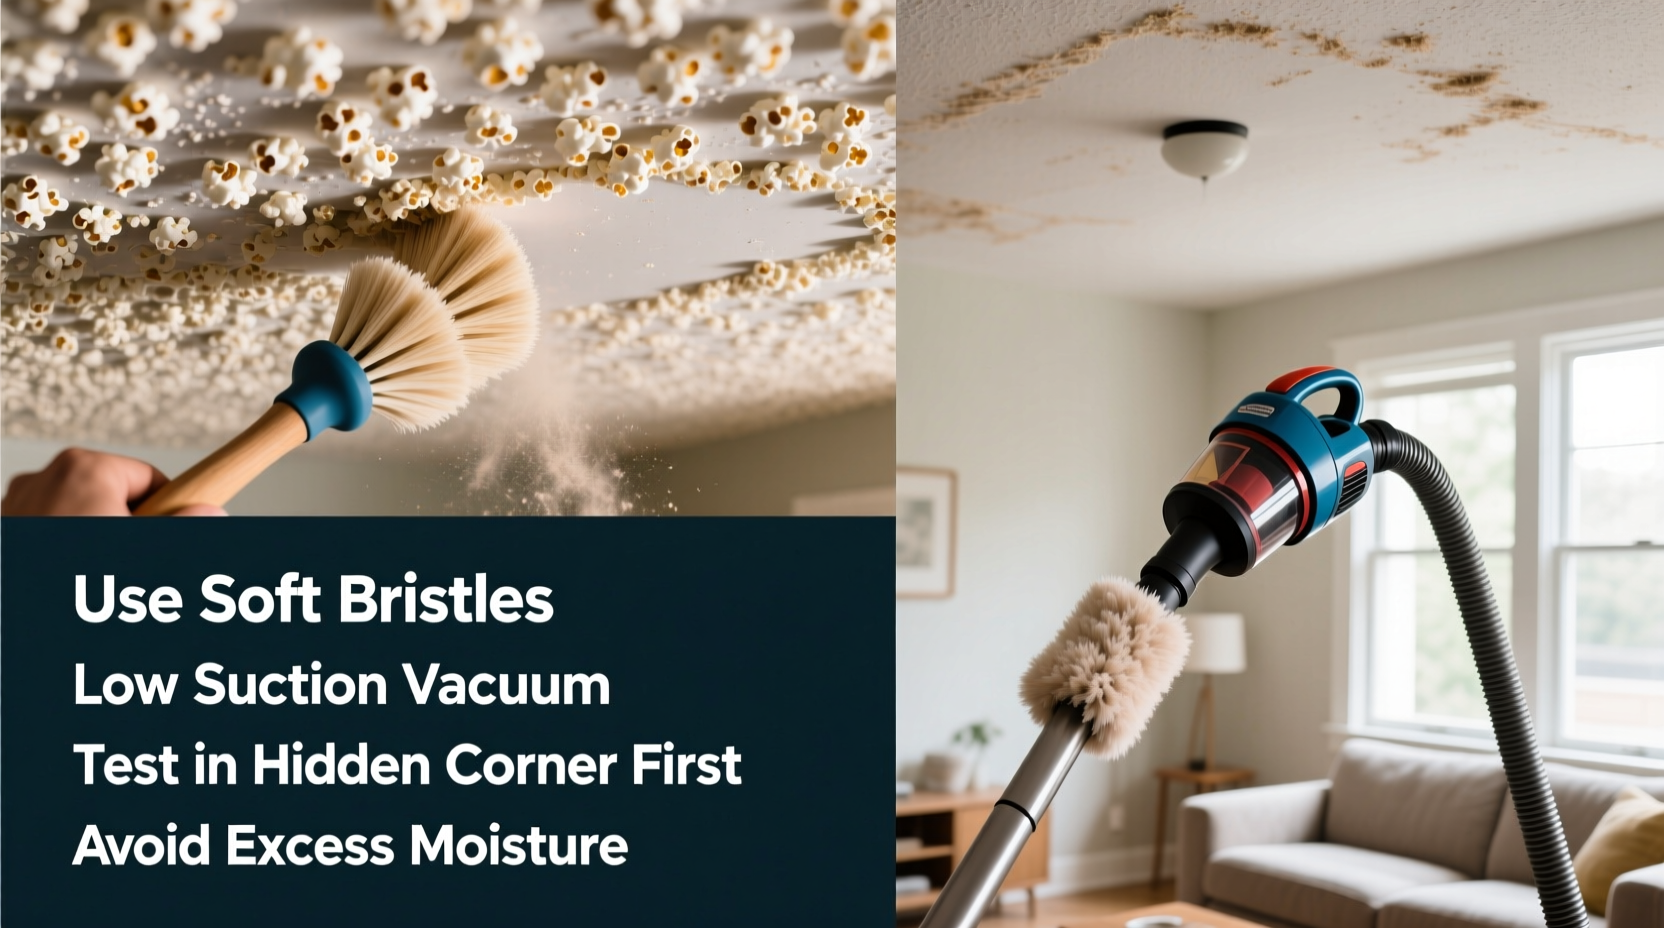
Step-by-Step Guide to Safe Popcorn Ceiling Cleaning
Cleaning a popcorn ceiling requires patience and precision. Follow this detailed process to achieve visible results without damaging the surface.
- Test for Asbestos (if pre-1980): Purchase an EPA-approved asbestos test kit or hire a certified inspector. Do not proceed with wet cleaning or scraping until results confirm safety.
- Clear the Room: Remove furniture or cover it completely with drop cloths. Seal vents and doorways to minimize dust spread.
- Vacuum with a Soft Brush Attachment: Use a vacuum cleaner equipped with a HEPA filter and a soft-bristle brush attachment. Gently glide the nozzle across the ceiling without pressing. This removes loose dust and cobwebs.
- Dry Sponge for Surface Grime: Use a chemical sponge (also called a dry sponge or magic sponge) designed for delicate surfaces. These sponges lift dirt without water. Lightly dab or roll the sponge over stained areas—never rub.
- Spot Clean Stains (If Safe): For localized stains like nicotine or water marks, lightly dampen a sponge with distilled water. Wring thoroughly so it’s barely moist. Dab gently and allow to air-dry completely within 30 minutes to avoid saturation.
- Use a Compressed Air Duster (Optional): For hard-to-reach corners, short bursts of compressed air can dislodge dust without contact.
- Inspect and Repeat if Needed: After 24 hours, assess results. Repeat only if necessary and always allow full drying between attempts.
Do’s and Don’ts: Best Practices Table
| Do | Don’t |
|---|---|
| Use a HEPA vacuum with a soft brush attachment | Use a feather duster or broom (spreads dust) |
| Test for asbestos in older homes | Scrub or apply excessive pressure |
| Dab stains with a slightly damp microfiber cloth | Soak the ceiling or use spray bottles |
| Work in small sections with proper lighting | Use household cleaners like bleach or ammonia |
| Allow 24–48 hours for complete drying | Paint over a dirty ceiling (traps grime) |
Real Example: Reviving a 1970s Kitchen Ceiling
Sarah, a homeowner in Cleveland, wanted to refresh her 1975 ranch-style kitchen without remodeling. The popcorn ceiling was yellowed from years of cooking fumes and dust buildup. She began by sending a small sample to an environmental lab—results showed no asbestos. With safety confirmed, she used a HEPA vacuum and dry sponge over two weekends. She worked section by section, starting near the doorway and moving backward to avoid touching cleaned areas. After vacuuming and dry-sponging, she noticed a dramatic improvement: the ceiling appeared nearly white again, and light reflected better. She avoided water entirely and reported zero texture loss. Her careful approach saved thousands compared to removal and re-texturing.
Alternative Methods and When to Avoid Them
While some online tutorials suggest steam cleaning or pressure washing popcorn ceilings, these methods are strongly discouraged. High moisture levels can weaken adhesive bonds, leading to drooping or collapse. Even \"low-moisture\" steam units risk condensation buildup in textured crevices.
Another common myth involves painting popcorn ceilings to “seal” them. While technically possible, painting adds weight and makes future repairs extremely difficult. Painted texture cannot be patched seamlessly, and if moisture ever penetrates, mold can grow unseen behind the coating.
If the ceiling is severely stained or damaged, consider consulting a professional drywall contractor. In some cases, encapsulation (applying a clear sealant) or partial re-texturing may be safer than deep cleaning.
Frequently Asked Questions
Can I use a Swiffer duster on a popcorn ceiling?
Yes, but only if it’s a dry, electrostatic model designed for delicate surfaces. Avoid models with liquid sprays. Glide gently without pressing into the texture to prevent breakage.
How often should I clean a popcorn ceiling?
Light dusting every 3–6 months is sufficient for most homes. Deep cleaning (dry sponging or vacuuming) should only be done every 3–5 years, or when visible soiling occurs.
What should I do if part of the ceiling breaks during cleaning?
Stop immediately. Small chips can be repaired using a canned popcorn texture spray available at hardware stores. Match the pattern by practicing on cardboard first. For larger damage, consult a professional to avoid uneven patches.
Essential Cleaning Checklist
- Confirm home construction date and test for asbestos if pre-1980
- Gather supplies: HEPA vacuum, soft brush attachment, dry sponges, microfiber cloths, ladder, goggles, mask
- Clear and cover room contents
- Vacuum ceiling gently in overlapping passes
- Dry-sponge stained or darkened areas with minimal pressure
- Spot-clean with barely damp cloth only if necessary
- Allow 24–48 hours for full drying before reassessment
- Dispose of used sponges and cloths properly (especially if asbestos is present)
Final Thoughts: Preserve, Don’t Overclean
The goal of cleaning a popcorn ceiling isn’t perfection—it’s preservation. These surfaces were never meant to be scrubbed like tile or walls. Over-cleaning causes more harm than good. By using low-moisture techniques, respecting material fragility, and prioritizing safety, you can extend the life of your ceiling and improve indoor air quality. Regular maintenance prevents the need for drastic measures later.


 浙公网安备
33010002000092号
浙公网安备
33010002000092号 浙B2-20120091-4
Comments
No comments yet. Why don't you start the discussion?