
Removing a decal from a car may seem straightforward, but doing it incorrectly can lead to scratches, paint lifting, or adhesive residue that dulls the surface. Whether you're removing an old bumper sticker, a racing logo, or a promotional vinyl wrap, preserving your car’s finish should be the top priority. The good news is that with the right tools, techniques, and patience, you can remove decals cleanly and safely—without harming the underlying paint.
The key lies in understanding the materials involved: modern automotive paints are durable but not impervious, and adhesives used in decals are designed to stick firmly. Rushing the process or using harsh chemicals can compromise both. This guide outlines tested, professional-grade methods to ensure a flawless removal every time.
Understanding Decal Adhesion and Paint Sensitivity
Decals adhere through pressure-sensitive adhesives that bond strongly to smooth surfaces like painted metal, glass, or plastic trim. Over time, exposure to sunlight and temperature fluctuations can cause the adhesive to harden or degrade unevenly, making removal more complex. Meanwhile, modern clear-coat paints—standard on most vehicles since the 1990s—are sensitive to solvents, abrasives, and heat if misapplied.
Attempting to peel a cold, sun-degraded decal in winter can result in jagged edges and paint pull-up. Conversely, applying excessive heat can soften the paint itself, especially on older or poorly maintained finishes. The goal is controlled softening of the adhesive while keeping the paint intact.
“Always assume the paint is more fragile than the decal. Work slowly, use heat wisely, and never force separation.” — Mark Reynolds, Auto Detailing Specialist with 18 years of experience
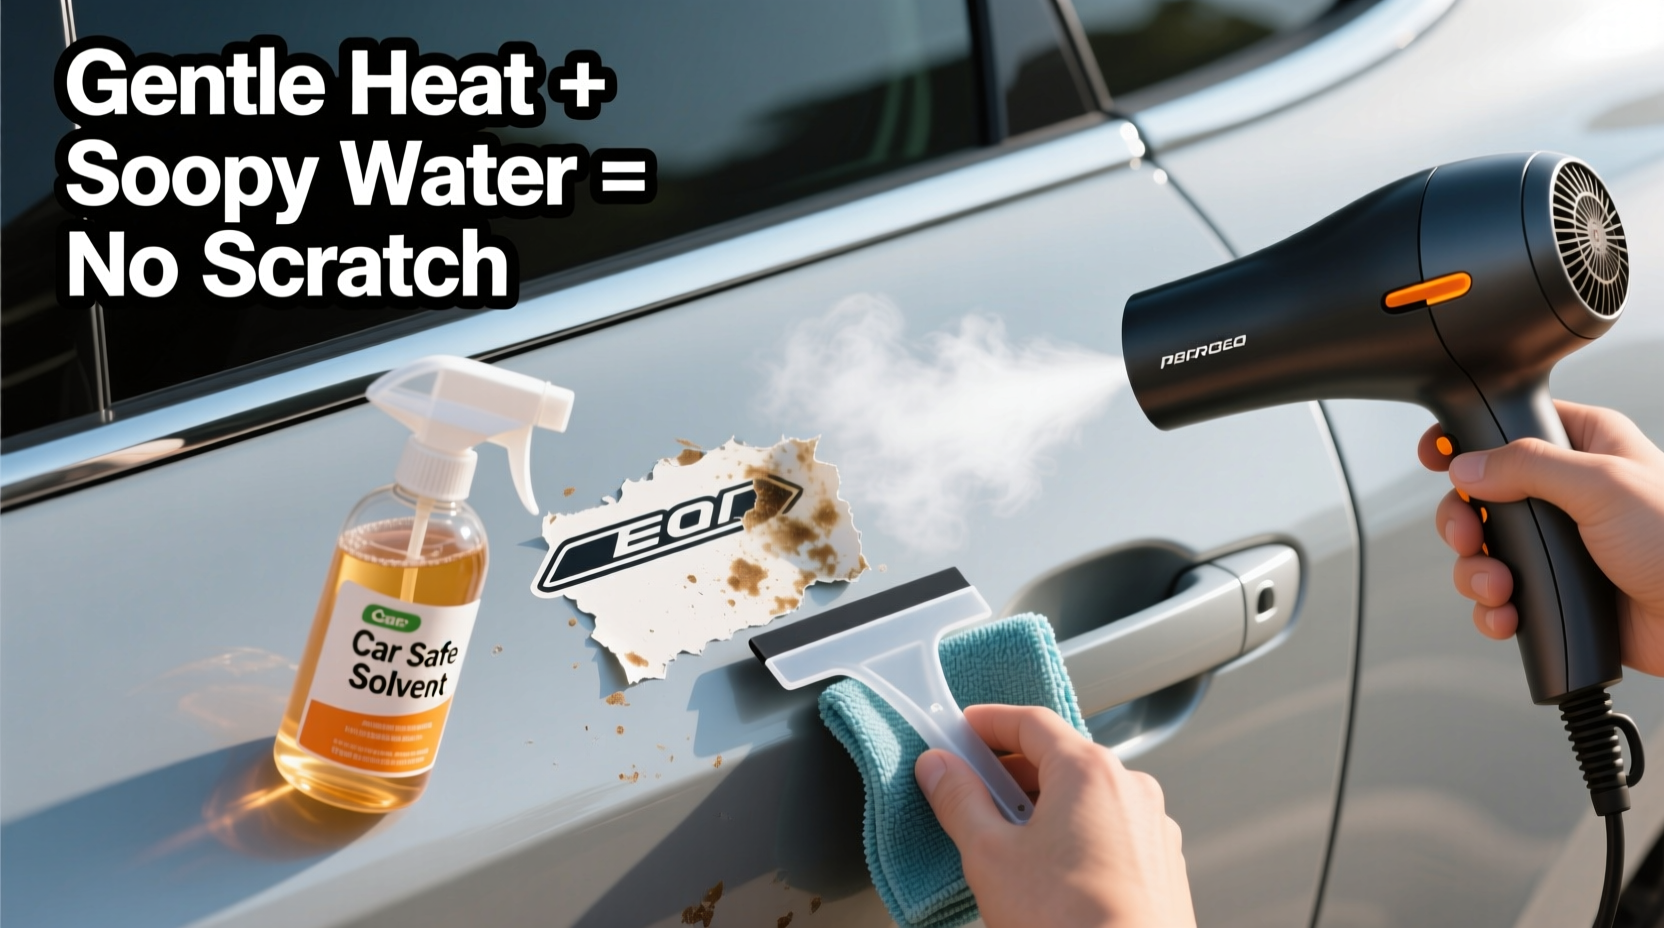
Step-by-Step Guide: Safe Decal Removal Process
Follow this systematic approach to minimize risk and maximize effectiveness:
- Wash the Area: Clean the surface around the decal with mild car shampoo and water. Dirt and grime can scratch the paint during removal.
- Apply Heat Gently: Use a household hairdryer or heat gun (on low setting) to warm the decal for 30–60 seconds. Hold it 4–6 inches away to avoid overheating.
- Lift an Edge Carefully: Use a plastic razor blade or credit card to gently lift one corner. Avoid metal scrapers unless absolutely necessary—and even then, use them at a shallow angle.
- Pull Slowly at a Low Angle: Once lifted, pull the decal back over itself at a 45-degree angle or less. This reduces stress on the paint.
- Remove Residue Immediately: As the decal lifts, wipe away any sticky residue with a cloth dampened with isopropyl alcohol or commercial adhesive remover.
- Final Clean and Polish: After removal, wash the area again and apply a light polish to restore shine if needed.
Best Tools and Products for Damage-Free Removal
Using the right tools makes all the difference. Here’s a comparison of common options:
| Tool/Product | Best For | Risks | Recommended? |
|---|---|---|---|
| Hairdryer | Gentle heating of small to medium decals | Slower than heat gun; limited reach | Yes – safest home option |
| Heat Gun (Low Setting) | Larger decals or stubborn adhesives | Can blister paint if too close or too hot | Yes – with caution |
| Plastic Razor Blade | Lifting edges and scraping residue | Minimal risk if used properly | Yes – preferred over metal |
| Isopropyl Alcohol (70%) | Dissolving adhesive residue | May dull unsealed surfaces if overused | Yes – diluted and wiped promptly |
| Citrus-Based Adhesive Remover | Tough residue on clear coats | Test first—some formulas affect wax layers | Yes – reputable brands only |
| Metal Scraper | Industrial applications | High risk of swirl marks and paint removal | No – avoid on painted surfaces |
Common Mistakes That Cause Damage
- Peeling in Cold Weather: Cold temperatures make adhesives brittle and more likely to leave fragments or pull paint.
- Using Solvents Without Testing: Acetone or brake cleaner can strip wax, damage clear coat, or discolor trim.
- Starting in the Middle: Always begin at an edge. Starting mid-decal risks tearing and trapping air bubbles under remaining sections.
- Leaving Residue Behind: Old adhesive attracts dirt and degrades over time, potentially staining the paint.
- Skipping Post-Removal Cleaning: Residual oils or chemicals can interfere with future detailing or repainting.
Real Example: Removing a 5-Year-Old Racing Decal
Tom, a car enthusiast in Arizona, wanted to remove a large racing decal from his sedan’s rear door. The decal had been exposed to intense sun for five years, making the edges nearly invisible. He began by washing the panel, then used a heat gun on low to warm a corner. With a plastic scraper, he lifted the edge and slowly peeled downward, reheating every few inches. Where residue remained, he applied a citrus-based remover with a microfiber cloth, wiping in circular motions. The entire process took 20 minutes. After a final wash and polish, the door looked factory-fresh—no scratches, no haze.
This case illustrates how environmental exposure increases difficulty, but proper technique compensates for age and UV degradation.
Checklist: How to Remove Car Decals Safely
Before starting, gather these items and follow this sequence:
- ✅ Car wash soap and sponge
- ✅ Hairdryer or heat gun (low setting)
- ✅ Plastic razor blade or credit card
- ✅ Microfiber cloths (2–3)
- ✅ Isopropyl alcohol or adhesive remover
- ✅ Rubber gloves (for chemical handling)
- ✅ Cool, shaded workspace (ideally 60–75°F)
- ✅ Time and patience
Frequently Asked Questions
Can I remove a decal in direct sunlight?
It’s not recommended. While sun-warmed surfaces may seem easier to work with, uncontrolled heat can cause adhesive to smear or paint to soften unpredictably. Work in shade or indoors for consistent results.
Will vinegar remove decal adhesive?
Vinegar has mild degreasing properties but is generally ineffective on strong pressure-sensitive adhesives. It may require prolonged soaking, which isn’t practical on vertical car panels. Stick to isopropyl alcohol or commercial removers instead.
What if paint comes off with the decal?
If paint lifts, stop immediately. This usually means the original paint was already compromised—either poorly bonded, oxidized, or previously damaged. Clean the area, mask it off, and consider touch-up paint or professional repair.
Conclusion: Preserve Your Car’s Finish with Smart Removal
Removing decals doesn’t have to be risky. By combining gentle heat, non-abrasive tools, and the right cleaning agents, you can eliminate unwanted graphics while protecting your car’s appearance. The process rewards patience and preparation—rushing leads to regrets. Whether you’re restoring a classic, updating a fleet vehicle, or simply refreshing your daily driver, these methods ensure a clean, damage-free result.


 浙公网安备
33010002000092号
浙公网安备
33010002000092号 浙B2-20120091-4
Comments
No comments yet. Why don't you start the discussion?