
Switch stickers—commonly used in mechanical keyboards, industrial controls, and electronic interfaces—are often exposed to moisture, spills, and environmental wear. While they serve aesthetic and functional labeling purposes, their vulnerability to water damage can compromise both appearance and performance. Without proper protection, moisture seepage leads to peeling, fading, or even electrical shorting beneath the surface. Fortunately, several proven techniques can significantly improve the waterproofing of switch stickers, extending their lifespan and reliability. This guide outlines practical, tested methods that balance durability, ease of application, and cost-effectiveness.
Understanding the Vulnerability of Switch Stickers
Most switch stickers are made from vinyl, polyester, or paper-based materials, each with inherent weaknesses when exposed to liquids. Even minor condensation or accidental spills can penetrate adhesive layers, causing delamination or corrosion on underlying circuits. The edges of stickers are particularly susceptible, acting as entry points for moisture. Additionally, frequent finger contact introduces oils and humidity, accelerating degradation.
In environments like kitchens, workshops, or outdoor control panels, these risks multiply. Standard off-the-shelf stickers rarely come with built-in waterproofing beyond basic lamination. To ensure long-term resilience, proactive sealing and material selection are essential.
Step-by-Step Guide to Enhancing Waterproofing
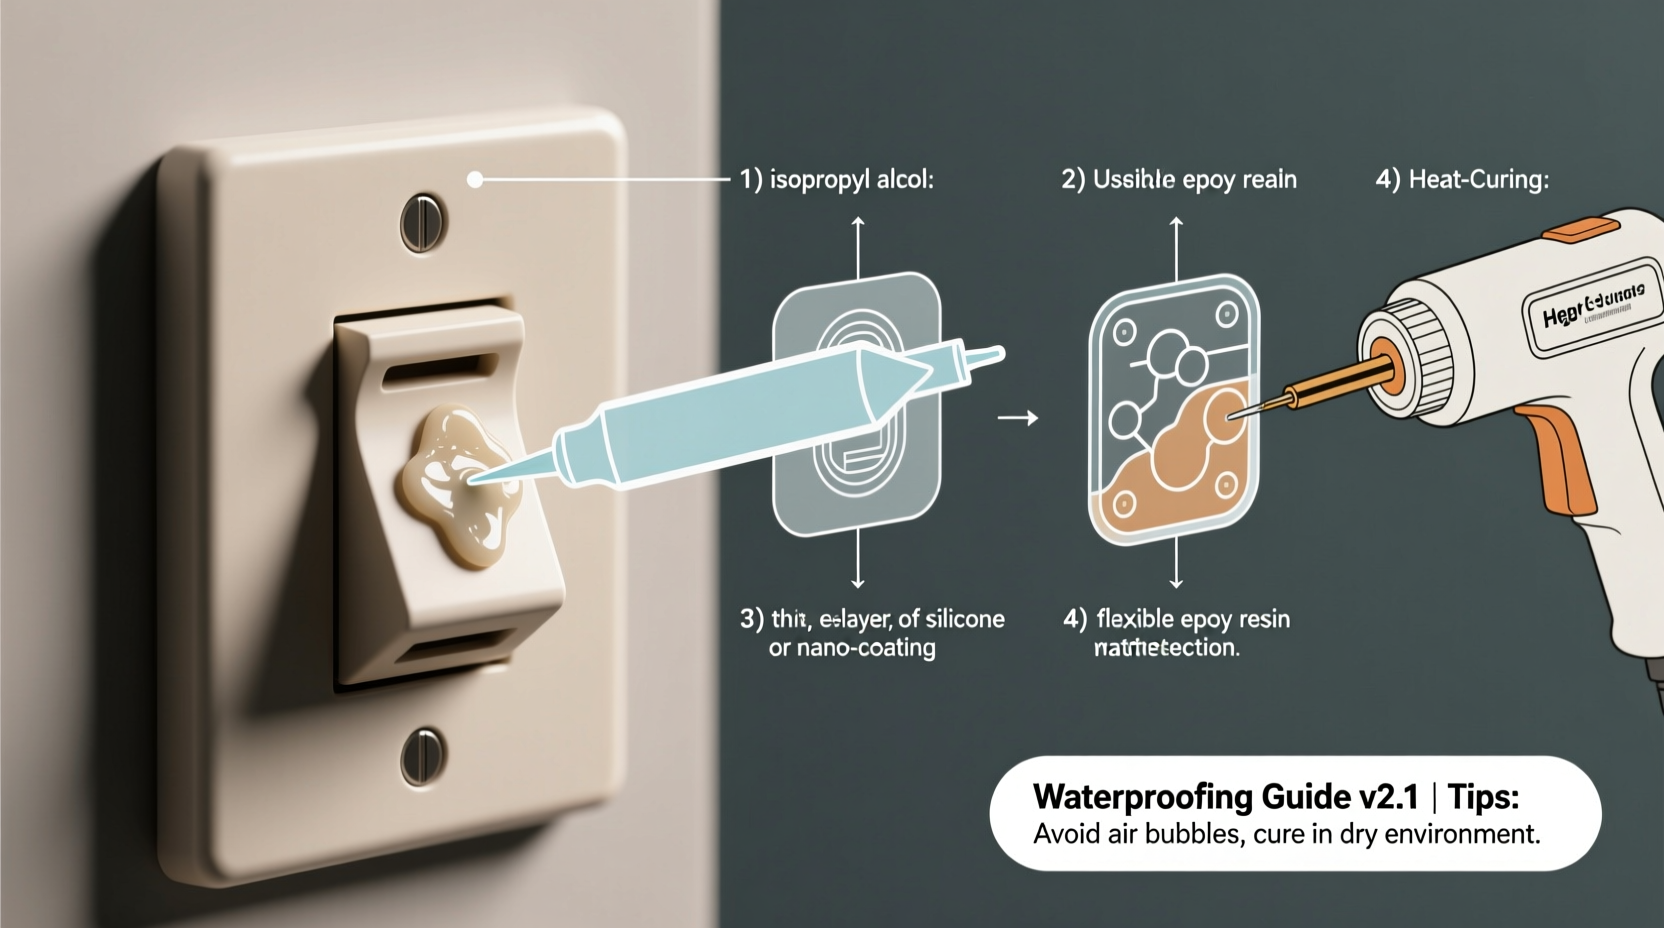
Improving the water resistance of switch stickers doesn’t require specialized tools or expertise. Follow this structured process to achieve durable protection:
- Surface Preparation: Remove existing stickers if necessary. Clean the area with isopropyl alcohol (70% or higher) to eliminate oils, dust, and residues. Allow complete drying before proceeding.
- Select High-Quality Stickers: Opt for stickers made from polyethylene terephthalate (PET) or vinyl with UV coating. These materials resist moisture better than standard paper labels.
- Apply with Precision: Align the sticker carefully and press down firmly from the center outward to avoid air bubbles. Use a credit card or squeegee for smooth application.
- Seal the Edges: Apply a thin layer of clear silicone sealant or epoxy resin along the perimeter using a fine brush or needle-tip applicator. This creates a moisture barrier at the most vulnerable point.
- Cure Properly: Allow sealants to cure according to manufacturer instructions—typically 12–24 hours. Avoid handling during this period.
- Test Water Resistance: After curing, lightly mist the surface with water and observe for beading or penetration. Reapply sealant if needed.
Choosing the Right Sealant
Not all sealants perform equally. The choice depends on flexibility, clarity, and compatibility with both the sticker and substrate.
| Sealant Type | Waterproof Level | Drying Time | Best For |
|---|---|---|---|
| Clear Silicone | High | 24 hours | Flexible surfaces, high-humidity areas |
| Epoxy Resin | Very High | 12–72 hours | Rigid panels, permanent installations |
| Acrylic Spray Coating | Moderate | 15–30 minutes | Quick fixes, temporary protection |
| UV-Curable Resin | High | 5–10 minutes (with UV light) | Precision applications, electronics |
“Edge sealing is non-negotiable in industrial settings. A properly sealed label can withstand years of washdown cycles without failure.” — Marcus Lin, Industrial Electronics Technician
Advanced Techniques for Maximum Protection
For mission-critical applications—such as marine equipment, medical devices, or outdoor signage—standard sealing may not suffice. Consider these advanced strategies:
- Laser-Cut Overlay Gaskets: Install a thin silicone gasket between the panel and the sticker. When compressed, it forms a hermetic seal around the switch area.
- Conformal Coating: Apply a dielectric polymer layer (e.g., parylene or acrylic) over the entire circuit board before placing the sticker. This protects internal components even if moisture breaches the label.
- Double-Sided Adhesive with Moisture Barrier: Use adhesive tapes like 3M VHB that incorporate hydrophobic layers, reducing wicking along the bond line.
- Encapsulation with Potting Compound: In extreme conditions, fully encapsulate the switch assembly in thermally conductive, waterproof potting resin. This method is irreversible but offers maximum protection.
Mini Case Study: Waterproofing Keypad Labels in a Food Processing Plant
A mid-sized food processing facility experienced frequent failures in their control panel keypads due to daily sanitation washdowns. Operators reported fading labels and unresponsive switches within three months of installation. An audit revealed that standard vinyl stickers were being used without edge sealing.
The maintenance team implemented a new protocol: replacing stickers with PET-based models, cleaning surfaces with alcohol wipes, and applying a bead of food-grade silicone around each label’s perimeter. After six months, no failures were reported. The same panels lasted over two years with only minor cosmetic wear. The change reduced downtime and saved approximately $4,200 annually in replacement costs and labor.
Checklist for Long-Lasting Waterproof Switch Stickers
Use this checklist before and after installation to ensure optimal results:
- ☐ Verify the operating environment (humidity, temperature, chemical exposure)
- ☐ Choose moisture-resistant sticker material (PET, vinyl, or laminated polyester)
- ☐ Clean the mounting surface with isopropyl alcohol
- ☐ Apply sticker smoothly, avoiding air pockets
- ☐ Seal all edges with appropriate waterproof compound
- ☐ Allow full curing time before exposing to moisture
- ☐ Inspect periodically for lifting or discoloration
- ☐ Re-seal if signs of wear appear
Frequently Asked Questions
Can I use nail polish as a sealant for small switch stickers?
While clear nail polish can provide a temporary moisture barrier, it is not recommended for long-term use. It tends to crack, yellow, and degrade when exposed to UV light or solvents. For reliable protection, use purpose-made sealants like epoxy or silicone.
Do waterproof stickers work underwater?
Standard “water-resistant” stickers are not designed for submersion. However, when combined with edge sealing and conformal coating, they can endure brief immersion. For continuous underwater use, consider fully encapsulated switches or IP68-rated enclosures instead.
How often should I reapply sealant?
Inspect stickers every 6–12 months in harsh environments. Reapply sealant if edges begin to lift or if water absorption is evident. In controlled indoor settings, a single application may last 3–5 years.
Final Recommendations and Next Steps
Effective waterproofing of switch stickers hinges on material selection, precise application, and proactive sealing. Whether you're maintaining a home keyboard or managing industrial control systems, these methods offer scalable solutions tailored to your needs. The investment in proper protection pays dividends through reduced maintenance, improved safety, and enhanced user experience.
Start by auditing your current setup: identify high-risk areas, choose the right materials, and apply one of the sealing techniques outlined here. Document results over time to refine your approach. Small changes yield significant improvements in durability and functionality.


 浙公网安备
33010002000092号
浙公网安备
33010002000092号 浙B2-20120091-4
Comments
No comments yet. Why don't you start the discussion?