
Wax spills on clothing are more common than many realize—whether from a candlelit dinner, a beauty treatment, or a forgotten crayon in the laundry. While wax itself isn’t inherently damaging to fabric, improper removal techniques can leave permanent stains, distort fibers, or even melt delicate materials like silk or polyester. The key lies not just in removing the wax, but in doing so with precision and care to preserve the garment’s integrity.
This guide outlines scientifically sound, practical, and fabric-conscious approaches to eliminate wax from various textiles. From cotton to wool, these strategies prioritize effectiveness without sacrificing the longevity of your favorite garments.
Understanding Wax Stains and Fabric Sensitivity
Wax is a hydrophobic substance, meaning it repels water. This makes traditional washing ineffective unless the wax is first removed. When heated, wax melts and spreads; when cooled, it hardens into a brittle layer over fabric fibers. The challenge is removing both the solid residue and any oily film left behind after melting.
Fabric type plays a crucial role in determining the safest method. Natural fibers like cotton and linen tolerate higher heat, while synthetics such as polyester or nylon can scorch or shrink under high temperatures. Delicate fabrics like silk or rayon require gentler handling to avoid weakening the weave.
“Attempting to wash wax-stained clothes without proper pre-treatment often sets the stain permanently. The oil component bonds with fibers during machine agitation.” — Dr. Lila Nguyen, Textile Chemist, Institute for Fabric Care
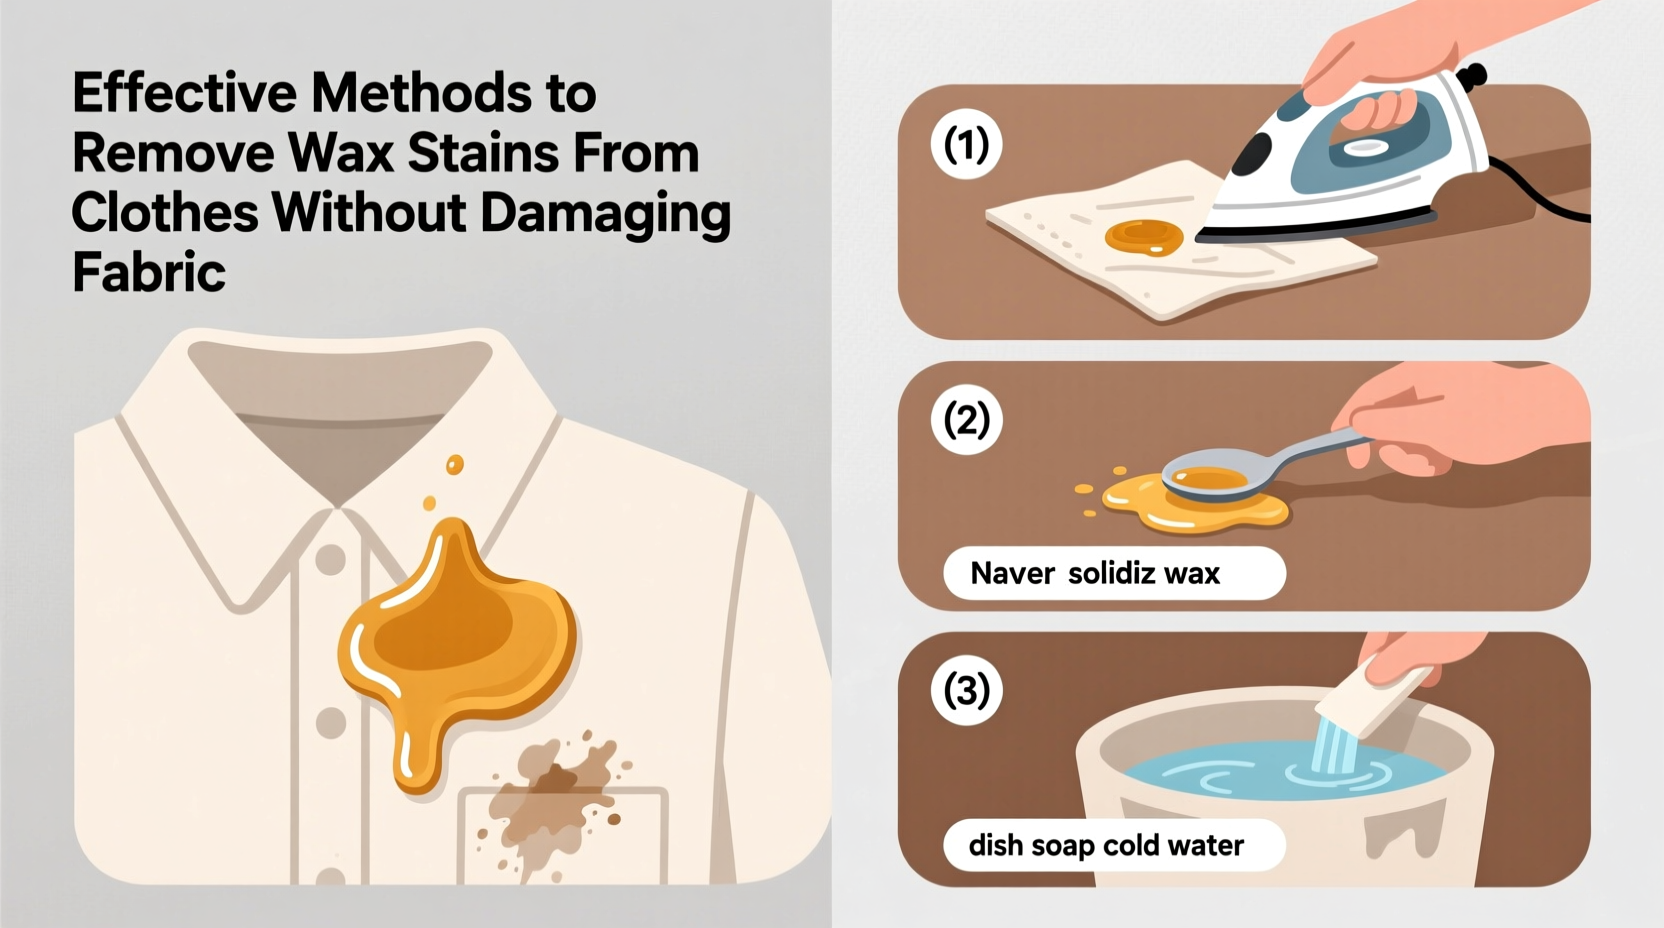
Step-by-Step Guide: Removing Wax Safely at Home
Follow this structured approach to effectively lift wax from clothing without harming the fabric.
- Let the wax harden completely. If the spill is fresh, place the garment in the freezer for 30–60 minutes to solidify the wax for easier removal.
- Scrape off excess wax. Use a dull knife or spoon edge to gently lift large chunks. Avoid pressing too hard to prevent fiber damage.
- Place absorbent paper on both sides of the stain. Lay the garment flat and sandwich the stained area between two layers of paper towels or blotting paper.
- Apply controlled heat. Using a dry iron set to low or medium heat (no steam), press over the top paper for 10–15 seconds. The heat will melt the wax, which the paper absorbs. Replace paper as it becomes saturated.
- Repeat until no more wax transfers. Continue alternating paper and ironing until no new wax appears on the paper.
- Treat residual oil marks. Apply a small amount of dish soap (like Dawn) directly to the area, gently work it in with fingers, and rinse with warm water.
- Wash according to fabric care label. Launder normally using appropriate temperature and detergent. Air dry first to confirm the stain is gone before using a dryer’s heat, which can set any remaining residue.
Alternative Methods for Delicate Fabrics
For silk, lace, or embellished garments where ironing poses a risk, consider these non-thermal alternatives:
- Cold solvent method: Place the item in the freezer until wax is brittle. Gently chip away residue, then apply a small amount of dry-cleaning solvent (e.g., carbon tetrachloride substitute) with a cotton swab. Blot—don’t rub—and allow to air dry.
- Freezer + adhesive tape: After freezing, use strong packing tape to dab and lift flaking wax particles. Repeat with fresh tape until minimal transfer occurs.
- Professional dry cleaning: For heirloom or high-value items, consult a reputable cleaner. Inform them of the wax incident so they can pre-treat appropriately.
These methods reduce thermal stress while still achieving effective results, especially when combined with careful mechanical removal.
Do’s and Don’ts: A Quick Reference Table
| Action | Do | Don’t |
|---|---|---|
| Initial response | Freeze to harden wax | Try to peel or scrub immediately |
| Heat application | Use low heat with protective paper | Iron directly on wax without barrier |
| Cleaning agents | Use mild dish soap or enzyme-based stain removers | Apply acetone or bleach without testing |
| Drying | Air dry first to verify stain removal | Tumble dry before confirming clean |
| Fabric-specific care | Check care labels and adjust method accordingly | Assume all fabrics react the same to heat |
Real-Life Example: Recovering a Wool Sweater After a Candle Spill
Sarah, a teacher from Portland, accidentally knocked over a tea light onto her favorite wool-blend cardigan during a winter evening. Initially panicked, she recalled advice about freezing wax instead of washing immediately. She placed the sweater in a plastic bag and froze it overnight.
The next day, she carefully scraped off the bulk of the wax with a butter knife. Using a pressing cloth and a low-heat iron, she applied heat through several layers of paper towels. After three cycles, the wax was fully absorbed. She then dabbed the area with diluted dish soap, rinsed with cool water, and laid the sweater flat to dry.
The result? No staining, no distortion, and the sweater remained wearable. “I was ready to donate it,” she said. “But taking the time to do it right saved a $70 piece I wear all winter.”
Essential Tips for Preventing Damage During Removal
Even effective methods can backfire if misapplied. Keep these insights in mind:
- Always perform a spot test on a hidden seam before applying solvents.
- Use brown paper bags or plain paper towels—not printed newspaper—as ink can transfer during ironing.
- For multi-layered garments, insert a paper barrier between fabric layers to prevent wax migration.
- If the stain persists after initial treatment, repeat the iron-and-paper process rather than escalating to harsh chemicals.
FAQ: Common Questions About Wax Stain Removal
Can I use a hairdryer instead of an iron?
While a hairdryer can soften wax, it lacks the direct contact and consistent pressure of an iron. This increases the chance of smearing rather than absorbing the wax. An iron with paper towels remains the most efficient method.
What if the fabric is colored and I’m worried about fading?
Stick to low heat and minimize exposure time. Test on a seam first. For dark or vibrant colors, avoid solvents that may strip dyes. Stick to gentle dish soap and cold-water rinsing.
Will vinegar help remove wax stains?
Vinegar does not dissolve wax effectively. It may help with odor or minor discoloration but should not replace mechanical removal or oil-targeting treatments. Rely on absorption and degreasing agents instead.
Final Checklist: Your Action Plan for Wax Stain Removal
- Allow wax to harden or freeze the garment.
- Gently scrape off excess wax with a dull tool.
- Sandwich the stain between absorbent papers.
- Iron on low-to-medium heat, replacing paper as needed.
- Apply dish soap to any greasy residue and rinse.
- Wash per care instructions and air dry first.
- Inspect before tumble drying.
Conclusion: Preserve Your Clothes with Smart, Safe Practices
Removing wax from clothing doesn’t require expensive products or professional tools—just patience, the right technique, and respect for fabric limitations. By understanding how wax interacts with textiles and following proven steps, you can rescue garments that might otherwise be discarded.
Every clothing item has value, whether sentimental, financial, or environmental. Taking the time to treat stains properly reduces waste and extends the life of your wardrobe. Next time wax lands where it shouldn’t, stay calm and follow this guide. Your clothes—and your conscience—will thank you.


 浙公网安备
33010002000092号
浙公网安备
33010002000092号 浙B2-20120091-4
Comments
No comments yet. Why don't you start the discussion?