
Acrylic checkerboard trays are prized for their sleek appearance, durability, and versatility in home decor, gaming setups, and event displays. Their glossy surface and bold alternating pattern make them a favorite among designers and collectors alike. However, acrylic is more sensitive than glass or metal—improper cleaning can lead to scratches, hazing, or even cracking over time. Many people unknowingly use abrasive cloths or harsh chemicals that degrade the material. This guide provides a detailed, damage-free method for maintaining your acrylic trays so they retain their clarity and color for years.
Understanding Acrylic: Why It Needs Special Care
Acrylic, also known as polymethyl methacrylate (PMMA), is a transparent thermoplastic often used as a lightweight, shatter-resistant alternative to glass. While it’s stronger than glass in some respects, its surface is softer and more prone to scratching. Unlike glass, which resists most household cleaners, acrylic can react negatively to ammonia-based products like Windex, alcohol, acetone, and other solvents commonly found in multipurpose sprays. These substances can cause micro-cracking, cloudiness, or permanent etching.
The checkerboard design on these trays—typically achieved through layered pigmentation or printing—can be compromised if aggressive scrubbing or chemical exposure occurs. Even minor abrasions can scatter light, dulling the contrast between black and white (or colored) squares. To preserve both structural integrity and visual appeal, a gentle, systematic approach is essential.
“Acrylic isn’t indestructible—it’s durable only when treated with respect. The key is using non-abrasive tools and pH-neutral solutions.” — Dr. Lena Torres, Materials Scientist & Polymer Specialist
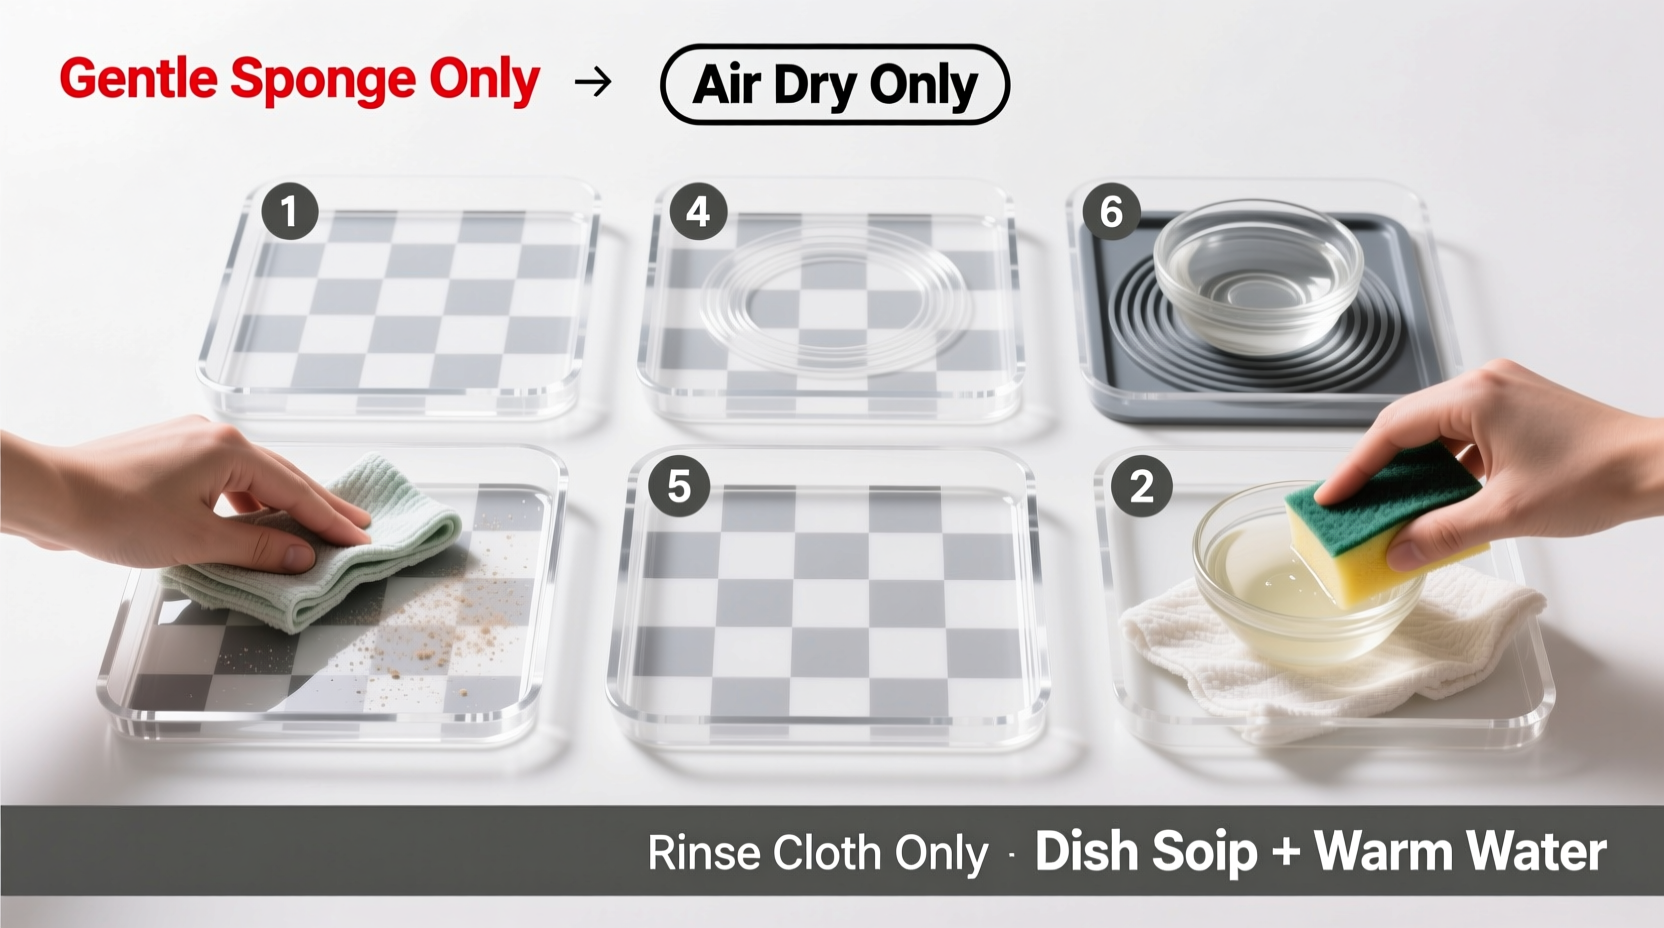
Step-by-Step Cleaning Procedure
Cleaning an acrylic checkerboard tray properly involves preparation, washing, rinsing, drying, and optional polishing. Follow this timeline to ensure every stage protects the surface while removing dirt, oils, and smudges effectively.
- Remove loose debris: Use a soft brush or dry microfiber cloth to gently sweep away dust, crumbs, or game pieces residue from the surface and edges.
- Prepare cleaning solution: Mix a few drops of mild dish soap (without degreasers or citrus additives) into a bowl of lukewarm water. Avoid hot water, which can warp thin acrylic sheets.
- Soak briefly (if needed): For trays with sticky residues or dried spills, submerge in the soapy water for no more than 5 minutes. Do not leave unattended.
- Wash with soft cloth: Dip a lint-free microfiber or cotton cloth into the solution. Gently wipe the entire surface using straight-line motions (not circular) to minimize swirl marks.
- Rinse thoroughly: Hold under cool running water or dip in clean water to remove all soap traces. Soap residue can attract dust and leave streaks.
- Dry immediately: Pat dry with a second clean, dry microfiber towel. Never air-dry, as water spots may form.
- Inspect and polish (optional): If slight haze appears after repeated cleanings, apply an acrylic-specific polish with a third soft cloth using light pressure.
Do’s and Don’ts: Table of Best Practices
| Do’s | Don’ts |
|---|---|
| Use pH-neutral dish soap and lukewarm water | Use ammonia, bleach, or alcohol-based cleaners |
| Clean with microfiber or cotton cloths | Scrub with paper towels, sponges, or steel wool |
| Wipe in straight lines to reduce micro-scratches | Apply excessive pressure during cleaning |
| Dry immediately with a lint-free towel | Allow water to pool or drip down sides unchecked |
| Store flat or vertically in padded containers | Stack trays directly on top of each other |
Real Example: A Collector’s Experience
Sarah Kim, a board game enthusiast from Portland, owns over a dozen acrylic checkerboard trays used for themed game nights. After noticing a gradual loss of shine on her favorite red-and-black set, she investigated proper care techniques. “I was using regular window cleaner because it made things look streak-free,” she said. “But within six months, two trays had fine web-like cracks near the corners.” Upon switching to hand-washing with baby shampoo and microfiber cloths, she reported immediate improvement. “The colors popped again, and there were no new blemishes after three months of weekly use.” Her routine now includes storing each tray in a fabric-lined box when not in use—a simple change that significantly reduced edge chipping.
Essential Cleaning Checklist
- ✔ Gather supplies: mild soap, two microfiber cloths, soft brush, clean towel
- ✔ Remove all items and debris from the tray surface
- ✔ Wash with soapy water using straight-line wiping motion
- ✔ Rinse completely under cool water
- ✔ Dry immediately with a lint-free cloth
- ✔ Inspect for haze or residue; polish if necessary
- ✔ Store flat or upright with protective padding between trays
Frequently Asked Questions
Can I put my acrylic checkerboard tray in the dishwasher?
No. Dishwashers expose acrylic to high heat, strong detergents, and mechanical agitation—all of which can warp, craze, or scratch the material. Hand washing is the only recommended method.
What should I do if my tray becomes cloudy?
Mild cloudiness can often be reversed with a specialized acrylic polish such as Novus #2 or Brillianize. Apply with a soft cloth in a linear motion. If the haze persists, it may indicate deep scratching, which requires professional buffing.
How often should I clean my acrylic tray?
For decorative or occasional-use trays, clean once every 2–4 weeks. For frequently used trays (e.g., daily games or dining), wipe lightly after each use and perform a full wash weekly to prevent buildup.
Preserving Longevity Through Smart Habits
Beyond regular cleaning, long-term preservation depends on usage and storage practices. Keep trays out of direct sunlight to prevent UV-induced yellowing, especially in lighter-colored acrylics. When stacking multiple trays, place acid-free tissue paper or felt liners between them to eliminate friction. For travel or seasonal storage, wrap each tray in bubble wrap (non-adhesive side facing the surface) and store in a rigid container.
Avoid placing heavy or sharp objects directly on the tray without protection. Even ceramic game pieces with rough bases can create micro-abrasions over time. Consider using felt pads on the bottom of frequently moved items placed atop the tray.
“Prevention is far more effective than restoration. One scratched square can compromise the entire aesthetic of a checkerboard design.” — Marcus Reed, Industrial Designer & Acrylic Product Consultant
Final Thoughts: Care That Honors Craftsmanship
An acrylic checkerboard tray is more than a functional item—it’s a blend of design precision and material elegance. Whether used for chess, serving appetizers, or display, its condition reflects attention to detail and appreciation for quality. By adopting a consistent, gentle cleaning routine and avoiding common pitfalls, you protect both the physical integrity and visual impact of your tray. These small efforts compound over time, ensuring your investment remains vibrant and flawless for years to come.


 浙公网安备
33010002000092号
浙公网安备
33010002000092号 浙B2-20120091-4
Comments
No comments yet. Why don't you start the discussion?