
Fountain pens are precision instruments that combine craftsmanship with daily utility. Over time, even the most carefully used pen can accumulate ink residue—both inside and out. While some staining is harmless and even adds character, excessive buildup can affect performance, clog feed systems, or mar the pen’s appearance. The key lies in cleaning effectively without compromising the integrity of materials like ebonite, celluloid, acrylic, or gold-plated trim. With the right approach, you can restore your pen’s clarity and function using safe, proven methods.
Understanding Ink Stains: Why They Form and What They Mean
Ink staining occurs when dye molecules bind to the internal surfaces of a fountain pen. Iron gall, pigmented, and highly saturated inks are especially prone to leaving behind discoloration. Some pens, particularly those with soft plastics or unsealed feeds, absorb ink more readily. While external stains are mostly cosmetic, internal deposits can hinder ink flow, cause hard starts, or lead to inconsistent writing performance.
It's important to distinguish between surface staining and chemical degradation. A light tint on a section or feed is normal and often reversible. However, deep-set discoloration or cloudiness in acrylic barrels may indicate prolonged exposure to aggressive solvents or UV light—not just ink. Addressing stains early prevents permanent absorption and keeps your pen operating smoothly.
“Regular maintenance isn’t about perfection—it’s about preserving function. A well-cleaned pen writes better and lasts longer.” — Daniel Park, Pen Restoration Specialist
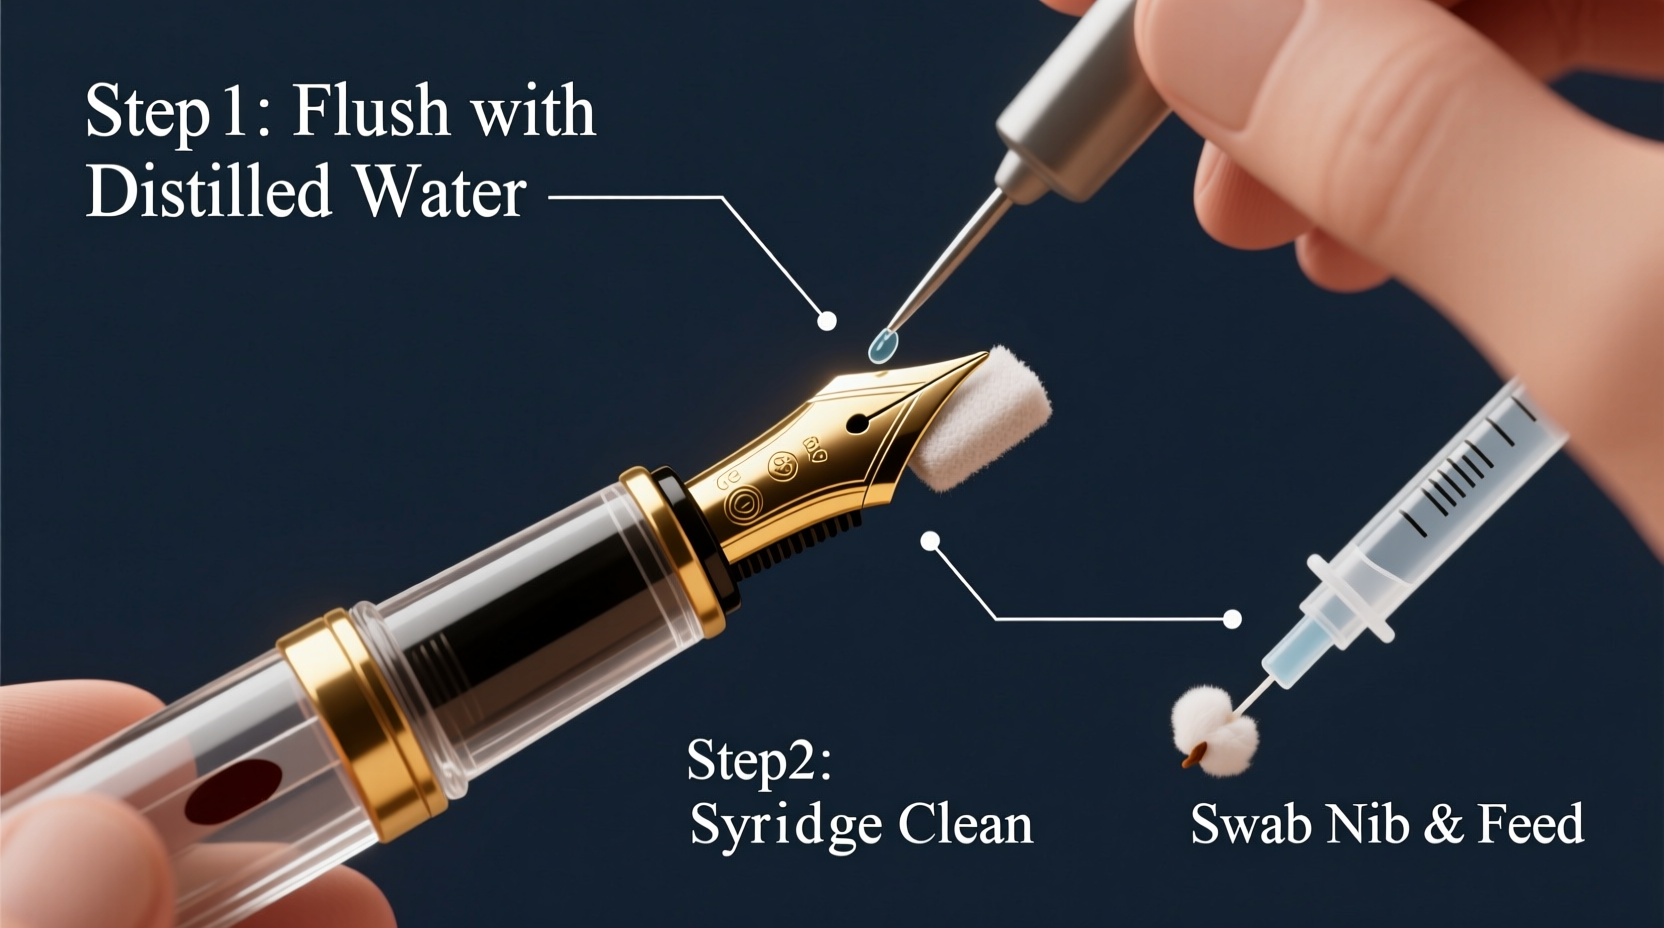
Step-by-Step Guide: Safe Internal Cleaning Methods
Cleaning the inside of a fountain pen requires patience and attention to material compatibility. Never force disassembly or use boiling water on pens with glued parts. Follow this sequence for optimal results:
- Disassemble the pen: Remove the nib, feed, and piston mechanism (if applicable). Place all parts on a clean towel.
- Rinse with lukewarm water: Flush each component under running tap water until the water runs clear. Avoid high pressure.
- Soak in distilled water: Submerge metal nibs and plastic feeds in a glass of distilled water for 12–24 hours. Replace water if it becomes heavily colored.
- Use a mild detergent (optional): For stubborn grime, add one drop of pH-neutral dish soap to the soak. Rinse thoroughly afterward.
- Flush with an aspirator or syringe: Gently draw and expel water through the feed and barrel to dislodge trapped particles.
- Air dry completely: Lay parts on a lint-free cloth in a dust-free area. Reassemble only when fully dry—usually after 24 hours.
Dealing with Persistent External Stains
External staining often appears on grip sections, caps, and transparent demonstrator pens. Unlike internal cleaning, surface treatment must protect both finish and structural integrity. Abrasives or alcohol-based cleaners can scratch or craze acrylics and dissolve adhesives.
For light surface marks, try a microfiber cloth dampened with distilled water. For deeper stains, consider these gentle solutions:
- Baking soda paste: Mix food-grade baking soda with a few drops of water. Apply with a cotton swab, gently rub the stained area, then rinse. Effective for ebonite and metal trims.
- Denture-cleaning tablets: Drop one tablet into a glass of warm water and soak the pen body (without nib unit) for up to 8 hours. This oxygen-based method lifts stains without etching plastic.
- Vinegar soak (for metal parts only): Use diluted white vinegar (1:4 with water) to remove calcium deposits or iron gall residue from steel nibs. Do not use on gold or aluminum components.
Do’s and Don’ts of External Stain Removal
| Do | Don’t |
|---|---|
| Use non-abrasive cloths (microfiber or lens cleaning fabric) | Scrub with paper towels or rough sponges |
| Test cleaning agents on inconspicuous areas first | Soak vintage pens with unknown adhesives |
| Store cleaned pens in protective cases | Expose pens to direct sunlight during drying |
| Handle transparent demonstrators with care—they show every flaw | Use bleach, acetone, or nail polish remover |
Mini Case Study: Reviving a Vintage Sheaffer Snorkel
A collector acquired a 1950s Sheaffer Snorkel with heavy blue-black ink staining inside the barrel and along the snorkel tube. The pen wrote poorly, with frequent skips and ink starvation. After disassembling the complex snorkel mechanism, the owner soaked the barrel and inner tube in a solution of lukewarm distilled water and half a denture tablet for six hours. He repeated the process twice, flushing intermittently with a bulb syringe. The third soak produced nearly clear water. After reassembly and a final flush with plain water, the pen demonstrated smooth, consistent flow. While faint ghosting remained in the plastic, functionality was fully restored—without any cracking or seal damage.
This case illustrates how patience and conservative chemistry yield better long-term results than aggressive solvents.
Checklist: Fountain Pen Stain Removal Protocol
Before beginning any cleaning procedure, follow this checklist to minimize risk:
- Identify the pen’s materials (acrylic, ebonite, celluloid, etc.)
- Confirm whether the pen has glued or threaded components
- Gather tools: soft brushes, syringe, distilled water, container
- Remove ink cartridge/converter before disassembly
- Label all parts to prevent mix-ups during reassembly
- Avoid mixing different pen models in the same soak
- Never leave pens soaking unattended for more than 24 hours
- Allow full air drying before reuse
Frequently Asked Questions
Can I use hydrogen peroxide to remove ink stains?
Yes, but cautiously. A 3% solution can be effective for persistent organic stains, especially on white or transparent plastics. Limit soak time to 4–6 hours and always follow with a thorough rinse in distilled water. Do not use on rubber sacs, ebonite, or vintage finishes, as peroxide may cause brittleness or yellowing over time.
Why does my pen still look stained after cleaning?
Some modern inks contain dyes designed to adhere strongly to surfaces. If the stain remains but ink flows freely, it may be purely aesthetic. Deeply absorbed dye in porous materials like celluloid cannot always be removed without damage. In such cases, accept minor discoloration as part of the pen’s history.
How often should I clean my fountain pen to prevent staining?
For regular users, a full flush every 4–6 weeks is ideal. If switching ink colors or using pigmented/iron-gall inks, clean immediately. Occasional writers should perform a basic rinse every 2–3 months, even if the pen isn’t used frequently, to prevent dried ink from hardening in the feed.
Conclusion: Preserve Performance Through Gentle Care
Removing ink stains from a fountain pen doesn’t require harsh chemicals or risky procedures. By understanding your pen’s construction and applying gentle, methodical techniques, you maintain both aesthetics and reliability. Whether dealing with a modern demonstrator or a vintage treasure, prioritize preservation over perfection. Consistent, thoughtful maintenance ensures your pens remain functional and beautiful for years to come.


 浙公网安备
33010002000092号
浙公网安备
33010002000092号 浙B2-20120091-4
Comments
No comments yet. Why don't you start the discussion?