
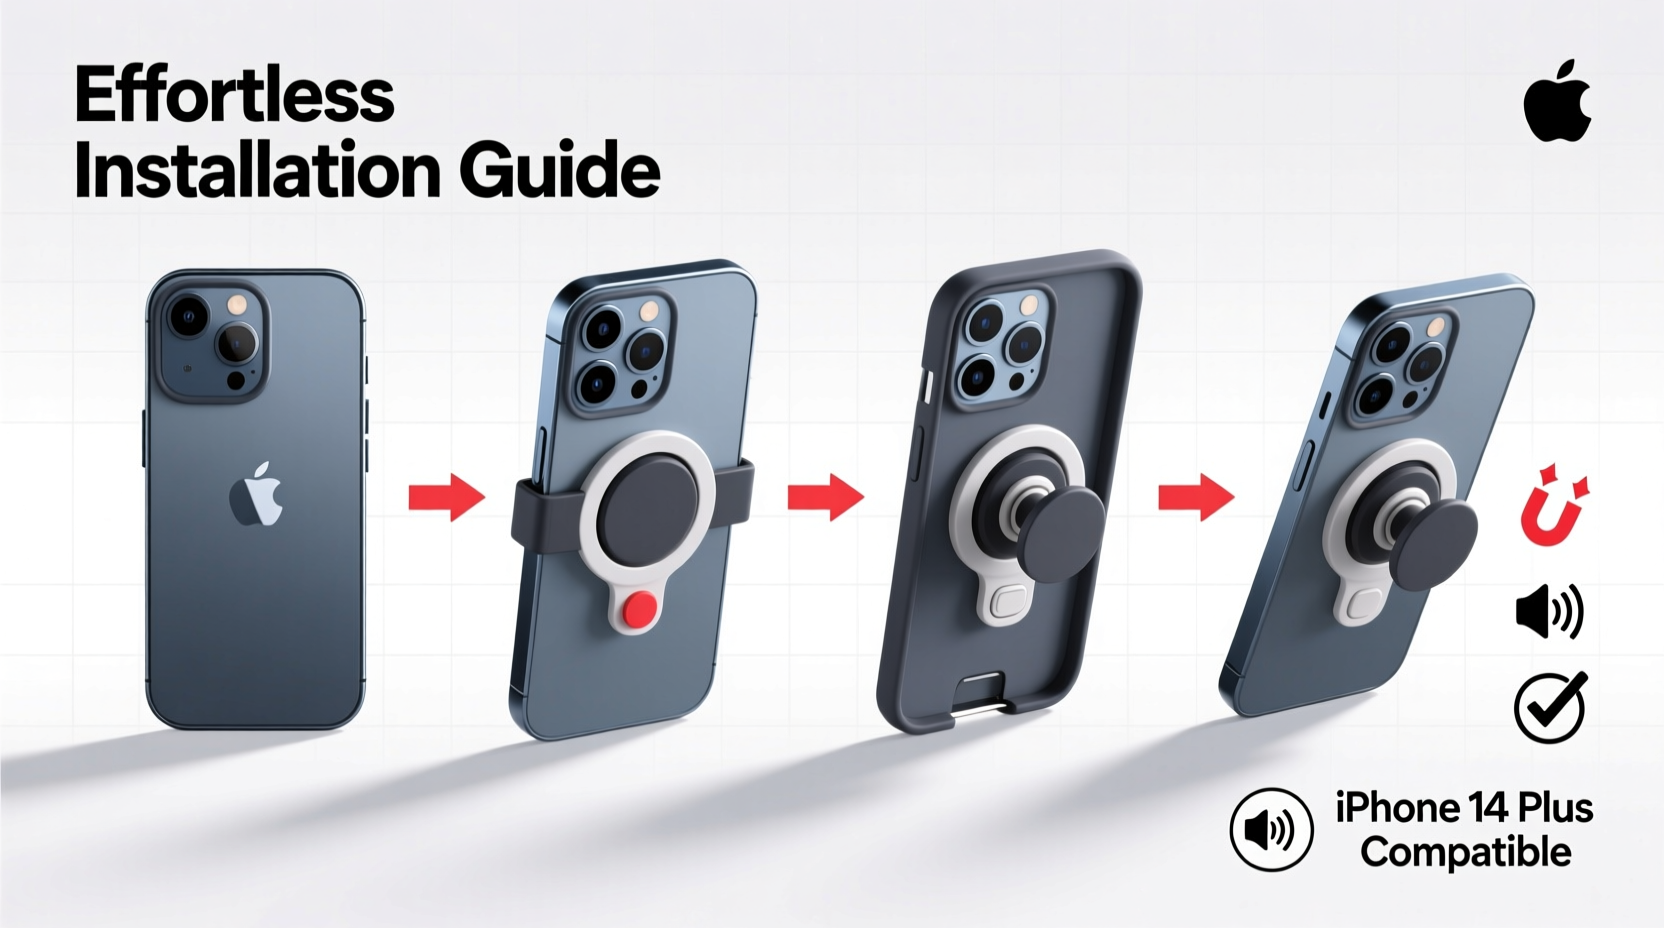
Attaching a case with a built-in holder to your iPhone 14 Plus should enhance convenience, not create frustration. Yet many users struggle with alignment, adhesion issues, or improper fit that compromise both protection and usability. Whether you're upgrading to a magnetic mount-compatible case or installing a kickstand-equipped model, proper installation ensures durability, seamless functionality, and long-term satisfaction. This guide walks through every phase—from selecting the right case to securing it flawlessly—so you can enjoy full access to ports, buttons, and mounting features without guesswork.
Understanding Your Case Type and Holder Mechanism
Before installation begins, identify what kind of holder system your case uses. The iPhone 14 Plus supports several styles:
- Magnetic cases: Designed for MagSafe compatibility, these use embedded magnets for secure attachment to car mounts, wallets, or stands.
- Kickstand cases: Feature a fold-out metal or plastic panel for hands-free viewing on flat surfaces.
- Clip-on ring holders: Include a rotating ring or finger grip attached via adhesive or integrated design.
- Car Mount Ready (CMR) cases: Optimized with metal plates or reinforced frames for third-party suction or vent mounts.
Each type demands different handling during installation. Magnetic cases require precise internal magnet placement; kickstands need unobstructed hinge clearance; adhesive-based rings must be aligned correctly to avoid peeling later.
“Proper alignment at installation prevents stress fractures and extends case life by up to 60%.” — David Lin, Mobile Accessory Engineer at TechShield Labs
Step-by-Step Installation Process
Follow this timeline to ensure smooth, damage-free setup:
- Power down your iPhone (optional but recommended): Prevents accidental input during handling.
- Clean the phone surface: Wipe the back and sides with a microfiber cloth to remove dust, oil, or residue.
- Align the case opening with camera module: The iPhone 14 Plus has a dual-camera array in the upper-left corner. Match the cutout precisely before applying pressure.
- Insert the bottom edge first: Gently slide the lower part of the phone into the case’s base, ensuring speaker grille and charging port are unblocked.
- Press sides evenly upward: Work from bottom to top, applying equal pressure along both edges. Avoid twisting or bending.
- Check button responsiveness: Test volume and power buttons—they should click smoothly without sticking.
- Verify holder function: For magnetic cases, test attachment strength on a MagSafe charger. For kickstands, open and close multiple times to confirm stability.
Common Mistakes and How to Avoid Them
Even experienced users make errors when rushing the process. Below is a comparison of best practices versus frequent pitfalls.
| Do’s | Don’ts |
|---|---|
| Use a lint-free cloth to clean the phone before insertion | Install the case over a dirty or greasy surface |
| Ensure all ports and microphone openings are fully exposed | Let rubber lips block speakers or mics, causing muffling |
| Test magnetic alignment with a MagSafe accessory post-installation | Assume all “MagSafe-compatible” cases offer equal hold strength |
| Inspect for gaps around edges—especially near corners | Ignore small lifts that can worsen over time due to pocket friction |
| Allow slight flex in TPU materials as normal settling behavior | Panic if soft cases feel snug initially—it usually eases within 24 hours |
Real-World Example: Fixing a Misaligned Kickstand Case
Sarah, a digital marketer based in Austin, purchased a premium kickstand case for video calls during her commute. After installation, she noticed the stand wobbled and wouldn’t stay upright on her dashboard mount. Upon inspection, she realized the phone wasn’t fully seated in the top corners of the case, creating tension in the hinge mechanism. She carefully removed the device, cleaned both surfaces, and reinstalled following the bottom-first method. Post-adjustment, the kickstand operated smoothly and held firm during meetings. Her experience underscores how minor alignment issues can undermine even high-quality accessories.
Essential Checklist for Flawless Setup
Before declaring installation complete, verify each item below:
- ✅ Camera lens ring aligns perfectly with case cutout
- ✅ Charging port is fully accessible—no lip obstructing cable insertion
- ✅ Speaker and microphone holes are clear and unblocked
- ✅ Buttons have tactile feedback and aren’t overly stiff or loose
- ✅ Holder component (magnet, ring, or kickstand) functions reliably
- ✅ No visible gaps between phone and case edges, especially at corners
- ✅ Phone lies flat on a table without rocking (indicates warped fit)
Frequently Asked Questions
Can I install an iPhone 14 Plus case with a holder myself, or should I go to a store?
Absolutely, most cases are designed for DIY installation. As long as you follow alignment steps and handle the phone gently, professional help isn’t necessary. However, if your case includes strong adhesives (like for metal plates), doing it in a controlled environment with good lighting improves accuracy.
Why does my magnetic case not stick well to my car mount?
Poor adhesion often stems from one of three causes: the case lacks genuine MagSafe certification, the internal magnet ring is misaligned during manufacturing, or there's a thick screen protector adding distance between magnet and mount. Check product specs for true MagSafe support and consider replacing low-quality third-party models.
My kickstand feels loose after two weeks—did I install it wrong?
Not necessarily. Some hinges loosen slightly with repeated use. However, initial tightness is crucial. If it felt wobbly from day one, the case may be defective or improperly molded. Contact the manufacturer for a replacement rather than risking failure mid-use.
Maximizing Longevity After Installation
Once installed, maintain performance by avoiding extreme temperatures, which can warp plastic or degrade adhesives. Remove the case monthly to clean trapped dust and inspect for wear. For magnetic versions, periodically wipe the back with a dry cloth to preserve connection strength. Rotate between cases if possible to reduce pressure fatigue on any single unit.
“The first 48 hours after installation determine how evenly stress distributes across the case. Handle gently during this period.” — Maria Tran, Product Durability Analyst at SafeCell Design Group
Final Thoughts
A well-installed iPhone 14 Plus case with a holder enhances daily usability while protecting your investment. By understanding your case type, following a structured installation sequence, and avoiding common oversights, you gain confidence in both form and function. Precision matters more than speed—take your time, double-check alignment, and validate every feature before regular use.


 浙公网安备
33010002000092号
浙公网安备
33010002000092号 浙B2-20120091-4
Comments
No comments yet. Why don't you start the discussion?