
Compressing folders on a Mac is one of the most practical ways to save space, organize data, and prepare files for email or cloud upload. Despite its simplicity, many users overlook the built-in tools Apple provides—tools that require no third-party software and deliver fast, reliable results. Whether you're sending a project to a client, backing up documents, or just cleaning up your desktop, mastering folder compression on macOS can save time and reduce digital clutter.
The good news? You don’t need technical expertise. macOS includes native support for creating ZIP archives with a few clicks. This guide walks through every method available, highlights common pitfalls, and shares expert-backed strategies to make file compression not only easy but efficient.
Why Compress Files on Mac?
Before diving into the how, it's worth understanding the why. File compression isn't just about shrinking size—it’s about utility. When you zip a folder, you bundle multiple files into a single package, which simplifies sharing and improves transfer reliability. It also reduces storage usage, especially when dealing with large media or development assets.
- Email attachments: Most email services limit attachment sizes. Zipping lets you send more within limits.
- Backup efficiency: Compressed folders take up less space on external drives or cloud storage.
- File integrity: A single archive prevents accidental misplacement of individual files.
- Cross-platform compatibility: ZIP is universally supported across Windows, Linux, and mobile devices.
“ZIP remains the most compatible compression format for everyday use. For most Mac users, the built-in Archive Utility is all they’ll ever need.” — Jordan Lee, Systems Optimization Specialist
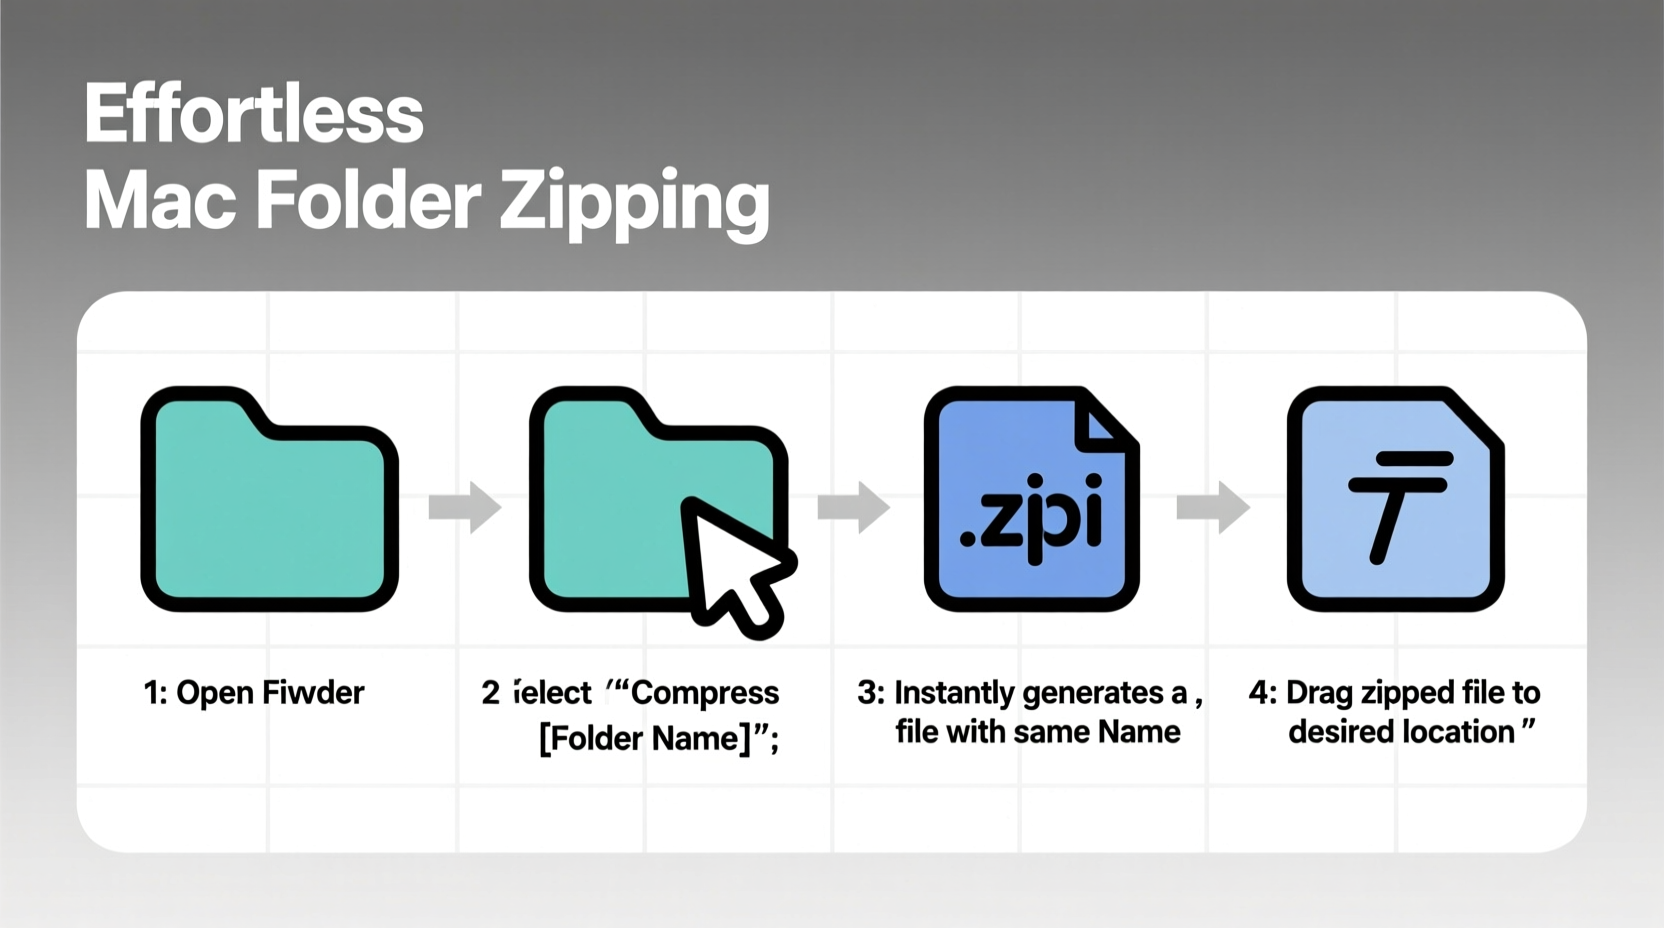
Step-by-Step: How to Zip a Folder on Mac (Native Method)
Apple’s Finder includes everything required to create a ZIP file. No downloads, no setup. Follow these steps to compress any folder in seconds.
- Locate the folder you want to compress in Finder.
- Right-click (or Control-click) on the folder.
- Select \"Compress [Folder Name]\" from the context menu.
- Wait a moment while macOS processes the folder. A progress bar will appear briefly.
- Once complete, a new file named
[Folder Name].zipappears in the same location.
The original folder remains untouched. The newly created ZIP file contains an exact copy of its contents. You can now move, rename, or delete the original as needed.
Advanced Compression Tips for Power Users
While basic zipping works well for most tasks, advanced scenarios call for smarter approaches. These techniques help optimize speed, security, and performance.
Rename Before Zipping
If you plan to share the ZIP file, rename the original folder first. The ZIP inherits the folder’s name, so “Project_Final_v3” becomes “Project_Final_v3.zip”—clear and professional.
Check Size Before and After
Not all file types compress equally. Media files like MP4s or JPEGs are already compressed, so zipping them yields minimal savings. Text files, code, or raw datasets, however, can shrink significantly. Use Finder’s Get Info (Command+I) to compare sizes.
Use Terminal for Faster Batch Processing
For users comfortable with command-line tools, Terminal offers faster batch compression. Open Terminal and type:
zip -r archive_name.zip /path/to/folder
This method is ideal for automating backups or scripting repetitive tasks.
Add Password Protection (Indirectly)
macOS does not natively support password-protected ZIPs via Finder. However, you can achieve this using Disk Utility:
- Open Disk Utility (Applications > Utilities).
- Create a new blank disk image (File > New Image > Blank Image).
- Set encryption to 128-bit or 256-bit AES.
- Name and save the image, then mount it like a drive.
- Copy your sensitive files into the mounted image.
- Eject the image and compress it via Finder as usual.
The resulting ZIP contains an encrypted disk image, securing its contents behind a password.
Common Issues and How to Avoid Them
Even simple processes can go wrong. Here are frequent problems and their solutions.
| Issue | Root Cause | Solution |
|---|---|---|
| ZIP file won’t open on Windows | Filenames with special characters or long paths | Use standard letters, numbers, underscores; keep names under 255 characters |
| Compression takes too long | Large folder with thousands of small files | Split into smaller folders or use Terminal for better performance |
| Corrupted ZIP after transfer | Interrupted upload or incomplete write | Always verify transfer completion; re-zip if needed |
| No option to \"Compress\" in right-click menu | Third-party apps interfering with Finder | Restart Finder (via Activity Monitor) or disable conflicting utilities |
com.apple.finder.plist (found in ~/Library/Preferences).
Real-World Example: Sending a Design Project
Imagine you’re a freelance graphic designer wrapping up a branding project. Your deliverables include 47 image files, three PDFs, a presentation, and source files totaling over 800MB. Emailing them individually is impossible due to size limits and disorganization.
You group everything into a folder named “BrandKit_ClientName_Final” and right-click > Compress. In under two minutes, macOS generates a 612MB ZIP file—still large, but now manageable. You upload it to a secure file-sharing service and send the link. The client receives one clean package, avoiding confusion and broken downloads.
Without compression, the process would involve multiple uploads, unclear labeling, and risk of missing files. With it, professionalism and reliability are preserved.
Quick Checklist: Optimize Your Zipping Workflow
Follow this checklist every time you prepare a folder for compression:
- ✅ Rename the folder clearly before zipping
- ✅ Remove unnecessary files (logs, temp files, duplicates)
- ✅ Verify file compatibility (avoid macOS-specific metadata if sharing externally)
- ✅ Check final ZIP size against transmission limits
- ✅ Test extraction on another device if security or integrity is critical
Frequently Asked Questions
Can I unzip files on Mac without extra software?
Yes. Double-click any ZIP file in Finder to extract its contents automatically. macOS uses Archive Utility by default, placing the extracted folder next to the original archive.
Does zipping damage my files?
No. ZIP compression is lossless, meaning files retain full quality and data integrity. Extracted files are bit-for-bit identical to the originals.
Why is my ZIP file larger than expected?
Some file types (like JPG, MP4, PNG) are already compressed. Attempting to zip them again offers little reduction. Focus on folders with text, spreadsheets, or uncompressed assets for best results.
Conclusion: Make Compression Part of Your Routine
Zipping folders on Mac should never feel like a chore. With native tools that are fast, reliable, and intuitive, compression becomes a seamless part of managing digital work. From simplifying collaboration to optimizing storage, the ability to quickly bundle and share files is a small skill with outsized impact.
Start applying these methods today. Clean up your desktop, organize your projects, and send files with confidence. Once you make zipping a habit, you’ll wonder how you ever worked without it.


 浙公网安备
33010002000092号
浙公网安备
33010002000092号 浙B2-20120091-4
Comments
No comments yet. Why don't you start the discussion?