
Pom poms are more than just whimsical decorations—they’re versatile, joyful accents that bring texture and color to everything from baby hats to wall art. While store-bought versions are convenient, handmade pom poms offer unmatched softness, fullness, and personalization. The best part? You don’t need special tools or advanced skills. With nothing more than yarn, scissors, and a pair of cardboard templates, you can create consistently fluffy pom poms in any size or hue.
This guide walks you through the entire process with precision and clarity, ensuring success even if you’ve never wrapped yarn around cardboard before. Whether you're crafting for a child’s project, seasonal décor, or a creative gift, mastering this technique opens up endless possibilities.
Selecting the Right Materials
The foundation of a perfect pom pom lies in your materials. Choosing wisely ensures durability, fluffiness, and ease of assembly.
- Yarn: Opt for medium-weight (worsted) yarn for balanced volume and manageability. Wool blends yield excellent fluff, while acrylic is budget-friendly and comes in vibrant colors. Avoid slippery silk or very thin thread unless you’re experienced.
- Cardboard: Use sturdy but easily cut material—cereal boxes or packaging scraps work well. It must hold its shape during wrapping.
- Scissors: Sharp fabric or craft scissors ensure clean cuts without fraying the yarn ends.
- Utility knife or craft blade (optional): Helpful for cutting precise slits in thicker cardboard.
Creating Your Cardboard Template
The cardboard template controls the size and uniformity of your pom pom. Unlike plastic pom pom makers, cardboard is free, customizable, and accessible.
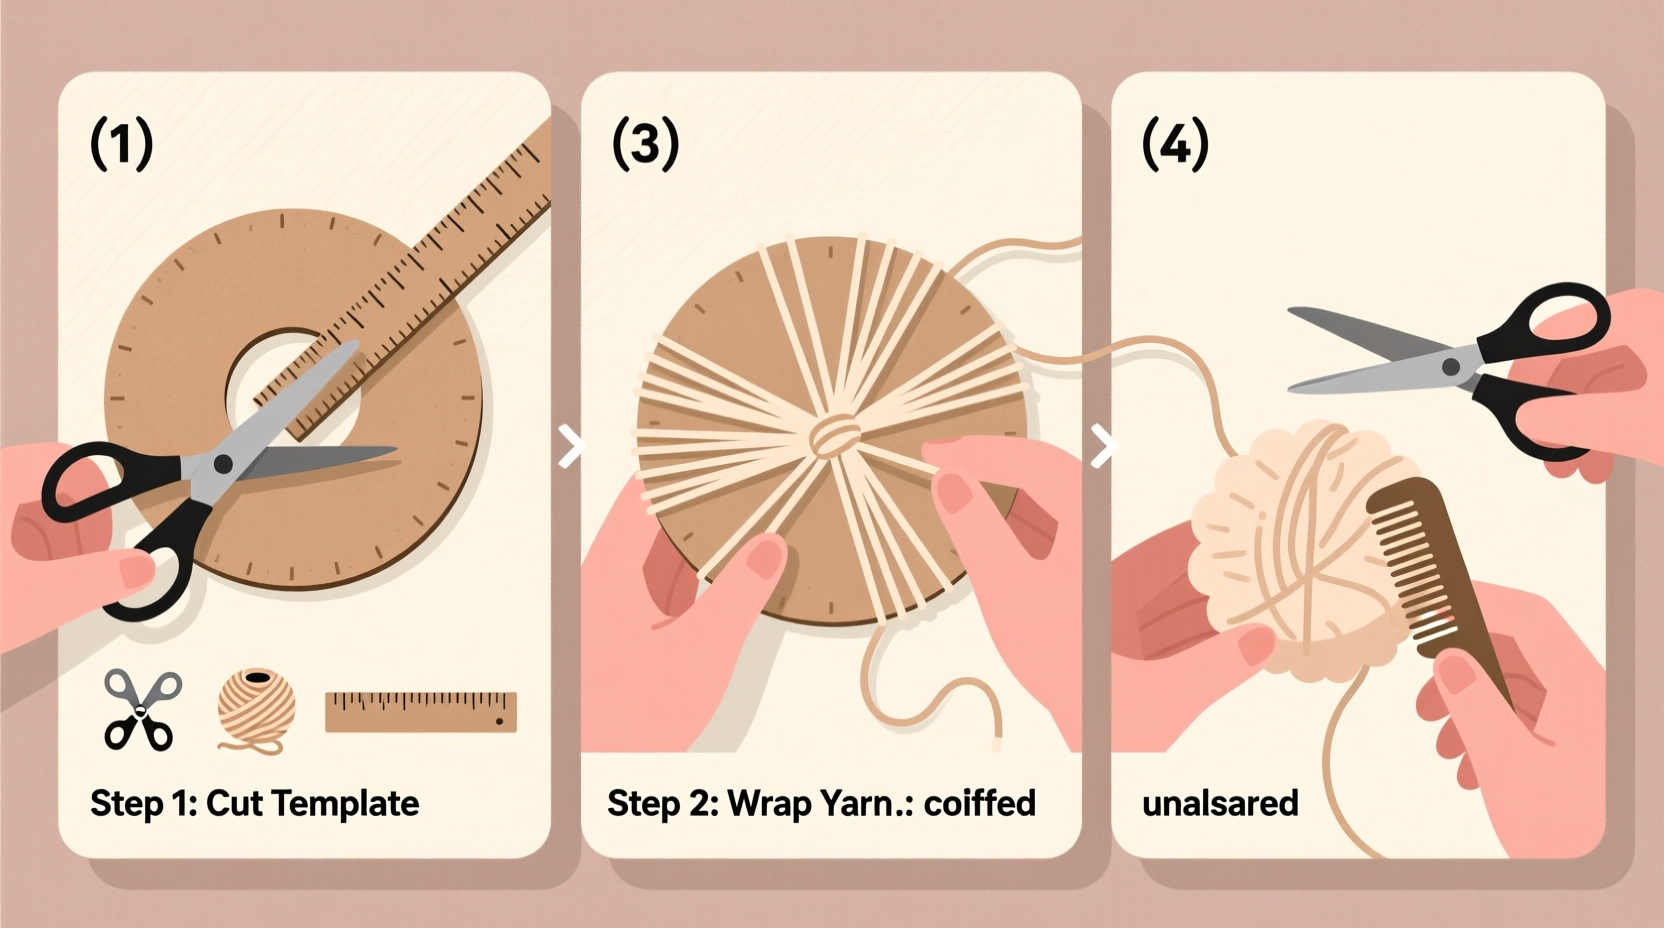
To make a standard circular template:
- Cut two identical cardboard circles. For a medium pom pom (about 3 inches), use a 3-inch diameter. Trace a bowl or lid for accuracy.
- In the center, cut out a smaller circle—roughly one-third the size of the outer circle (e.g., 1 inch). This forms a ring shape, like a donut.
- Make a single radial slit from the outer edge to the inner hole. This allows you to feed the yarn end through and begin wrapping smoothly.
For larger pom poms (4–5 inches), scale up both diameters proportionally. Smaller ones (1–2 inches) are ideal for garlands or baby items.
| Desired Pom Pom Size | Outer Circle Diameter | Inner Hole Diameter |
|---|---|---|
| 1.5 inches | 2 inches | 0.75 inches |
| 3 inches | 3 inches | 1 inch |
| 5 inches | 5 inches | 1.75 inches |
Wrapping and Building Volume
How densely you wrap the yarn directly affects the final fluffiness. Under-wrapping leads to sparse, lopsided results; over-wrapping makes trimming difficult.
Follow these steps for optimal coverage:
- Place the two cardboard rings together. Insert the yarn tail through the slit and secure it between the layers.
- Begin wrapping the yarn around the ring, moving clockwise or counterclockwise. Keep tension even but not tight enough to bend the cardboard.
- Continue wrapping until the center hole is nearly filled and the outer edge is densely covered. For a 3-inch template, aim for at least 100 wraps—more for extra fluff.
The goal is to build thickness so that when you cut the outer looped edge, there’s enough yarn mass to form a plush ball.
“Pom poms live and die by their density. I always wrap at least 120 times for a 3-inch ring—it’s the secret to that professional bounce.” — Lena Ruiz, Fiber Artist & Craft Instructor
Securing, Cutting, and Fluffing
Now comes the transformation—from wrapped ring to fluffy sphere.
- Once fully wrapped, slide a 12-inch piece of strong yarn (or dental floss) between the two cardboard layers along the inner circle.
- Tie a double knot as tightly as possible. This binds the core and prevents unraveling.
- Carefully cut along the outer edge of the ring, following the looped yarn all the way around. Use sharp scissors and cut cleanly through each strand.
- Gently pull the cardboard halves apart. The tied center will hold the pom pom together.
- Trim any uneven strands to shape the pom pom into a smooth, round ball. Rotate as you cut for symmetry.
- Shake and fluff vigorously. The more you shake, the fluffier it becomes.
For multicolored effects, alternate yarn colors every 20 wraps. Or layer different textures—chenille with wool—for visual interest.
Mini Case Study: Holiday Garland Success
Sophie, a kindergarten teacher in Portland, needed cheerful classroom décor for winter. She wanted a reusable, non-plastic garland that her students could help make. Using cereal box cardboard and leftover acrylic yarn, she created 3-inch templates with her utility knife. Each child wrapped a pom pom in holiday colors—crimson, forest green, gold.
After tying and cutting, they trimmed their creations with supervision. Within two hours, they’d made 40 pom poms. Sophie strung them onto jute twine with a tapestry needle. The result was a vibrant, tactile garland that lasted three seasons. “The kids still ask if we can ‘make yarn donuts’ again,” she said. “It’s now a December tradition.”
Common Pitfalls and How to Avoid Them
Even simple crafts have hidden challenges. Awareness prevents frustration.
| Issue | Why It Happens | Solution |
|---|---|---|
| Pom pom falls apart | Core tie was too loose or weak yarn used | Double-knot with thick yarn; pull with pliers if needed |
| Lopsided shape | Uneven wrapping or cutting | Wrap methodically; rotate the ring as you go |
| Not fluffy enough | Too few wraps or overly aggressive trimming | Wrap at least 100 times; trim lightly in stages |
Checklist: Making Fluffy Pom Poms with Cardboard Templates
- ☐ Gather yarn, cardboard, scissors, and strong tying thread
- ☐ Cut two matching cardboard rings with a center hole and radial slit
- ☐ Sandwich rings together and anchor yarn end through the slit
- ☐ Wrap yarn densely—minimum 100 times for a 3-inch ring
- ☐ Insert and tightly knot a tie string around the inner circle
- ☐ Cut the outer loops all the way around
- ☐ Remove cardboard and trim for a rounded shape
- ☐ Shake, fluff, and admire your creation
FAQ
Can I reuse the cardboard templates?
Yes, as long as they remain intact. Stiff, uncreased cardboard can be reused dozens of times. Store them flat in a craft box.
How do I attach a pom pom to a hat or tassel?
Leave a long tie-end when securing the core. Use this tail to sew the pom pom directly onto fabric. For tassels, leave the top string extended and knot it to a keyring or zipper pull.
What’s the best way to clean a dusty pom pom?
Revive flattened or dusty pom poms by placing them in a clean mesh laundry bag and tumbling on air-only cycle for 10 minutes. Alternatively, gently hand-fluff and spot-clean with a damp cloth.
Conclusion
Making fluffy pom poms with cardboard templates is a satisfying blend of simplicity and craftsmanship. No machines, no cost, no waste—just creativity shaped by your hands. Once mastered, the technique becomes second nature, opening doors to personalized décor, heartfelt gifts, and engaging group activities.


 浙公网安备
33010002000092号
浙公网安备
33010002000092号 浙B2-20120091-4
Comments
No comments yet. Why don't you start the discussion?