
Smartphone photography has transformed how we capture life’s moments, but even the best shots can end up sideways or backward. Whether you snapped a portrait in landscape mode or need to mirror a selfie for symmetry, knowing how to quickly rotate and flip photos on your iPhone is essential. The good news? You don’t need third-party apps or advanced editing skills. Apple’s native Photos app offers intuitive tools that let you correct orientation and reflect images with just a few taps. Master these techniques to keep your gallery polished and professional—without the hassle.
Why Photo Orientation Matters
A well-composed photo loses impact when it's rotated incorrectly. Misaligned images disrupt visual flow, especially when sharing on social media or creating digital albums. Many users assume their iPhone automatically fixes orientation, but this isn’t always reliable—especially when transferring photos between devices or using certain camera modes. Additionally, flipping an image horizontally can be useful for checking symmetry, preparing graphics, or correcting mirror-reversed selfies.
Understanding how to manually control rotation and flipping gives you full creative authority over your visuals. It ensures consistency across your library and enhances the overall quality of your shared content.
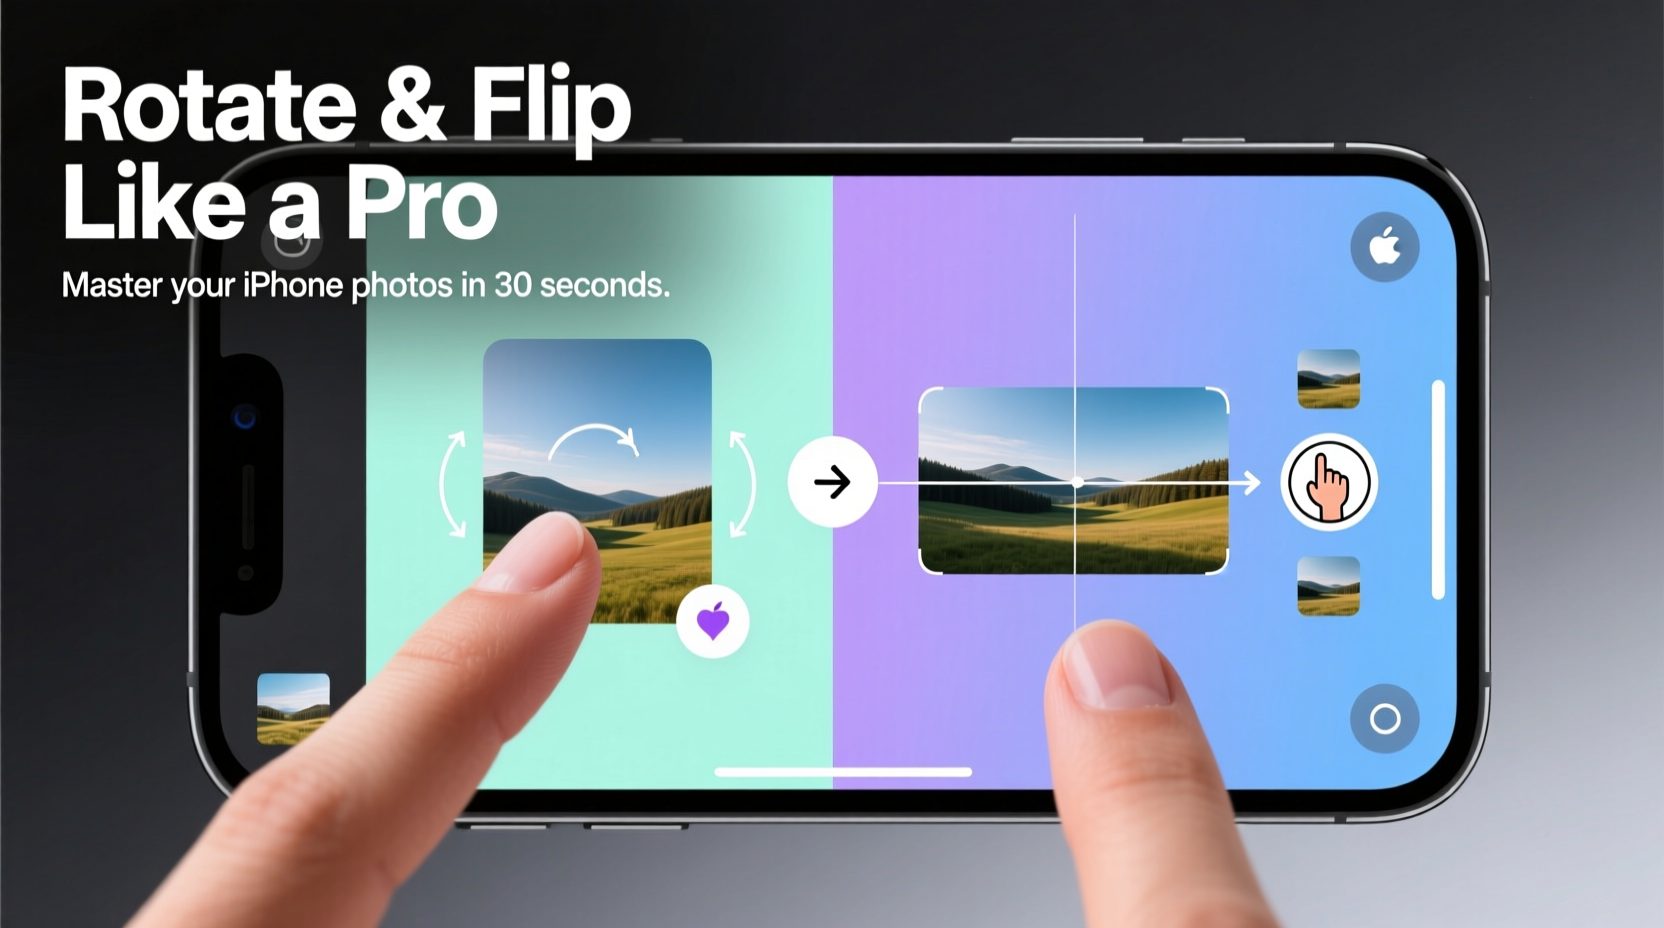
Step-by-Step: How to Rotate Photos in the Photos App
The most common issue is a photo that appears sideways. Fortunately, rotating it upright takes seconds using the iPhone’s built-in editor.
- Open the Photos app and select the image you want to rotate.
- Tap Edit in the top-right corner.
- Tap the Crop icon (a square with arrows) at the bottom menu.
- In the toolbar that appears, tap the Rotate icon (an arrow circling a square).
- Each tap rotates the image 90 degrees clockwise. Continue until the photo is correctly oriented.
- Tap Done to save changes.
This method works for all photo formats, including HEIC and JPEG. The rotation metadata is embedded directly into the image file, so the correction persists across devices and platforms.
How to Flip (Mirror) a Picture on iPhone
Unlike rotation, the native Photos app doesn’t include a dedicated “flip” tool. However, you can achieve a mirrored effect using a simple workaround with the Markup feature—a hidden gem many users overlook.
- Select the photo in the Photos app and tap Edit.
- Tap the More button (three dots) in the top-right corner.
- Choose Markup from the menu.
- Once in Markup mode, tap the + Add button (a circle with a plus) in the top-left.
- Select Image and choose the same photo from your library.
- With the image selected, tap the Flip option (two opposing arrows) at the bottom.
- Adjust the size if needed, then tap Done.
- Tap Done again to exit Markup and save.
The result is a flipped version of your original photo. While this method overlays the image rather than modifying it directly, the output is visually identical and ready to share.
“Flipping a selfie reveals how others see you—often a surprising difference from the mirror image you're used to.” — Dr. Lena Torres, Visual Perception Researcher
Do’s and Don’ts of Photo Rotation and Flipping
| Do’s | Don’ts |
|---|---|
| Use the Rotate tool for quick 90-degree adjustments | Assume all apps preserve rotation after export |
| Save originals before heavy editing | Overuse flipping unless it serves a purpose (e.g., symmetry check) |
| Leverage Markup for mirroring without third-party apps | Ignore orientation issues when printing or framing photos |
| Check photo alignment before sharing on Instagram or email | Forget to update iOS—newer versions improve editing accuracy |
Real Example: Fixing a Family Portrait Gone Sideways
Sarah was compiling a digital album for her parents’ anniversary when she noticed a key group photo was rotated 90 degrees left. She had taken it quickly during a beach picnic, holding the phone vertically, but the horizon ended up vertical instead of horizontal. After uploading several images to a cloud gallery, she realized the misalignment disrupted the layout.
Using the crop and rotate tool in the Photos app, Sarah corrected the orientation in under a minute. She then used the Markup method to create a mirrored version for comparison, ensuring no faces were distorted. The final album looked cohesive, and her parents praised the attention to detail. This small fix saved the presentation—and reminded her that minor edits make a major difference.
Alternative Methods Using Third-Party Apps
While the native tools are sufficient for most needs, some users prefer more control. Apps like Snapseed, Adobe Lightroom Mobile, and VSCO offer advanced flipping and rotation options, including freeform angle adjustment and batch processing.
- Snapseed: Offers a “Rotate” tool with auto-straighten and manual flip functions.
- Adobe Lightroom: Provides precise angle rotation and horizontal/vertical flipping with non-destructive editing.
- VSCO: Includes basic flip controls within its crop tool, ideal for social media prep.
These apps are especially useful if you frequently edit photos or work with RAW files. However, for everyday corrections, sticking to the built-in Photos app keeps things fast and clutter-free.
Frequently Asked Questions
Can I rotate a Live Photo?
Yes. When you rotate a Live Photo using the Edit > Crop > Rotate function, both the still frame and the video component rotate together. The Live effect remains intact after rotation.
Why does my photo revert to the original orientation after sending it?
This usually happens due to EXIF orientation tags not being properly recognized by the receiving app or device. Always rotate and save the photo before sharing. Sending via iMessage or AirDrop typically preserves orientation better than MMS or some social platforms.
Is there a way to flip a photo without using Markup?
Not natively in the Photos app. Markup is currently the only built-in method to mirror an image. Alternatively, you can use the front-facing camera in “mirror mode” when taking selfies—some third-party camera apps offer this setting to avoid post-flipping altogether.
Maintaining Photo Integrity Across Devices
One overlooked aspect of photo editing is consistency across ecosystems. A rotated image may display correctly on your iPhone but appear sideways on a Windows PC or smart TV. This occurs because different systems interpret EXIF data differently.
To prevent this, always finalize rotation in the Photos app before exporting. When in doubt, take a screenshot of the correctly oriented photo or export it as a new file after editing. This embeds the orientation directly into the pixel data, eliminating reliance on metadata.
Conclusion: Take Control of Your Visual Storytelling
Rotating and flipping photos shouldn’t be an afterthought. With just a few taps, you can ensure every image in your library looks intentional and polished. Whether you’re curating memories, preparing content, or simply fixing a crooked horizon, these effortless techniques empower you to edit like a pro—using only what your iPhone already provides.


 浙公网安备
33010002000092号
浙公网安备
33010002000092号 浙B2-20120091-4
Comments
No comments yet. Why don't you start the discussion?