
When preparing to sell, trade in, or give away your iPhone, protecting your personal information is non-negotiable. Two options often come up during this process: “Erase iPhone” and “Remove from Find My.” While they sound similar—and are both found within Apple’s ecosystem—they serve fundamentally different purposes. One permanently deletes your data; the other does not. Confusing them could leave your photos, messages, passwords, and financial details exposed. Understanding the difference isn’t just helpful—it’s essential for digital safety.
What Happens When You Erase iPhone?
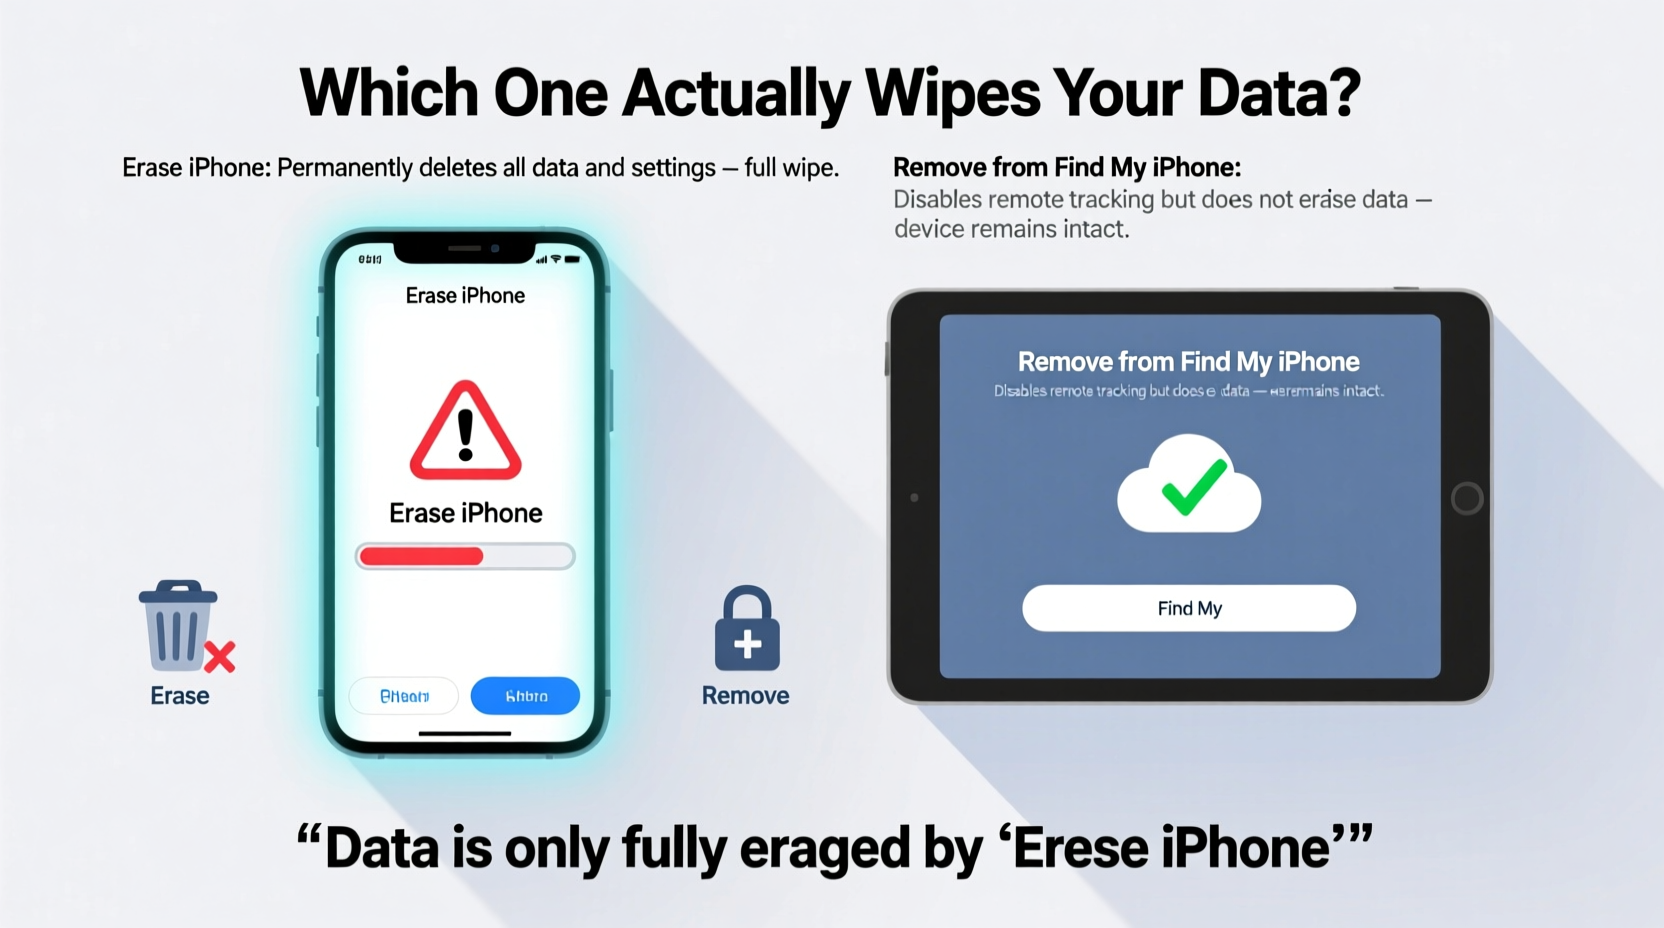
Selecting “Erase iPhone” initiates a full factory reset of your device. This process removes all personal data, apps, settings, media, and accounts stored locally on the phone. It's designed to return the iPhone to its original out-of-the-box state—just as if it had never been used.
The erase process works by deleting the encryption keys that protect your data. Modern iPhones use hardware-based encryption (via the Secure Enclave), meaning your files are scrambled and inaccessible without these keys. Once erased, even advanced recovery tools cannot retrieve your information under normal circumstances.
This option is accessible through:
- Settings > General > Transfer or Reset iPhone > Erase All Content and Settings
- iCloud.com > Find > All Devices > [Your iPhone] > Erase [Device]
- Finding My app (on another Apple device) > Devices > Select iPhone > Erase This Device
What Does “Remove from Find My” Actually Do?
Removing your iPhone from your Apple ID via Find My does not erase any data from the device itself. Instead, it simply detaches the iPhone from your iCloud account and disables Activation Lock—the security feature that prevents unauthorized users from setting up your iPhone after a reset.
If someone tries to erase or reactivate an iPhone still linked to your Apple ID, they’ll be prompted for your password due to Activation Lock. By removing the device from your account, you disable this lock—but only if the phone has already been erased. If you skip erasing and only remove it from Find My, the device remains fully loaded with your personal data, completely unprotected.
In short: Removing from Find My is about account management, not data deletion.
“Many users assume de-registering a device means it’s wiped. That’s a dangerous misconception. The data stays unless explicitly erased.” — Lisa Tran, Senior Security Analyst at MobileTrust Labs
Erase iPhone vs Remove from Find My: Key Differences
| Action | Data Wiped? | Activation Lock Removed? | Device Still Usable? | Recommended Before Selling? |
|---|---|---|---|---|
| Erase iPhone | Yes – all local data deleted | No – still linked to Apple ID | Yes – but requires Apple ID to activate | Partially – must also remove from Find My |
| Remove from Find My | No – data remains intact | Yes – Activation Lock disabled | Yes – ready for new user | No – unsafe if not erased first |
| Erase + Remove from Find My | Yes – complete wipe | Yes – clean handoff | Yes – secure and transferable | ✅ Yes – gold standard |
The safest approach combines both actions—but in the correct order. First, erase the iPhone. Then, if it hasn’t automatically detached, remove it from your Find My list. Attempting to remove it first leaves your data vulnerable.
Step-by-Step: How to Safely Prepare Your iPhone for Transfer
To ensure your privacy and allow the new owner full access, follow this verified sequence:
- Back Up Your Data: Use iCloud or iTunes/Finder to create a complete backup. Go to Settings > [Your Name] > iCloud > iCloud Backup > Back Up Now.
- Sign Out of iCloud and iTunes: Navigate to Settings > [Your Name], scroll down, and tap “Sign Out.” Confirm and enter your password when prompted.
- Erase All Content and Settings: Go to Settings > General > Transfer or Reset iPhone > Erase All Content and Settings. Enter your passcode and Apple ID password if required.
- Wait for Completion: The phone will reboot and display the \"Hello\" screen. This may take several minutes.
- Verify Removal from Find My: On a computer or another device, visit iCloud.com, sign in, open Find, go to Devices, and confirm your iPhone no longer appears. If it does, select it and click “Remove from Account.”
Real-World Example: A Costly Mistake
Mark decided to upgrade his iPhone 13 and sold it through an online marketplace. Wanting to make setup easy for the buyer, he went into Find My, selected his device, and clicked “Remove from Account.” He believed this cleared everything. The buyer received the phone, turned it on, and was greeted with Mark’s home screen—apps, photos, banking apps with saved logins, and years of text messages.
It wasn’t until Mark received a notification that someone had logged into his email from a new location that he realized his error. He had removed the device from his account but never erased it. His personal life was now in the hands of a stranger.
After contacting Apple Support and resetting all his passwords, Mark learned the hard way: removal ≠ erasure.
Common Misconceptions About iPhone Data Removal
Several myths persist around what constitutes a secure wipe:
- Myth: Logging out of iCloud is enough.
Truth: Local data remains unless erased. - Myth: Turning off Find My disables tracking.
Truth: Activation Lock remains active until erased or manually removed. - Myth: A restored iPhone is always clean.
Truth: If restoration fails midway, some data may remain recoverable.
FAQ: Clearing Up Confusion
Does removing an iPhone from Find My erase it?
No. Removing a device from Find My only unlinks it from your Apple ID. The phone retains all data unless you’ve already performed a factory reset.
Can someone access my data if I only remove the phone from Find My?
Yes, absolutely. If the device hasn’t been erased, anyone who turns it on can access your apps, messages, photos, and potentially sensitive accounts—especially if AutoFill or saved passwords were enabled.
Will erasing my iPhone remove it from my account automatically?
Usually, yes—especially if done through the device or while signed in to iCloud. However, if the phone is offline or the process fails, it may remain listed. Always double-check iCloud to confirm removal.
Final Checklist Before Selling or Giving Away Your iPhone
- ✅ Backed up all data to iCloud or computer
- ✅ Signed out of iCloud and iTunes & App Store
- ✅ Turned off Find My iPhone (or initiated remote erase)
- ✅ Completed “Erase All Content and Settings”
- ✅ Verified the device shows the welcome screen
- ✅ Confirmed removal from iCloud.com/devices list
- ✅ Removed SIM card and any accessories with personal value
Conclusion: Protect Yourself with the Right Steps
“Erase iPhone” is the only action that truly wipes your data. “Remove from Find My” is a follow-up step for account cleanup—not a substitute for a reset. Performing one without the other creates either a locked, unusable device or a data breach waiting to happen.
Taking a few extra minutes to follow the proper procedure protects your identity, finances, and peace of mind. Whether you’re upgrading, recycling, or gifting your iPhone, treat data removal like locking your front door: don’t assume it’s secure until you’ve checked yourself.


 浙公网安备
33010002000092号
浙公网安备
33010002000092号 浙B2-20120091-4
Comments
No comments yet. Why don't you start the discussion?