
A well-sealed aquarium is the foundation of a healthy, stable aquatic environment. Whether you're building a new tank or repairing an older one, ensuring a watertight seal prevents leaks, structural failure, and costly damage to your home. Silicone sealing isn't just about sticking glass together—it's a precise process that demands attention to detail, patience, and the right materials. Done correctly, a properly sealed aquarium can last decades without issues. This guide walks through every critical phase: from understanding sealant types to executing a flawless reseal, complete with expert insights and real-world examples.
Why Proper Sealing Matters
The integrity of an aquarium depends entirely on its silicone seals. Water exerts constant pressure on the seams, especially in larger tanks. A weak or improperly applied seal can fail over time, leading to slow seepage or sudden catastrophic leaks. Beyond water damage, a leaking tank endangers fish, plants, and equipment. Moreover, poor sealing often results from DIY mistakes—using the wrong silicone, skipping surface prep, or rushing the curing process.
Professional-grade aquariums use high-strength, non-toxic silicone specifically formulated for prolonged water exposure. Unlike standard bathroom caulk, aquarium-safe silicone remains flexible, resists mold, and bonds permanently to glass. Understanding this distinction is crucial before beginning any sealing project.
“Over 70% of aquarium failures I see stem from improper silicone application—not material defects.” — Daniel Reyes, Aquarium Fabrication Specialist with 18 years of experience
Choosing the Right Sealant: Do’s and Don’ts
Not all silicones are created equal. Using the wrong type can compromise both safety and durability. The key is selecting a 100% neutral-cure silicone free from fungicides, mildewcides, or solvents, which are toxic to aquatic life.
| Product Type | Safe for Aquariums? | Reason |
|---|---|---|
| 100% Silicone (Neutral Cure) | ✅ Yes | No additives; fully safe after curing |
| Acetic Cure Silicone (Vinegar Smell) | ⚠️ Use with caution | Acidic fumes during cure may linger; not recommended for sensitive setups |
| Mold-Resistant Bathroom Caulk | ❌ No | Contains biocides harmful to fish |
| Marine-Grade Silicone | ✅ Yes | Specifically designed for saltwater environments; excellent adhesion |
Step-by-Step Guide to Resealing Your Aquarium
Whether you’re fixing a small leak or rebuilding a secondhand tank, follow this methodical approach to ensure a permanent, waterproof bond.
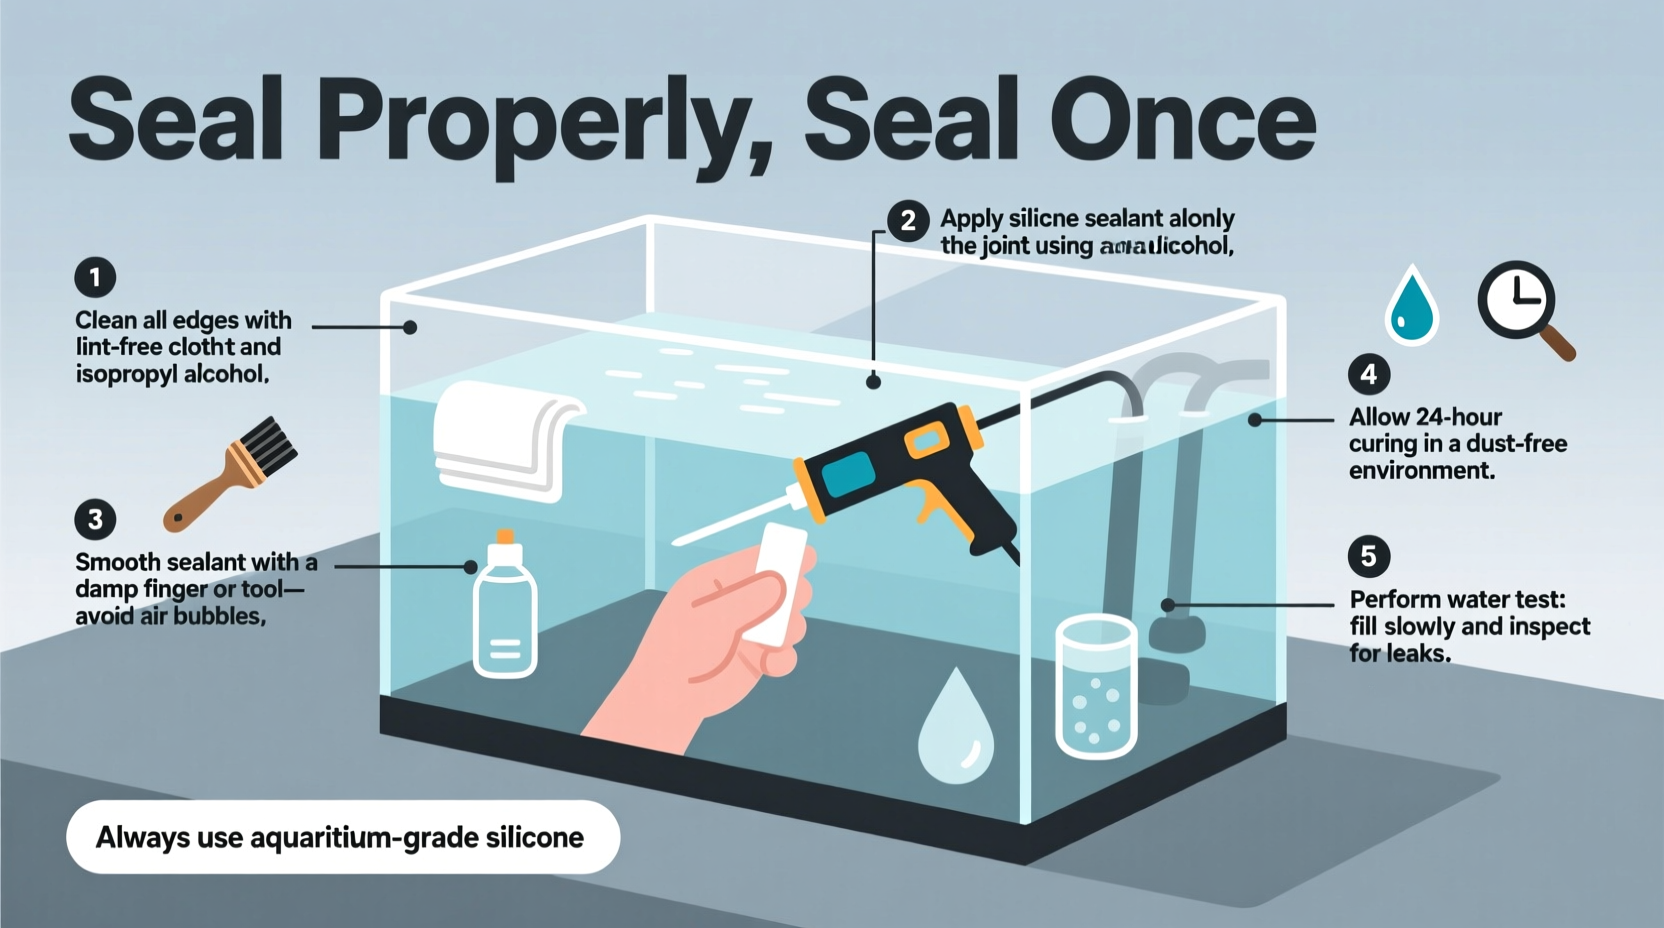
- Drain and Disassemble: Remove all water, substrate, decorations, and equipment. If resealing only the bottom seam, leave panels intact. For full rebuilds, carefully separate glass pieces using a razor blade or plastic scraper.
- Clean All Surfaces Thoroughly: Use isopropyl alcohol and lint-free cloth to wipe down edges where silicone will adhere. Any oil, algae, or old residue compromises bonding.
- Remove Old Silicone Completely: Use a single-edge razor or silicone removal tool to scrape out degraded sealant. Work slowly to avoid scratching glass. Ensure joints are clean and dry.
- Mask the Edges (Optional but Recommended): Apply painter’s tape along the inside and outside edges of each seam. This creates clean lines and prevents messy overflow.
- Apply New Silicone Evenly: Cut the nozzle at a 45° angle and apply steady pressure to lay a continuous bead into the joint. Press firmly with a silicone smoothing tool or damp finger to ensure full contact and eliminate air pockets.
- Allow Proper Curing Time: Most silicones require 24–48 hours to skin over, but full cure takes 7 days. Avoid handling or filling during this period. Higher humidity can speed curing; low temperatures slow it.
- Test Before Use: Fill the tank with water and let it sit for 24–48 hours in a safe location (like a garage or bathtub). Check for drips, bulges, or weeping seams.
Pro Technique: Double-Sealing for Maximum Strength
For tanks over 50 gallons or custom builds, consider applying a secondary interior bead after the first has cured. This “double seal” adds redundancy and improves structural rigidity. It’s commonly used in public aquarium construction and commercial systems.
Real Example: Reviving a Vintage Tank
Mark T., an aquarist in Portland, purchased a used 75-gallon glass tank from a local thrift store. Excited to repurpose it, he filled it immediately—only to discover a slow drip at the bottom corner within hours. Instead of discarding it, Mark drained the tank, removed all old silicone, and resealed it using marine-grade 100% silicone. He masked the seams, applied two even beads, and waited seven full days before refilling. The tank has held strong for over three years, now housing a thriving planted community. His mistake? Skipping the test fill. His lesson? “Patience beats urgency every time.”
Essential Checklist for a Leak-Proof Result
- ✔️ Confirm silicone is labeled “aquarium safe” and 100% pure
- ✔️ Clean all glass surfaces with alcohol before application
- ✔️ Remove every trace of old silicone from seams
- ✔️ Work in a dust-free, dry environment
- ✔️ Apply consistent, uninterrupted beads without gaps
- ✔️ Smooth silicone for maximum adhesion and aesthetics
- ✔️ Allow full 7-day cure before testing or installing
- ✔️ Conduct a water test for at least 24 hours
Frequently Asked Questions
Can I patch a small leak instead of resealing the entire tank?
Minor edge leaks can sometimes be patched if the surrounding seal is sound. Clean the area thoroughly, roughen slightly with fine sandpaper, and apply a thin layer of aquarium-safe silicone. However, if the original seal is aged or cracked elsewhere, a full reseal is safer and more cost-effective long-term.
How do I know if my tank needs resealing?
Signs include water stains near seams, fogging between panes (in rimless tanks), visible cracks in silicone, or actual dripping. Older tanks (10+ years) should be inspected annually, even without obvious symptoms.
Is it safe to use the tank during silicone curing?
No. Uncured silicone emits acetic acid (in acetic-cure types) or other byproducts that are toxic to fish. Never introduce livestock until the sealant has fully cured and the tank has been rinsed and tested.
Final Tips for Long-Term Success
Even the best seal degrades over time under constant stress. To extend the life of your aquarium’s integrity:
- Place the tank on a level, sturdy stand that distributes weight evenly.
- Avoid moving a filled tank, as shifting water stresses seams.
- Inspect seals annually, especially in tanks over 5 years old.
- Keep the area around the tank dry—standing water accelerates silicone breakdown.
Conclusion
Sealing an aquarium properly is not a shortcut task—it’s an investment in safety, longevity, and peace of mind. With the right materials, technique, and patience, you can build or restore a tank that performs flawlessly for years. Whether you're reviving a vintage gem or reinforcing a modern setup, precision and care make all the difference. Take your time, follow best practices, and trust the process. Your aquatic ecosystem—and your floor—will thank you.


 浙公网安备
33010002000092号
浙公网安备
33010002000092号 浙B2-20120091-4
Comments
No comments yet. Why don't you start the discussion?