
Installing a gas line for your stove is a significant home improvement task that requires precision, knowledge, and strict adherence to safety standards. Natural gas provides efficient cooking power, but improper installation can lead to leaks, fires, or even carbon monoxide exposure. While some homeowners attempt DIY installations, the risks involved make it essential to understand both the technical process and the critical safety protocols. This guide walks through every phase—from planning to final inspection—with actionable advice, expert insights, and real-world considerations.
Understanding Gas Line Basics and Risks
Natural gas is delivered under pressure through rigid black iron or corrugated stainless steel tubing (CSST). These materials resist corrosion and maintain integrity over time when properly installed. Unlike electrical work, gas line errors don’t just cause inconvenience—they can be life-threatening. Even a small leak can accumulate in enclosed spaces, creating an explosive environment.
The primary dangers include:
- Gas leaks leading to fire or explosion
- Carbon monoxide buildup from incomplete combustion
- Improper venting due to incorrect pipe sizing
- Violation of local building codes resulting in fines or failed inspections
“Gas line installation isn’t about saving money with a DIY fix—it’s about ensuring long-term safety. One faulty joint can compromise an entire household.” — Daniel Reeves, Master Plumber and HVAC Inspector
Pre-Installation Planning and Permits
Before touching a wrench, confirm whether your project requires permits. Most jurisdictions mandate licensed professionals to handle gas piping, especially when connecting to the main supply line. Skipping this step may void homeowner insurance in case of accidents.
Key planning steps:
- Determine the correct pipe size based on stove BTU requirements (typically ½-inch diameter for residential stoves).
- Map out the shortest, most direct route from the gas meter or supply line to the stove location.
- Verify clearance distances from walls, outlets, and combustible materials (minimum 3 inches is standard).
- Contact your local utility company to discuss load capacity and possible upgrades.
| Factor | What to Check | Common Mistake |
|---|---|---|
| Pipe Material | Black iron vs. CSST suitability | Using flexible gas hose as permanent line |
| BTU Load | Stove specs vs. system capacity | Oversizing causing low pressure |
| Permits | Local code requirements | Assuming no permit needed |
| Shut-off Valve | Accessible location near appliance | Installing behind cabinetry |
Step-by-Step Installation Guide
This procedure assumes access to the main gas line and basic plumbing tools. If you're unsure at any point, consult a licensed technician.
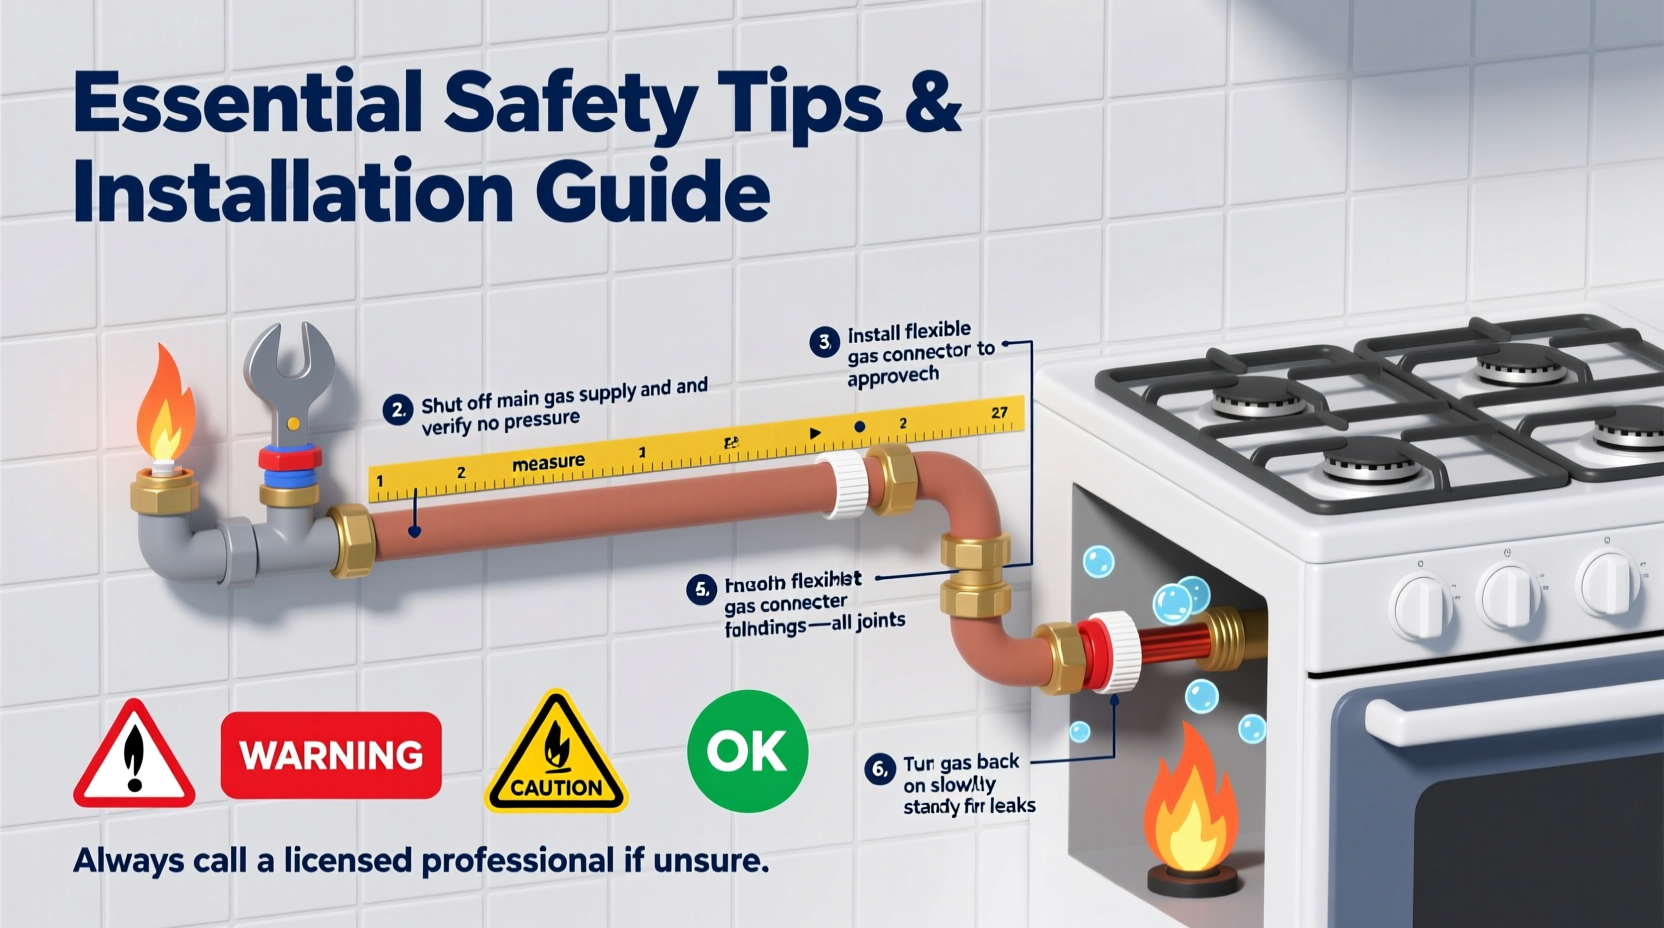
- Turn Off Main Gas Supply
Locate the outdoor gas meter shut-off valve and rotate it 90 degrees to block flow. Confirm shutdown by attempting to light a burner—no flame should appear. - Install a T-Fitting on Existing Line
Cut into the existing gas line using a pipe cutter (not a hacksaw, which creates debris). Clean edges thoroughly. Thread a T-fitting rated for gas lines and apply yellow PTFE tape (gas-rated thread sealant) clockwise on male threads only. Hand-tighten first, then use a wrench for one-quarter turn past hand-tight. - Run New Pipe to Stove Location
Use schedule 40 black iron pipe supported every 4 feet vertically and 6 feet horizontally. Slope slightly toward the main line to prevent condensation pooling. Avoid sharp bends; use factory-made elbows instead of field-threaded joints. - Install Shutoff Valve Near Appliance
Within 6 feet of the stove and in clear view, install a quarter-turn ball valve. This allows quick isolation during maintenance or emergencies. - Connect Flex Connector to Stove
Use a UL-listed stainless steel flex connector (maximum 36 inches long). Connect to the stub-out using a flare nut and ensure no kinks or stress on the fitting. - Pressure Test the System
Seal all ends and pressurize the line to 3–5 psi using nitrogen or air. Monitor pressure gauge for 15 minutes. A drop indicates a leak. Use soapy water solution to locate bubbles at joints. - Schedule Final Inspection
Have a city inspector verify compliance with NFPA 54 (National Fuel Gas Code). Only after approval should gas be restored.
Real-World Scenario: The Cost of Cutting Corners
In suburban Denver, a homeowner rerouted a gas line to accommodate a kitchen remodel. Believing the job was simple, he used a plastic-coated CSST without proper grounding and skipped the pressure test. Two weeks later, a minor leak developed near a poorly sealed elbow. The odor went unnoticed until a spark from a nearby outlet triggered a flash fire. Fortunately, no one was injured, but the kitchen sustained $40,000 in damage. An investigation revealed unlicensed work and non-compliant materials. Insurance denied the claim due to violation of policy terms requiring licensed contractors for gas work.
This case underscores why corners shouldn’t be cut—even for seemingly minor tasks. Professional oversight protects more than just property; it safeguards lives.
Safety Checklist Before Turning On the Gas
- ✅ All threaded connections tightened with proper sealant
- ✅ No obstructions or kinks in flex connector
- ✅ Shut-off valve easily accessible and labeled
- ✅ Ventilation adequate around stove area
- ✅ Carbon monoxide detector installed nearby
- ✅ Pressure test completed with no drop
- ✅ Final inspection passed by local authority
Frequently Asked Questions
Can I install a gas line myself?
While some states allow homeowners to perform their own gas work if they pass an exam, most require licensed plumbers. Even where permitted, liability and safety concerns make hiring a pro advisable. Mistakes are not visible like water leaks—they’re silent until disaster strikes.
How much does professional gas line installation cost?
Average costs range from $300 to $800 depending on distance, wall access, and local rates. Complex jobs involving slab drilling or long runs may exceed $1,200. Consider this a worthwhile investment compared to potential repair or injury costs.
What kind of connector should I use between the pipe and stove?
Only use a CSA- or UL-listed stainless steel corrugated flex connector designed for gas appliances. Avoid rubber hoses or generic tubing—they degrade quickly and pose fire hazards.
Final Steps and Ongoing Safety Practices
After successful inspection and activation, monitor the stove during its first few uses. Smell for gas (rotten egg odor), listen for hissing, and watch flames—blue indicates clean combustion; yellow or floating flames suggest issues. Test your carbon monoxide detector monthly and replace batteries annually.
Annual visual checks of the flex connector for cracks, bulges, or corrosion are recommended. Never store cleaning products or flammable liquids beneath the stove. Keep children away from controls and valves.
“The safest gas system is one that’s forgotten because it works perfectly. That peace of mind comes from doing it right the first time.” — Maria Tran, Building Safety Coordinator, ICC
Take Action Today—Safely
Your kitchen deserves reliable, safe energy delivery. Whether you’re upgrading from electric or relocating your stove, proper gas line installation sets the foundation for years of trouble-free use. Don’t gamble with shortcuts or uncertified work. Follow these guidelines, respect the regulations, and prioritize professional help when in doubt. Share this guide with others planning similar projects, and always put safety first—your family’s well-being depends on it.


 浙公网安备
33010002000092号
浙公网安备
33010002000092号 浙B2-20120091-4
Comments
No comments yet. Why don't you start the discussion?