
Applying nail patches at home offers a quick, damage-free alternative to traditional manicures—when done correctly. The secret to long-lasting wear and flawless appearance lies not in the patch itself, but in how well you prepare your natural nails. Skipping or rushing prep can lead to lifting, peeling, or uneven adhesion within hours. With the right technique, however, full patch applications can last up to two weeks with zero chipping. This guide walks through every critical step of nail preparation, from tools to timing, so you can achieve seamless, professional-grade results in your own bathroom.
Why Nail Preparation Matters
Nail patches are designed to adhere directly to the nail plate, forming a protective seal that mimics gel or acrylic overlays. Unlike polish, they don’t penetrate the surface—they rely on clean, dry, oil-free contact. Any residue, moisture, or texture irregularities compromise bonding strength. A poorly prepped nail creates micro-gaps where air and moisture accumulate, causing the patch to lift prematurely.
Dermatologists and nail technicians emphasize that over 70% of early patch failure stems from inadequate prep—not product quality. As Dr. Lena Torres, a cosmetic dermatologist specializing in nail health, explains:
“Adhesion is everything. You could have the most advanced patch on the market, but if your nail surface has oils, dust, or moisture, it won’t bond properly. Think of it like painting a wall—if it’s not cleaned and sanded first, the paint will peel.” — Dr. Lena Torres, MD, Cosmetic Dermatology Specialist
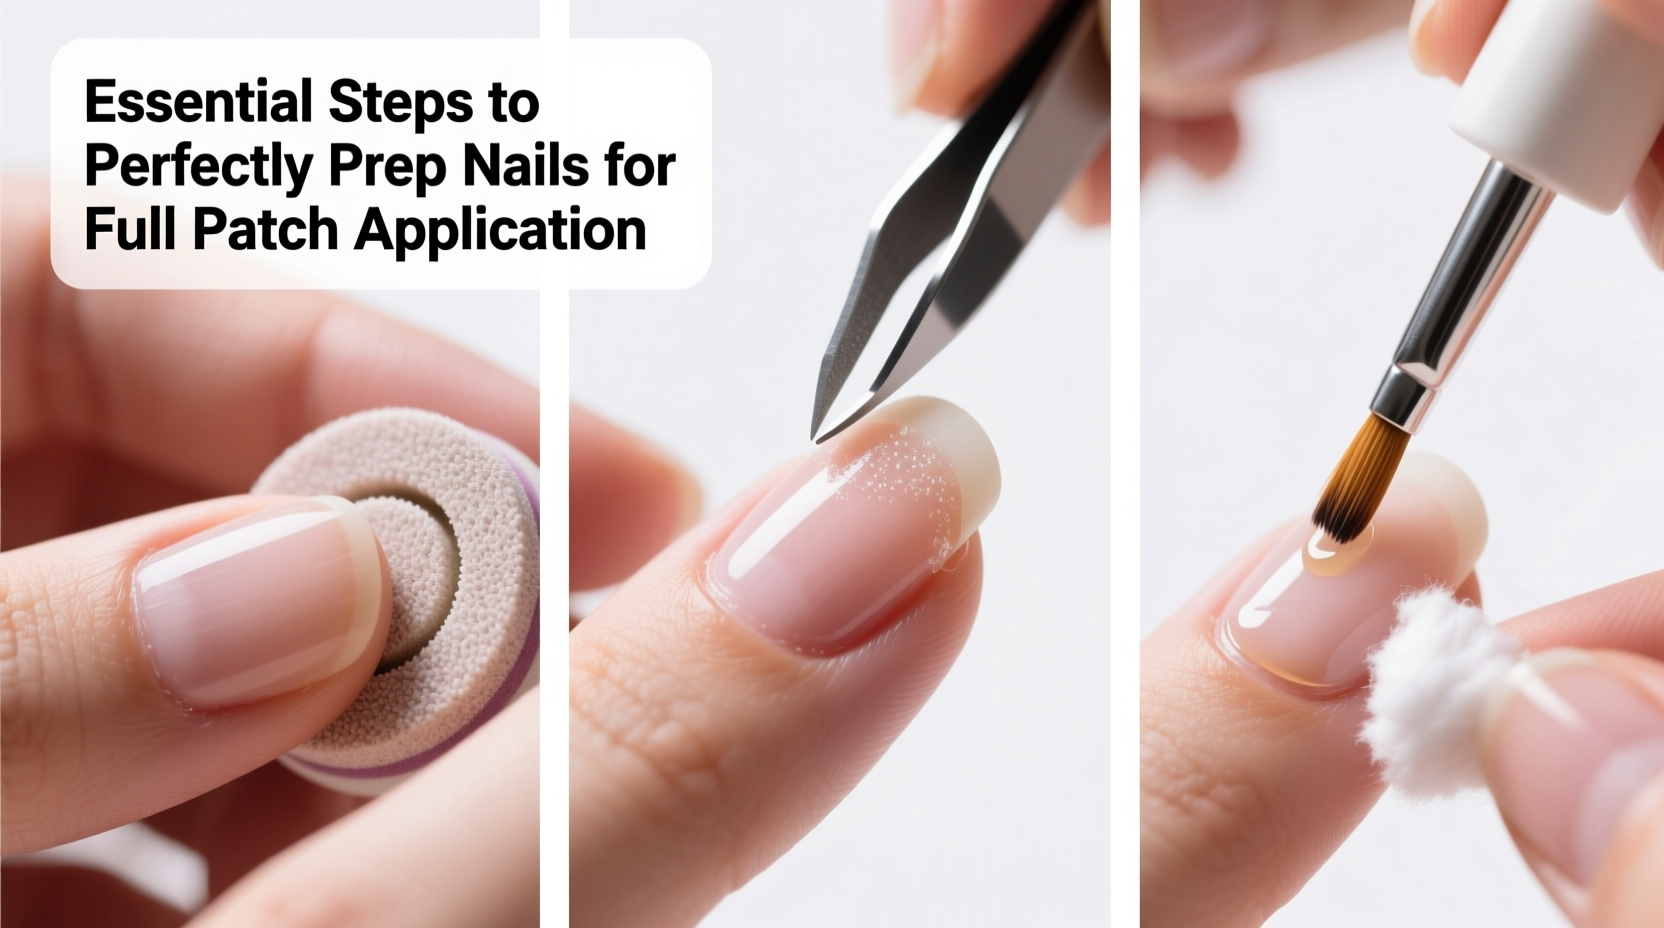
Step-by-Step Guide: Prepping Nails for Full Patch Application
Follow this precise sequence to ensure optimal adhesion and longevity. Allow 15–20 minutes for prep to avoid rushing and compromising results.
- Remove old polish and soak hands (optional)
Use acetone-free remover to wipe away any existing color. If your cuticles are dry or slightly overgrown, soak fingertips in warm, soapy water for 3–4 minutes. Do not over-soak, as excessive moisture weakens nail structure and delays drying. - Shape and file your natural nails
Trim nails to desired length using clippers, then gently shape with a 180-grit file. File in one direction only to prevent splitting. Oval or squoval shapes work best with most patch designs. Avoid pointed or stiletto cuts unless the patch specifically accommodates them. - Gently push back cuticles
After drying hands thoroughly, use a wooden cuticle stick wrapped in cotton to nudge back loose skin. Never cut cuticles at home—this increases infection risk and disrupts the nail matrix. Only remove visible hangnails with sterilized tweezers if necessary. - Buff the nail surface lightly
Use a fine-grit buffer (180–240) to smooth ridges and create a slightly matte finish. Focus on high points, not the entire surface. Over-buffing thins the nail and increases sensitivity. One pass per nail is sufficient. - Cleanse with alcohol or nail prep solution
Wipe each nail with a lint-free pad soaked in 70% isopropyl alcohol or dedicated nail dehydrator. This removes invisible oils, lotions, and sweat residue. Let nails air-dry completely—do not blow-dry or fan. - Final check and dry time
Inspect each nail under bright light. Ensure no shine remains, cuticles aren’t swollen, and edges are smooth. Wait at least 2 minutes after cleansing before applying patches to guarantee zero moisture.
Essential Tools & Products Checklist
Having the right supplies on hand streamlines the process and prevents mid-application interruptions. Here’s what you need:
- Nail clippers or scissors
- 180-grit nail file (glass or emery)
- Cuticle pusher (wooden or metal with rounded tip)
- Fine-grit buffer block (180–240 grit)
- Lint-free wipes or pads (alcohol-compatible)
- 70% isopropyl alcohol or nail prep solution
- Acetone-free nail polish remover (if needed)
- Timer or clock (to track drying intervals)
- Tweezers (for handling small patches)
Do’s and Don’ts During Nail Prep
| Do’s | Don’ts |
|---|---|
| File in one direction to prevent splitting | Use a sawing motion when filing |
| Buff lightly to remove ridges | Over-buff until nails feel thin or flexible |
| Push back cuticles gently after softening | Cut cuticles or force them aggressively |
| Wipe nails with alcohol post-buffing | Touch nails with fingers after cleaning |
| Allow full drying time before patching | Apply patches while nails are damp or oily |
A Real-Life Example: Why Prep Prevents Problems
Sophia, a remote worker in Portland, tried nail patches twice before giving up. The first set lifted within six hours; the second lasted two days but peeled at the corners. Frustrated, she watched a technician demo online and realized she’d skipped buffing and used hand lotion right before application. She repeated the process with strict prep: filed, buffed, cleansed with alcohol, and waited 3 minutes before applying. The third set stayed intact for 11 days—even through gardening and typing marathons. Her mistake wasn’t the product; it was skipping the foundational steps that create adhesion.
Common Questions About Nail Patch Prep
Can I skip buffing if my nails are smooth?
Even seemingly smooth nails have a glossy top layer that repels adhesives. Light buffing removes this shine and increases surface area for better grip. Skipping it significantly reduces wear time.
Is acetone better than alcohol for prep?
Acetone is more effective at removing oils but can be overly drying and may degrade some patch materials upon contact. Alcohol (70% isopropyl) is gentler, evaporates quickly, and is safe for both natural nails and patches. Most brands recommend alcohol-based prep.
What if my nails are weak or peeling?
Avoid patches temporarily if you have deep splits or layers peeling off. Instead, focus on strengthening with biotin treatments or nail hardeners for 2–3 weeks. Patch application on compromised nails can worsen separation. When ready, opt for partial-cover patches instead of full-coverage until strength improves.
Final Thoughts: Consistency Is Key
Perfectly prepped nails transform a DIY beauty session into a polished, enduring result. It’s not about speed—it’s about precision. Taking the time to shape, cleanse, and dehydrate each nail ensures that your full patch application doesn’t just look professional, but performs like one. Whether you’re dressing up for an event or simplifying your weekly routine, mastering prep empowers you to trust your manicure through daily life.


 浙公网安备
33010002000092号
浙公网安备
33010002000092号 浙B2-20120091-4
Comments
No comments yet. Why don't you start the discussion?