
Corrugated roofing is a popular choice for sheds, garages, agricultural buildings, and even modern residential designs due to its lightweight nature, cost-effectiveness, and excellent water runoff capabilities. However, its performance hinges entirely on proper installation—especially secure and efficient fastening. Poorly attached sheets can lead to leaks, wind uplift, corrosion, and premature failure. Understanding the right methods, tools, and materials ensures your roof remains watertight, stable, and long-lasting.
Selecting the Right Fasteners
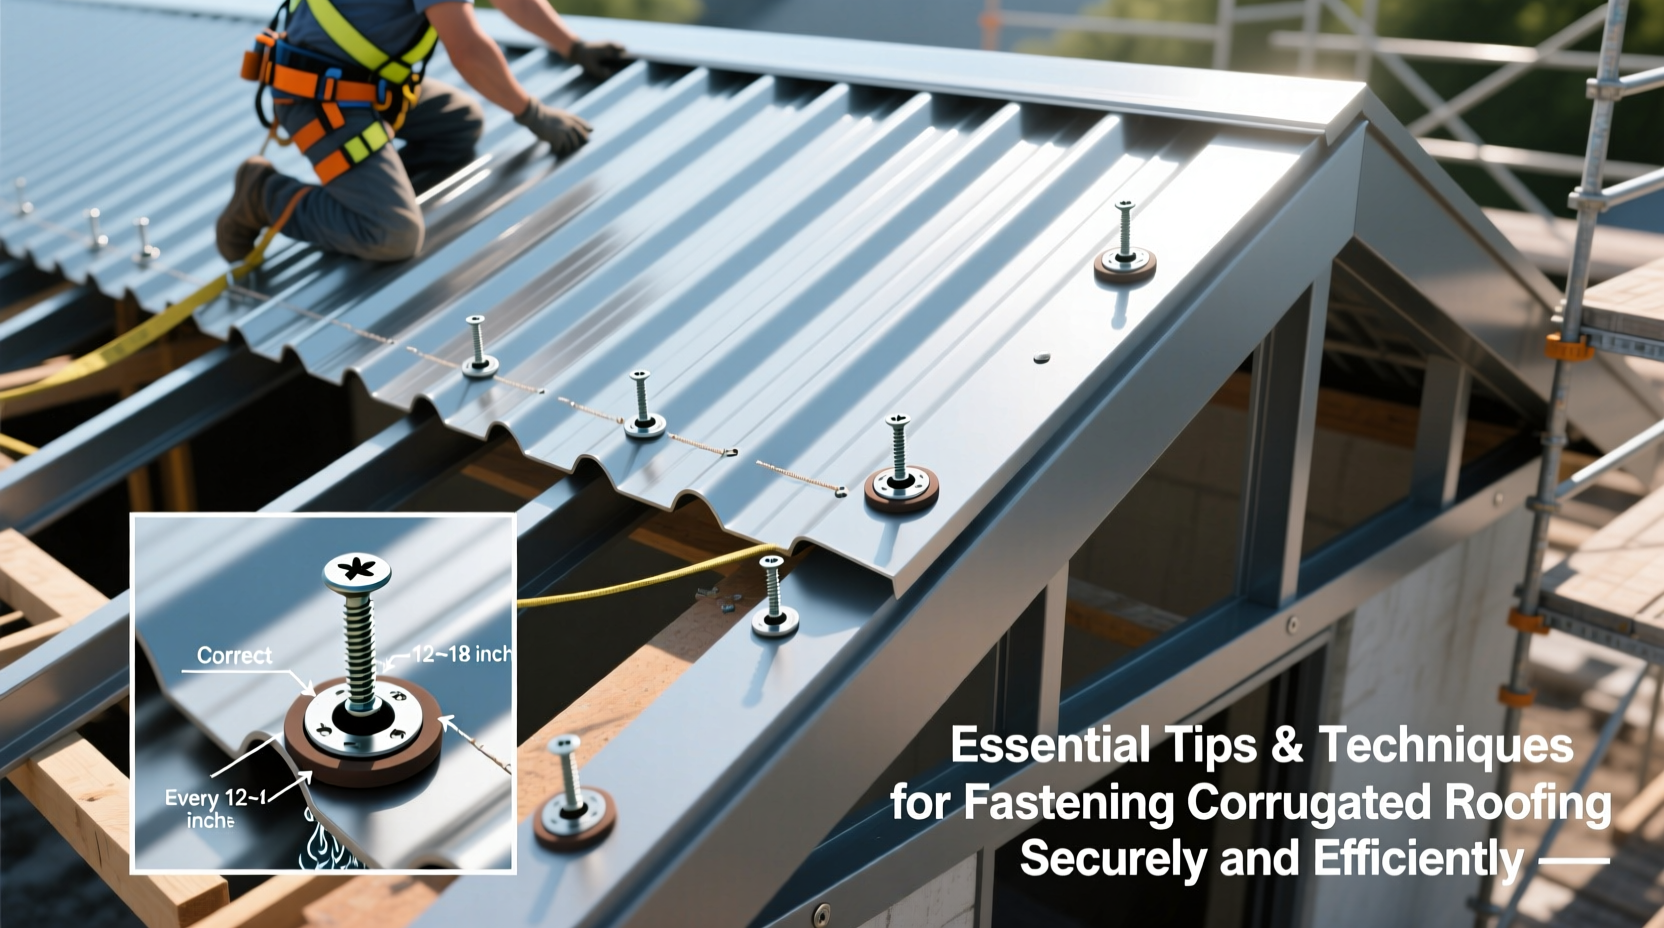
The foundation of a durable corrugated roof begins with choosing appropriate fasteners. Not all screws or nails are suitable for metal roofing, and using the wrong type can compromise the entire structure.
Self-drilling, corrosion-resistant screws with EPDM (ethylene propylene diene monomer) washers are the industry standard. These washers compress during installation, forming a watertight seal that prevents moisture ingress. Stainless steel or color-matched coated screws prevent galvanic corrosion when used with different metal sheets such as aluminum or galvanized steel.
Avoid using nails unless absolutely necessary, as they lack sealing capability and are prone to loosening under thermal expansion and contraction. If nails must be used, pair them with neoprene washers and ensure they’re ring-shank or clinch types to resist pull-out.
Proper Fastening Pattern and Spacing
Fastener placement directly affects both structural stability and waterproofing. The general rule is to fasten at every second or third corrugation along the length, depending on wind load and sheet thickness. However, edge rows should always be fastened at every corrugation for added strength against uplift forces.
Spacing varies based on local building codes and environmental conditions. As a baseline:
- Fasteners should be placed every 12–24 inches along supports in standard conditions.
- On edges and rake lines, reduce spacing to 6–12 inches.
- In high-wind areas, follow engineered specifications or reduce spacing to 12 inches across all rows.
| Condition | Recommended Fastener Spacing | Notes |
|---|---|---|
| Standard Roof Pitch (3:12 or higher) | Every 24 inches | Ensure support framing aligns with fastener points |
| Low Slope (Less than 3:12) | Every 12–18 inches | Increased risk of water pooling requires tighter spacing |
| High Wind Zones | Every 12 inches | Use reinforced fasteners and additional seals |
| End Laps & Ridge Caps | Every 6–12 inches | Critical for preventing blow-offs |
Step-by-Step Installation Guide
Efficient and secure fastening follows a logical sequence. Rushing or skipping steps increases the risk of misalignment, leaks, and mechanical stress.
- Inspect and Prepare the Frame: Ensure purlins or battens are level, spaced correctly (typically 24–30 inches apart), and free from sharp protrusions.
- Start at the Eave Edge: Begin installing sheets from the lower edge, overlapping side laps by at least one full corrugation (usually 1.5–2 inches).
- Align and Temporarily Secure: Use clamps or weighted objects to hold sheets in place before fastening.
- Pre-Drill if Necessary: For thicker metals or composite panels, pre-drilling prevents splitting and ensures clean screw insertion.
- Drive Screws Straight: Hold the drill perpendicular to the surface. Angled driving damages washers and compromises seals.
- Do Not Over-Tighten: Compress the washer until it contacts the panel fully—but no further. Over-tightening cracks the rubber and warps the metal.
- Install Successive Rows: Overlap sheets properly and stagger end joints to avoid continuous seams.
- Seal End Laps and Valleys: Apply butyl tape or roofing sealant beneath end overlaps for extra protection.
Avoiding Common Fastening Mistakes
Even experienced installers can fall into traps that undermine roof integrity. Awareness of these errors leads to better outcomes.
- Misaligned Fasteners: Screwing into the valley instead of the crest weakens grip and invites water pooling.
- Skipping Expansion Gaps: Metal expands and contracts with temperature changes. Fixed rigidly at both ends, sheets can buckle or distort.
- Using Mismatched Metals: Combining aluminum sheets with steel fasteners causes galvanic corrosion over time.
- Walking Directly on Panels: This can dent or deform thin gauge sheets. Use crawl boards to distribute weight.
- Ignoring Thermal Movement: Long runs require slotted holes or floating clips to allow lateral movement without stressing fasteners.
“Over 60% of corrugated roof failures stem from improper fastening—not material defects.” — James Rutherford, Senior Structural Engineer, Coastal Building Institute
Real-World Example: Coastal Shed Project
A homeowner in North Carolina installed corrugated metal roofing on a backyard storage shed using standard deck screws and spaced them irregularly, assuming “more is better.” Within six months, several sheets were partially detached after a tropical storm. Inspection revealed stripped washers, corroded screws, and misaligned placements.
After consulting a roofing contractor, the owner reinstalled the roof using self-drilling metal screws with EPDM washers, spaced every 18 inches along the crest of each wave. Edge rows were tightened to 12-inch intervals, and butyl tape was applied at end laps. The revised roof has remained intact through two hurricane seasons with no issues.
This case underscores that correct fastener type, placement, and technique matter more than sheer quantity.
Checklist for Secure Corrugated Roof Fastening
Before finalizing your installation, review this checklist to ensure best practices are followed:
- ✅ Use roofing-specific self-drilling screws with EPDM washers
- ✅ Fasten only on the high points (crests) of corrugations
- ✅ Maintain consistent spacing per regional guidelines
- ✅ Avoid over-tightening fasteners
- ✅ Stagger end laps between adjacent rows
- ✅ Seal end overlaps and valleys with compatible sealant
- ✅ Allow for thermal expansion in long panels
- ✅ Inspect alignment and overlap before permanent fixing
- ✅ Wear non-slip footwear and use crawl boards during installation
- ✅ Confirm compatibility between fastener and sheet material
Frequently Asked Questions
Can I reuse old fasteners when replacing corrugated sheets?
No. Old fasteners may be corroded, stripped, or have degraded washers. Reusing them compromises the seal and structural integrity. Always install new, code-compliant fasteners.
How do I prevent oil canning in corrugated metal roofs?
Oil canning—the visible waviness in flat areas of metal panels—is often caused by over-fastening or rigid restraint. Use proper spacing, avoid over-tightening, and consider slotted fastener holes or clip systems for longer spans to allow natural movement.
Should I caulk around every screw head?
No. Quality screws with integrated EPDM washers create a reliable seal without additional caulking. Adding external caulk can trap moisture and degrade over time, leading to leaks. Reserve sealants for lap joints and penetrations.
Final Recommendations
Fastening corrugated roofing securely and efficiently isn’t just about hammering in screws—it’s a precision task that blends material knowledge, correct tools, and adherence to engineering principles. From selecting corrosion-resistant fasteners to respecting thermal dynamics, each decision impacts longevity and performance.
Whether you're a DIY enthusiast or a professional builder, taking the time to follow proven techniques pays off in reduced maintenance, improved safety, and decades of reliable service from your metal roof. A well-fastened corrugated roof doesn’t just look better—it performs better, season after season.


 浙公网安备
33010002000092号
浙公网安备
33010002000092号 浙B2-20120091-4
Comments
No comments yet. Why don't you start the discussion?