
Purchasing a used camera lens can be a smart way to expand your photography gear without breaking the bank. Whether you're upgrading from a kit lens or building a collection of specialty optics, the secondhand market offers excellent value. However, it also comes with risks—hidden damage, wear, and misleading listings can turn a bargain into a regret. Knowing exactly what to inspect before handing over payment is crucial. A thorough evaluation protects your investment and ensures the lens performs as expected in real-world shooting conditions.
Examine the Physical Condition Closely
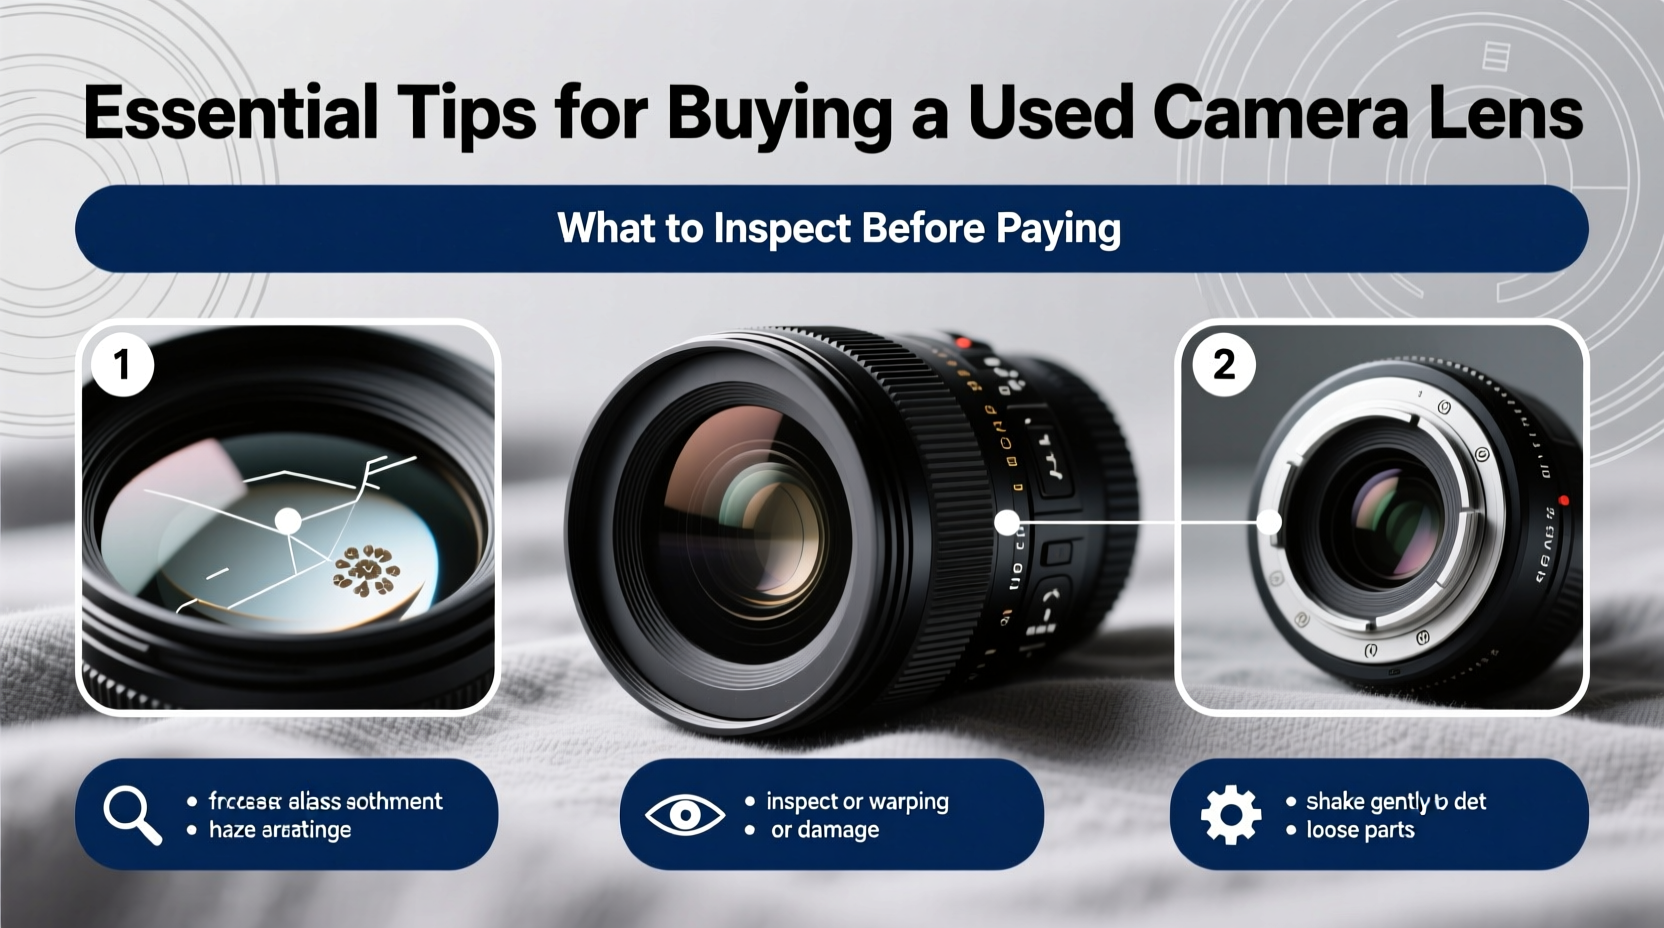
The first step in assessing a used lens is a detailed physical inspection. Scratches, dents, and signs of impact may seem cosmetic at first glance, but they can indicate deeper issues like internal misalignment or compromised weather sealing. Start by checking the lens barrel for any cracks or warping, especially near the mount. These areas endure stress during attachment and removal, so damage here could affect focus accuracy or electronic communication with the camera body.
Pay close attention to the front and rear elements. Even minor scratches on the glass can cause flare, reduce contrast, or create soft spots in images. Hold the lens up to a bright light and rotate it slowly; this helps reveal fine scratches or haze that aren’t visible under normal lighting. Fungus growth inside the lens is another red flag—it often appears as web-like patterns or speckles and degrades image quality over time. While light fungus might be cleanable, heavy infestation usually means internal disassembly is required, which isn’t cost-effective.
Test the Focus Mechanism and Aperture Control
A lens’s functionality matters far more than its appearance. The autofocus system should respond quickly and smoothly without hunting or making grinding noises. If possible, attach the lens to a compatible camera body and test autofocus on both nearby and distant subjects. Listen carefully for unusual sounds—whirring, clicking, or stuttering—which may signal motor wear or gear damage.
Manual focus rings should turn with consistent resistance. Gritty or uneven movement suggests dirt buildup or internal damage. Similarly, zoom lenses must extend and retract smoothly. Stiffness or wobbling indicates worn mechanics or potential misalignment of internal lens groups.
The aperture blades are another critical component. Set the camera to aperture priority mode and cycle through different f-stops while looking through the lens. The blades should open and close evenly and fully. Sticky or partially closed blades result in inconsistent exposure and reduced sharpness. Some sellers provide video demonstrations—ask for one if live testing isn’t possible.
“Many photographers overlook aperture health until they notice exposure inconsistencies. A quick blade check can prevent costly post-purchase surprises.” — Daniel Reyes, Professional Camera Technician
Check for Optical Flaws and Image Quality Issues
Even a cosmetically perfect lens can suffer from optical flaws. Internal dust is common and usually harmless unless it's excessive. However, internal oil residue—often from degraded lubricants in older zoom lenses—is a serious concern. It coats lens elements and appears as smears or droplets when held to the light. This not only reduces contrast but can migrate over time, worsening image degradation.
To evaluate actual image performance, take sample shots if allowed. Use a high-contrast scene like text on a wall or a detailed pattern. Shoot at various apertures and focal lengths (for zooms). Review the images at 100% magnification on a computer screen. Look for soft corners, chromatic aberration, distortion, or vignetting beyond acceptable levels. While some flaws can be corrected in post-processing, persistent center blur or halo effects suggest misaligned elements.
Another subtle issue is \"declicking\" or modification of aperture mechanisms in vintage lenses adapted for modern systems. While popular among cine shooters, these modifications can make precise exposure control difficult in still photography and may void any remaining warranty or resale value.
Do’s and Don’ts When Testing Optics
| Do | Don't |
|---|---|
| Test at multiple apertures | Assume specs match new lens performance |
| Shoot high-contrast scenes | Ignore corner softness |
| Inspect for internal oil or haze | Overlook autofocus speed consistency |
| Use live view for focus accuracy | Rely solely on seller-provided photos |
Verify Compatibility and Electronic Functions
Not all lenses work seamlessly across camera bodies, even within the same brand. Ensure the lens model is compatible with your camera’s mount and firmware version. Some older lenses lack full electronic integration, resulting in lost features like EXIF data, image stabilization, or in-body focus confirmation.
When attached, the camera should recognize the lens and display the correct focal length and maximum aperture. If error codes appear or the lens isn’t detected, there may be an issue with the electrical contacts. Clean them gently with a dry cotton swab—avoid alcohol or liquids unless you’re experienced. Corrosion or scratched contacts often mean moisture exposure or rough handling, which could point to broader reliability concerns.
Image stabilization (IS), vibration reduction (VR), or optical steadyshot (OSS) systems should activate with a noticeable hum or slight movement when engaged. Test stabilization by shooting handheld at slow shutter speeds (e.g., 1/15s) and comparing sharpness with IS on and off. Lack of improvement may indicate a failing mechanism.
Follow a Step-by-Step Inspection Checklist Before Paying
Before finalizing any purchase, conduct a systematic review. Rushing through the process increases the risk of overlooking critical flaws. Follow this timeline to ensure nothing is missed:
- Visual Inspection (5 minutes): Examine the lens barrel, glass surfaces, and mount for scratches, dents, or corrosion.
- Element Check (3 minutes): Inspect front and rear elements under bright light for scratches, fungus, haze, or oil.
- Mount and Contacts (2 minutes): Check metal mount for bends and contacts for cleanliness or oxidation.
- Mechanical Testing (5 minutes): Rotate focus and zoom rings; listen for abnormal noises during autofocus operation.
- Aperture Function (3 minutes): Cycle through apertures and observe blade movement via live view or manual inspection.
- Camera Integration (7 minutes): Attach to camera, confirm recognition, test autofocus accuracy, and verify IS/VR function.
- Sample Shooting (10 minutes): Capture test images at various distances, apertures, and focal lengths; review for sharpness and artifacts.
If buying online, request recent, high-resolution photos of the lens from multiple angles—including close-ups of both glass surfaces and the mount. Ask the seller to demonstrate autofocus and aperture operation in a short video. Reputable platforms often allow returns, but shipping costs and delays make prevention better than remedy.
Real Example: The Hidden Cost of a “Clean” Listing
Jamie, a travel photographer, purchased a used 24-70mm f/2.8 lens from an online marketplace. The listing showed minimal wear and included sample photos. However, upon arrival, she noticed slight resistance when zooming. After disassembling the lens for cleaning (a service costing $120), a technician discovered internal grease had begun to liquefy—a common issue in older zoom lenses stored in warm climates. Though functional, the lens required servicing immediately after purchase, erasing the savings. Jamie now insists on video demonstrations and always tests zoom action before completing transactions.
Frequently Asked Questions
Can I trust a lens that has been serviced professionally?
Generally, yes—especially if serviced by an authorized repair center. A professional service history often includes ultrasonic cleaning, alignment calibration, and replacement of worn parts. Request documentation such as receipts or service reports. However, extensive repairs on older lenses may not justify long-term reliability, so weigh the cost against buying newer models.
Is minor lens creep a dealbreaker?
Lens creep—the barrel extending under gravity—is common in older zoom designs and doesn’t always affect image quality. However, it indicates worn internal components and lack of tight seals. In field use, it can shift your focal length unexpectedly. While not fatal, it suggests the lens is past its prime and may require eventual servicing.
Should I avoid third-party lenses when buying used?
No—brands like Sigma, Tamron, and Tokina offer excellent value, especially with recent generations featuring robust build and fast autofocus. However, older third-party lenses may have less reliable quality control or limited firmware support. Stick to well-reviewed models and check compatibility thoroughly.
Final Thoughts: Invest Time, Not Just Money
Buying a used camera lens successfully hinges on diligence. The difference between a great find and a financial setback often comes down to a few extra minutes of inspection. Prioritize function over cosmetics, verify electronic communication, and never skip real-world testing. Remember, a lens is a long-term tool—its optical integrity and mechanical reliability directly impact your creative output.
With the right approach, you can confidently navigate the secondhand market and acquire high-performance glass at a fraction of retail cost. Equip yourself with knowledge, bring your checklist, and trust verified performance over polished appearances.


 浙公网安备
33010002000092号
浙公网安备
33010002000092号 浙B2-20120091-4
Comments
No comments yet. Why don't you start the discussion?