
A well-oxygenated aquarium is the foundation of a thriving aquatic ecosystem. Fish, beneficial bacteria, and even live plants rely on dissolved oxygen to survive and flourish. While surface agitation from filters contributes to gas exchange, adding an air pump significantly enhances oxygen levels—especially in densely stocked tanks or warm water environments where oxygen solubility drops. Proper installation ensures consistent performance, energy efficiency, and long-term equipment durability. This guide walks through the essential steps and considerations for setting up an air pump that delivers reliable, quiet, and effective aeration.
Why Oxygenation Matters in Aquariums
Oxygen enters the water primarily through surface diffusion. The greater the surface movement, the more efficient this process becomes. In still or overstocked tanks, oxygen can deplete rapidly, especially at night when plants stop photosynthesizing and begin consuming oxygen. Low oxygen levels lead to stressed fish, reduced immunity, and in extreme cases, mass fatalities.
An air pump introduces bubbles that rise through the water column, creating upward currents that promote circulation and surface agitation. As bubbles burst at the surface, they facilitate the release of carbon dioxide and the absorption of atmospheric oxygen. When paired with devices like airstones, sponge filters, or undergravel filters, air pumps also support biological filtration by keeping beneficial bacteria aerated and active.
“Many aquarium issues stem not from disease but from poor gas exchange. A properly installed air pump can prevent chronic stress before it starts.” — Dr. Lena Torres, Aquatic Veterinarian
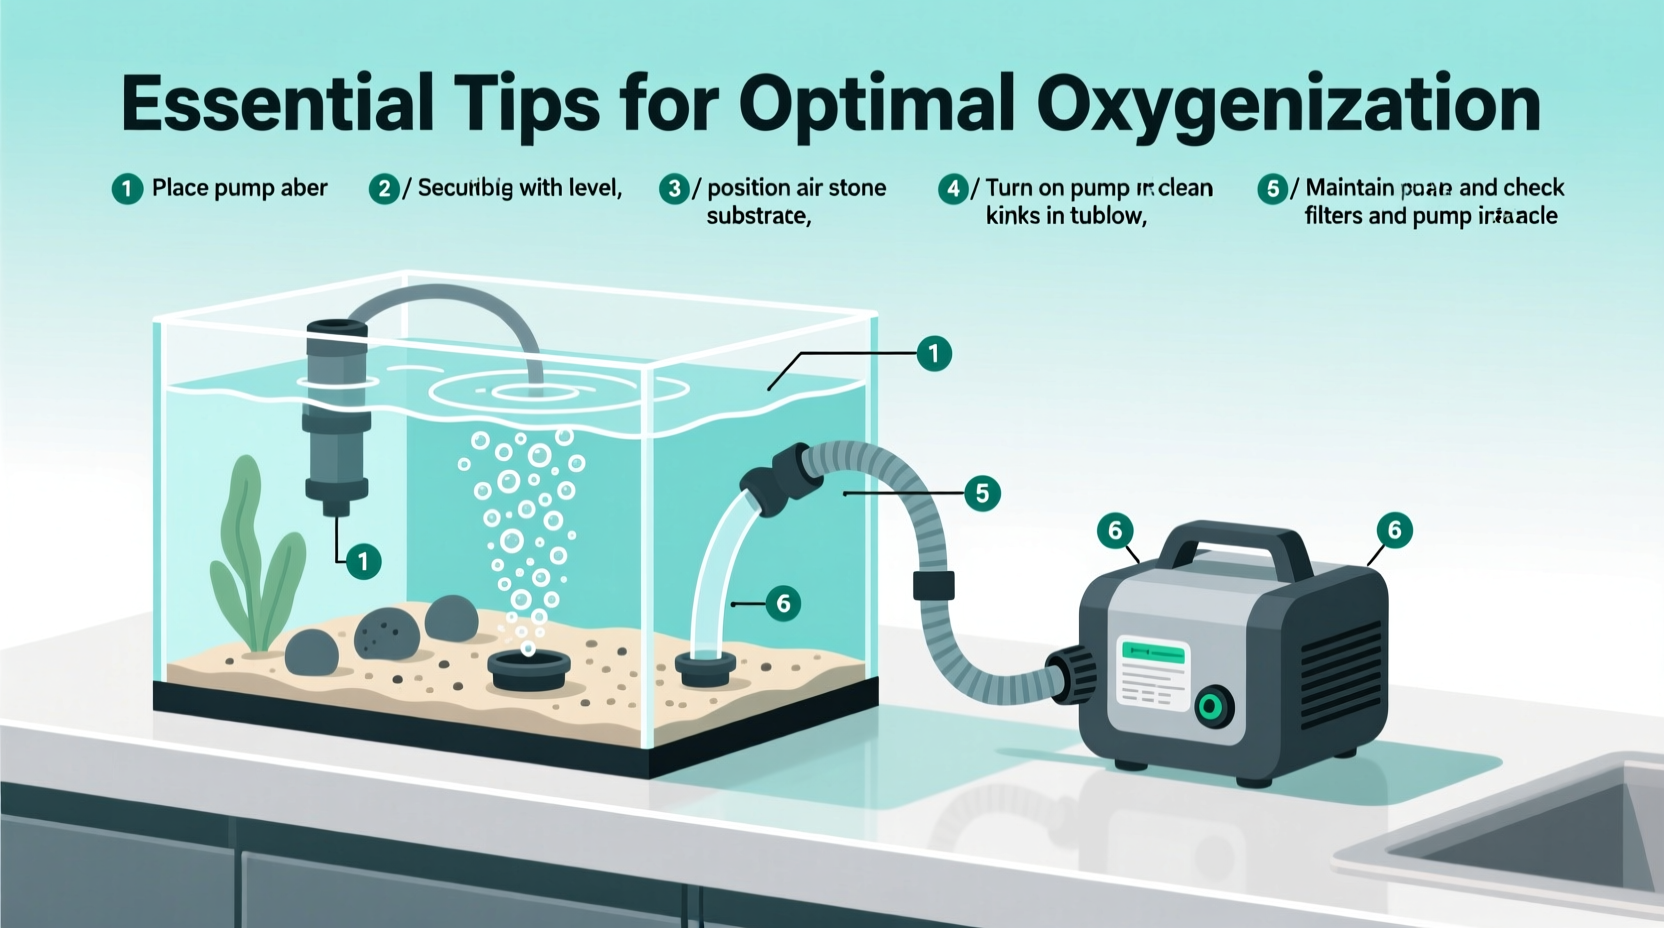
Step-by-Step Guide to Installing Your Air Pump
Correct installation prevents backflow, noise, and premature wear. Follow these steps carefully to maximize function and longevity.
- Choose the Right Location: Mount the air pump above the water level of the tank. If placed below (e.g., inside a cabinet), install a check valve to prevent siphoning during power outages.
- Attach the Airline Tubing: Cut a length of airline tubing sufficient to reach from the pump to the tank with slight slack. Connect one end to the pump’s outlet nozzle.
- Install a Check Valve: Slide a check valve onto the tubing near the pump. Ensure the arrow points toward the tank—this allows air to flow in but stops water from flowing back.
- Add a Control Valve (Optional): For adjustable airflow, insert an inline air control valve. This lets you fine-tune bubble rate without replacing components.
- Connect to Diffuser or Filter: Attach the other end of the tubing to an airstone, sponge filter, or decorative bubbler inside the tank. Submerge the airstone fully to avoid splashing.
- Power On and Test: Plug in the pump and verify steady airflow. Adjust the control valve if needed. Listen for excessive vibration or buzzing.
- Secure Loose Tubing: Use suction cups or clips to fasten tubing along walls or behind the tank to prevent kinks and tripping hazards.
Choosing the Right Equipment: Matching Components to Your Tank
Not all air pumps are created equal. Selecting compatible components ensures optimal performance and avoids under- or over-aeration.
| Component | Purpose | Best For | Considerations |
|---|---|---|---|
| Airstone (Fine Pore) | Breaks air into small bubbles for maximum surface contact | Small to medium tanks, planted setups | Clogs over time; clean monthly with vinegar soak |
| Sponge Filter | Provides mechanical and biological filtration + aeration | Breeding tanks, quarantine setups, nano tanks | Requires regular rinsing in tank water to preserve bacteria |
| Decorative Bubbler | Visual appeal with moderate aeration | Show tanks, centerpiece displays | Less efficient than airstones; may need stronger pump |
| Diaphragm Air Pump (Dual Outlet) | Runs multiple devices simultaneously | Larger tanks or multi-tank systems | Noise varies by model; opt for oil-free, low-vibration units |
Common Mistakes and How to Avoid Them
Even experienced aquarists occasionally make errors that compromise aeration effectiveness.
- Placing the pump below tank level without a check valve: Risk of water back-siphoning into the pump during a power cut, which can destroy the unit and flood your floor.
- Using kinked or undersized tubing: Restricts airflow and strains the pump motor, reducing lifespan.
- Ignoring maintenance: Airstones calcify or clog, diminishing output. Replace every 3–6 months or clean regularly.
- Over-aerating small tanks: Excessive turbulence stresses timid fish like bettas or dwarf shrimp. Adjust flow accordingly.
- Mismatching pump size to tank volume: Too weak = ineffective; too strong = disruptive. Match pump output (liters per hour) to tank needs.
Real-World Example: Solving Low Oxygen in a Community Tank
Ravi maintained a 55-gallon community tank with tetras, Corydoras, and live plants. During summer, water temperatures rose to 82°F (28°C), and he noticed his bottom-dwellers becoming sluggish. One morning, two Corydoras were found lifeless at the substrate.
After testing parameters (which showed normal ammonia and nitrites), Ravi suspected low oxygen due to reduced solubility in warmer water. He installed a dual-outlet air pump—one line powering a fine-pore airstone in the back corner, the other driving a sponge filter in a breeding section. Within hours, surface agitation increased visibly, and fish resumed normal activity. Over the next week, no further losses occurred. The simple addition of targeted aeration resolved an invisible but critical imbalance.
Essential Checklist Before Powering On
Use this checklist to ensure a safe and effective setup:
- ☐ Air pump positioned above water line or equipped with a check valve
- ☐ Airline tubing securely connected and free of kinks
- ☐ Airstone or diffuser fully submerged and weighted if necessary
- ☐ Check valve installed with correct orientation (arrow toward tank)
- ☐ Control valve adjusted to desired bubble rate
- ☐ Pump stable and isolated from hard surfaces (use rubber feet or mat)
- ☐ Electrical outlet protected from splashes (use GFCI if near water source)
Frequently Asked Questions
Can I turn off the air pump at night?
It’s generally not recommended. While plants produce oxygen during daylight, they consume it at night. Turning off the pump risks oxygen depletion, especially in heavily stocked or warm tanks. Continuous operation maintains stability.
My air pump is noisy—what can I do?
Noise often comes from vibration against surfaces or internal diaphragm wear. Place the pump on a soft pad, ensure it's level, and check for loose parts. Older models may need diaphragm replacement kits, available from most manufacturers.
Do I need an air pump if I have a filter?
Many filters provide surface agitation, but they may not suffice in deeper tanks or high-temperature setups. An air pump supplements oxygenation, improves circulation in dead zones, and supports biofiltration—particularly valuable in emergencies like filter failure.
Final Thoughts and Next Steps
Installing an air pump is a simple yet transformative upgrade for any aquarium. Beyond boosting oxygen, it enhances water movement, supports biological processes, and adds visual interest. The key lies in thoughtful selection, proper installation, and routine upkeep. Whether you're managing a peaceful betta bowl or a bustling community tank, ensuring optimal oxygenation is non-negotiable for long-term success.


 浙公网安备
33010002000092号
浙公网安备
33010002000092号 浙B2-20120091-4
Comments
No comments yet. Why don't you start the discussion?