
Wooden cutting boards are kitchen essentials—durable, gentle on knives, and naturally antibacterial when properly maintained. But without consistent care, they can dry out, warp, or develop deep cracks that harbor bacteria. The key to longevity? Regular oiling. Applying the right oil at the right time doesn’t just enhance appearance—it seals the wood, repels moisture, and prevents structural damage. This guide breaks down exactly how to oil your board effectively, what to avoid, and how to build a sustainable maintenance routine.
Why Oiling Matters: The Science Behind Wood Protection
Wood is porous. Every time you rinse your cutting board or expose it to raw meats and acidic foods, moisture seeps in. Over time, this causes swelling, warping, and eventual cracking as the wood expands and contracts. Oiling fills these microscopic pores with a protective barrier, reducing water absorption and stabilizing the fibers.
Unlike plastic boards, wood has natural antimicrobial properties, but only when intact. Cracks compromise hygiene and safety. A well-oiled board remains smooth, resilient, and food-safe for years. According to Dr. Alan Harper, a materials scientist specializing in culinary surfaces, “Oiling isn’t cosmetic—it’s structural reinforcement. It slows down degradation by up to 70% compared to untreated boards.”
“Oiling isn’t cosmetic—it’s structural reinforcement. It slows down degradation by up to 70% compared to untreated boards.” — Dr. Alan Harper, Materials Scientist
The Right Oil Makes All the Difference
Not all oils are suitable for food-contact surfaces. Some go rancid quickly; others don’t penetrate deeply enough. Here’s a breakdown of common options:
| Oil Type | Safe for Food? | Penetration | Rancidity Risk | Recommended? |
|---|---|---|---|---|
| Mineral Oil (Food-Grade) | Yes | High | None | ✅ Best choice |
| Camellia Oil | Yes | High | Low | ✅ Excellent alternative |
| Walnut Oil | Yes (but allergenic) | High | Moderate | ⚠️ Use cautiously |
| Olive, Coconut, or Vegetable Oil | Yes | Low-Moderate | High | ❌ Avoid long-term use |
| Beeswax (blended with oil) | Yes | Surface sealant | None | ✅ Great for finishing |
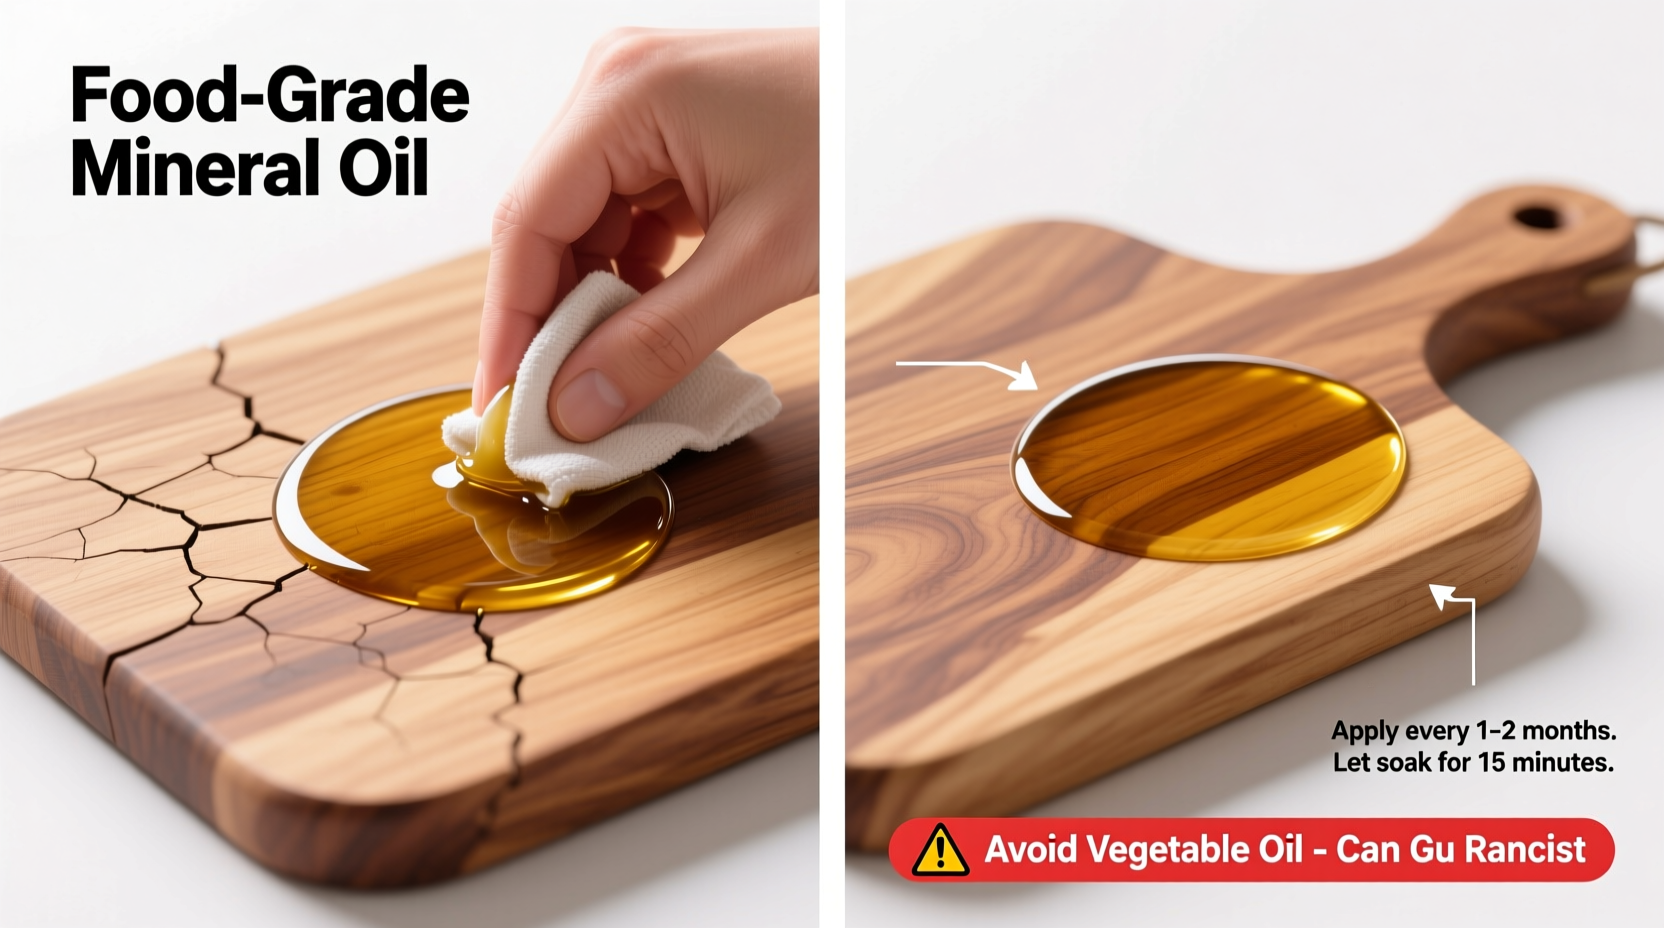
Food-grade mineral oil is the gold standard—odorless, tasteless, and shelf-stable. Camellia oil, popular in Japanese kitchens, offers similar benefits with added antioxidants. For extra protection, many professionals use a 2:1 blend of mineral oil and beeswax, which creates a harder, more water-resistant finish.
Step-by-Step Guide to Properly Oil Your Cutting Board
Oiling should be thorough, not rushed. Follow this proven process every time:
- Clean the board thoroughly. Wash with mild soap and warm water, scrubbing any stuck-on debris with a soft brush. Do not soak or run through the dishwasher.
- Dry completely. Let the board air-dry upright for 12–24 hours. Moisture blocks oil absorption.
- Apply oil generously. Pour 1–2 tablespoons of oil onto the surface. Use a clean cloth or paper towel to spread it evenly across all sides, edges, and corners.
- Let it soak. Allow the oil to penetrate for at least 4–6 hours, preferably overnight. Reapply if the surface looks dry after an hour.
- Wipe off excess. After soaking, remove any unabsorbed oil to prevent stickiness or rancidity.
- Repeat monthly or as needed. High-use boards may require oiling every 3–4 weeks.
This process works equally well for end-grain, edge-grain, and bamboo boards. Always oil both sides and the edges—neglecting any surface invites uneven expansion and warping.
How Often Should You Oil Your Board?
Frequency depends on usage and environment. A board used daily in a dry climate will need more attention than one used weekly in a humid kitchen.
- New boards: Oil once before first use, then weekly for the first month.
- Regular use (daily/weekly): Oil every 3–6 weeks.
- Signs it’s time to re-oil: Dull color, rough texture, water soaking in instead of beading.
A simple test: sprinkle a few drops of water on the surface. If it beads up, the board is well-sealed. If it soaks in within seconds, it’s time to oil.
Avoid These Common Oiling Mistakes
Even with good intentions, improper techniques can shorten your board’s life:
- Using cooking oils like olive or coconut oil. These oxidize and turn rancid, leaving unpleasant odors and sticky residues.
- Putting the board in the dishwasher. Extreme heat and prolonged water exposure destroy wood fibers and strip oil instantly.
- Storing flat on the counter. Always store upright or on its side to allow airflow and prevent moisture pooling.
- Skipping edge treatment. Edges absorb water just like surfaces—always oil them.
- Over-oiling without wiping. Excess oil attracts dust and degrades over time, creating a gummy film.
“The biggest mistake home cooks make is waiting until the board looks bad to oil it. Prevention beats restoration every time.” — Maria Tran, Artisan Woodcraft Specialist
Real Example: How One Chef Saved a Cracked Board
At a farm-to-table bistro in Vermont, chef Lena Ruiz noticed her favorite cherry wood board developing fine cracks near the handle. Instead of discarding it, she followed a deep-repair protocol: cleaned it with coarse salt and lemon, sanded lightly with 220-grit paper, then applied mineral oil twice over 48 hours. She stored it upright in a low-humidity pantry for three days. The cracks closed significantly, and the board regained its luster. “It’s now back in rotation,” she says. “A little attention brought it back from the brink.”
This case shows that even damaged boards can recover—with patience and correct oiling technique.
Checklist: Monthly Cutting Board Maintenance Routine
Stay ahead of wear with this quick checklist:
- ☐ Clean with soap and water after each use
- ☐ Dry completely before storing
- ☐ Inspect for stains, odors, or rough patches
- ☐ Perform water bead test
- ☐ Sand lightly if surface feels rough (use 200+ grit)
- ☐ Apply food-grade mineral oil or camellia oil
- ☐ Wipe off excess after 6 hours
- ☐ Store in upright position with good airflow
Frequently Asked Questions
Can I use coconut oil on my wooden cutting board?
No. Despite being natural, coconut oil can go rancid and leave a residue that attracts bacteria. Stick to food-grade mineral oil or camellia oil for long-term safety.
How do I remove odors from my cutting board?
Sprinkle baking soda or coarse salt on the surface, then rub with half a lemon. Rinse and dry thoroughly. Repeat if needed. Avoid vinegar too frequently, as acidity can degrade wood over time.
Is it safe to oil a board with visible cracks?
Yes, but understand that oil won’t fix deep cracks—it only prevents further splitting. For minor cracks, oiling helps close them slightly. For major splits, consider professional repair or retirement.
Conclusion: Make Oiling a Habit, Not a Chore
A wooden cutting board is an investment in both function and aesthetics. With regular oiling, it can last decades—outliving multiple plastic or composite alternatives. The process takes minutes but pays off in durability, hygiene, and performance. By choosing the right oil, following a simple routine, and avoiding common pitfalls, you protect not just the board, but the quality of your meals.


 浙公网安备
33010002000092号
浙公网安备
33010002000092号 浙B2-20120091-4
Comments
No comments yet. Why don't you start the discussion?