
Opening an iPhone 7 for repair can seem intimidating, but with the right tools and a methodical approach, it’s entirely manageable—even for DIY enthusiasts. Whether you're replacing a cracked screen, swapping out a failing battery, or fixing a faulty speaker, understanding how to properly disassemble your device is crucial to avoiding permanent damage. The iPhone 7 uses precision engineering, proprietary screws, and delicate ribbon cables, all of which demand respect and care.
This guide walks through every critical phase: from gathering specialized tools to reassembly. By following these steps, you’ll maintain your phone’s integrity while completing necessary repairs efficiently and safely.
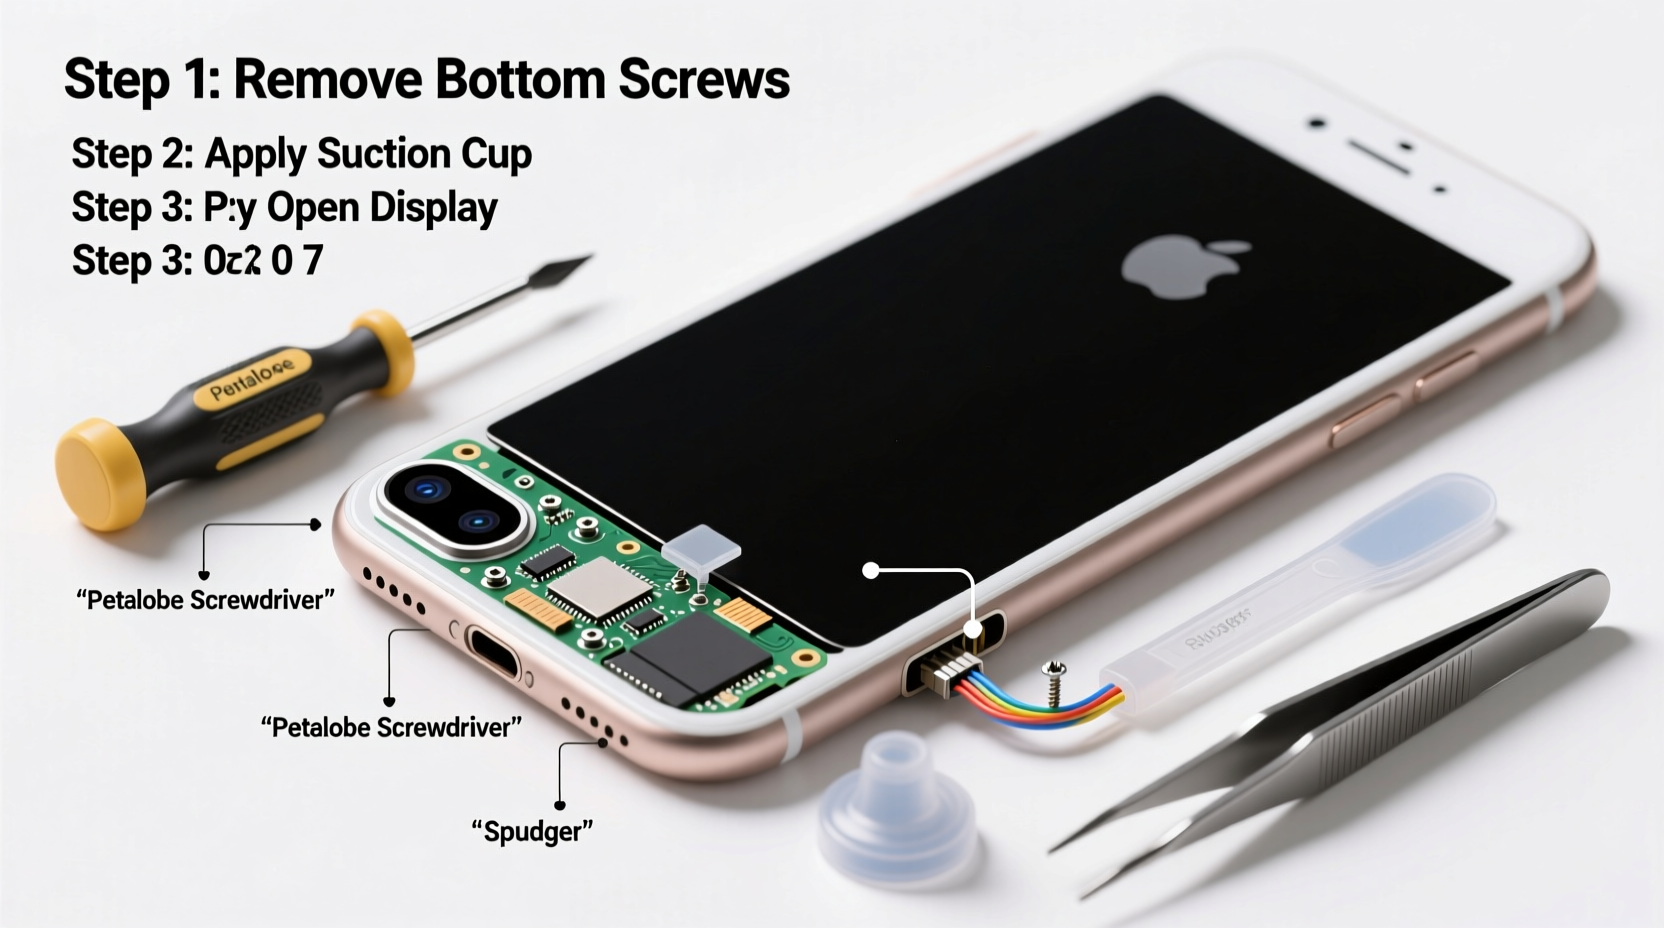
Essential Tools for Opening the iPhone 7
The first rule of any successful repair is preparation. Using improper tools can strip screws, crack glass, or sever fragile connectors. Invest in a quality toolkit designed specifically for smartphones. Here's what you'll need:
- Pentalobe P2 screwdriver – For removing the two bottom screws on the exterior.
- Phillips #000 screwdriver – Used inside the device for standard Phillips screws.
- Pry tools (plastic opening picks) – To gently separate adhesive-sealed components without scratching.
- Suction cup – Helps lift the display safely after heating.
- iOpener or heat gun/hair dryer – Softens the strong adhesive binding the front panel.
- Spudger or metal probe – For disconnecting ribbon cables and prying small parts.
- Magnetic mat or organizer – Keeps tiny screws sorted and prevents loss.
- Tweezers (anti-static preferred) – Useful for handling small connectors and screws.
Step-by-Step Guide to Safely Open Your iPhone 7
Follow this sequence carefully. Rushing or skipping steps increases the risk of irreversible damage.
- Power off the device completely. Hold the side button and slide to power off. This prevents accidental short circuits during disassembly.
- Remove the two pentalobe screws at the base. Use the P2 pentalobe driver. These are the only external screws.
- Apply heat to the lower edge. Use an iOpener heated in the microwave for 60 seconds, or a hair dryer on medium heat, moving it back and forth along the seam for 90 seconds. This softens the adhesive securing the display.
- Attach the suction cup just above the home button. Pull upward gently while inserting a plastic pry tool into the gap between the front and rear panels. Work slowly around the perimeter to separate the adhesive seal.
- Lift the display slightly—do not open fully. Once loose, prop it open at about 90 degrees using a rubber band or stand. Never force it open; ribbon cables still connect the display to the logic board.
- Remove the three Phillips screws securing the display cable bracket. Use the #000 Phillips driver. Keep screws organized.
- Gently disconnect the display cables. Use a spudger to lift the three connectors from their sockets on the logic board. Start with the topmost one, then middle, then lower.
- Lift the display assembly aside. Lay it face-up on a soft surface to avoid screen damage.
You now have full access to internal components such as the battery, cameras, speakers, and logic board. Always ground yourself or work on an anti-static mat to prevent electrostatic discharge (ESD), which can fry sensitive electronics.
Do’s and Don’ts During Disassembly
| Do’s | Don’ts |
|---|---|
| Use proper lighting and magnification if needed | Don’t use metal tools near battery or connectors |
| Work on a clean, static-free surface | Don’t rush—take breaks if needed |
| Label and organize screws immediately | Don’t stack components directly on top of each other |
| Disconnect the battery before working near logic board | Don’t peel adhesive strips too quickly—risk of tearing |
| Take photos before disconnecting cables | Don’t apply excessive pressure when reconnecting ribbons |
“Precision and patience are more important than speed when repairing modern smartphones. One misaligned connector can render a device unusable.” — David Lin, Senior Mobile Repair Technician, iFix Electronics
Mini Case Study: Replacing a Swollen Battery
Mark, a freelance photographer, noticed his iPhone 7 bulging slightly and shutting down unexpectedly. Instead of paying $80 at a service center, he decided to replace the battery himself. After watching several tutorials and purchasing a reputable repair kit, he followed the steps outlined here. He used heat to loosen the adhesive, carefully lifted the display, disconnected the battery connector before removal, and replaced the old unit with a certified aftermarket battery. The entire process took 45 minutes. His phone regained full battery life and no longer overheated. Most importantly, no damage occurred to the housing or screen because he avoided prying near the battery and used plastic tools throughout.
This case illustrates that with the correct tools and caution, users can perform meaningful repairs that extend device lifespan and save money.
Checklist: Before You Begin & After Completion
Use this checklist to ensure nothing is overlooked.
- ✅ Power off the iPhone
- ✅ Gather all necessary tools
- ✅ Charge your tools’ batteries (e.g., heat gun)
- ✅ Back up data via iCloud or iTunes
- ✅ Clean your workspace
- ✅ Reconnect all display and battery cables securely
- ✅ Reinstall all screws in correct positions
- ✅ Test touchscreen, buttons, camera, and audio before sealing
- ✅ Apply new adhesive strips if resealing the display
- ✅ Power cycle the device to confirm stability
Frequently Asked Questions
Can I reuse the original display adhesive?
No. The factory adhesive is designed for single use and loses effectiveness once removed. Purchase replacement adhesive strips to ensure a secure, water-resistant seal upon reassembly.
Is it safe to use a hair dryer instead of an iOpener?
Yes, but with caution. Set the dryer to low or medium heat and keep it moving to avoid overheating one spot. Overheating can damage the OLED panel or melt internal components. An iOpener provides safer, more even heat distribution.
What should I do if a ribbon cable tears?
If a cable is damaged, the affected component (e.g., screen, camera) will likely fail. Replacement cables are available, but soldering may be required. For most users, replacing the entire display assembly is more practical and reliable.
Final Steps and Closing Advice
After completing your repair, take time to reassemble the device methodically. Reconnect the battery last unless testing requires earlier power. Once everything is secured, press the display firmly around the edges to activate the new adhesive. Allow 2–4 hours for the bond to set before exposing the phone to moisture or drops.
Regular maintenance and timely repairs not only save money but also reduce electronic waste. With practice, opening your iPhone 7 becomes quicker and more intuitive. Always prioritize safety over speed, and never hesitate to pause and double-check connections.


 浙公网安备
33010002000092号
浙公网安备
33010002000092号 浙B2-20120091-4
Comments
No comments yet. Why don't you start the discussion?