
Replacing or installing a new light fixture can dramatically improve the ambiance and functionality of any room. While many homeowners assume it requires an electrician, mounting a light fixture is often a manageable DIY project—provided you follow proper safety protocols and understand the electrical system in your home. Done correctly, it’s efficient, cost-effective, and satisfying. This guide walks you through every step, from preparation to final testing, ensuring a safe and professional result.
Understanding Your Electrical System
Before touching a wire, it's essential to understand the basic components involved in lighting installations. Most residential fixtures connect to a standard 120-volt circuit controlled by a wall switch. The electrical box in your ceiling contains three main wires: black (hot), white (neutral), and green or bare copper (ground). These must be connected properly to corresponding wires on the new fixture.
Modern homes typically have junction boxes rated for light fixtures, which support the weight of most ceiling-mounted units. However, older homes may have outdated or undersized boxes not designed for heavier lights. Always check that the electrical box is securely mounted and rated to handle the weight of your chosen fixture.
“Never assume an existing box can support a heavy chandelier just because it held a previous light. Weight limits vary, and failure can lead to serious injury.” — James Ralston, Master Electrician & NEC Consultant
Essential Tools and Materials
Gathering the right tools before beginning ensures a smooth process and reduces the risk of mistakes. Here’s what you’ll need:
- Voltage tester (non-contact)
- Wire stripper
- Needle-nose pliers
- Screwdrivers (flathead and Phillips)
- Wire connectors (wire nuts)
- Ladder (stable and tall enough for safe reach)
- Work gloves and safety glasses
- New light fixture and mounting hardware
Step-by-Step Installation Process
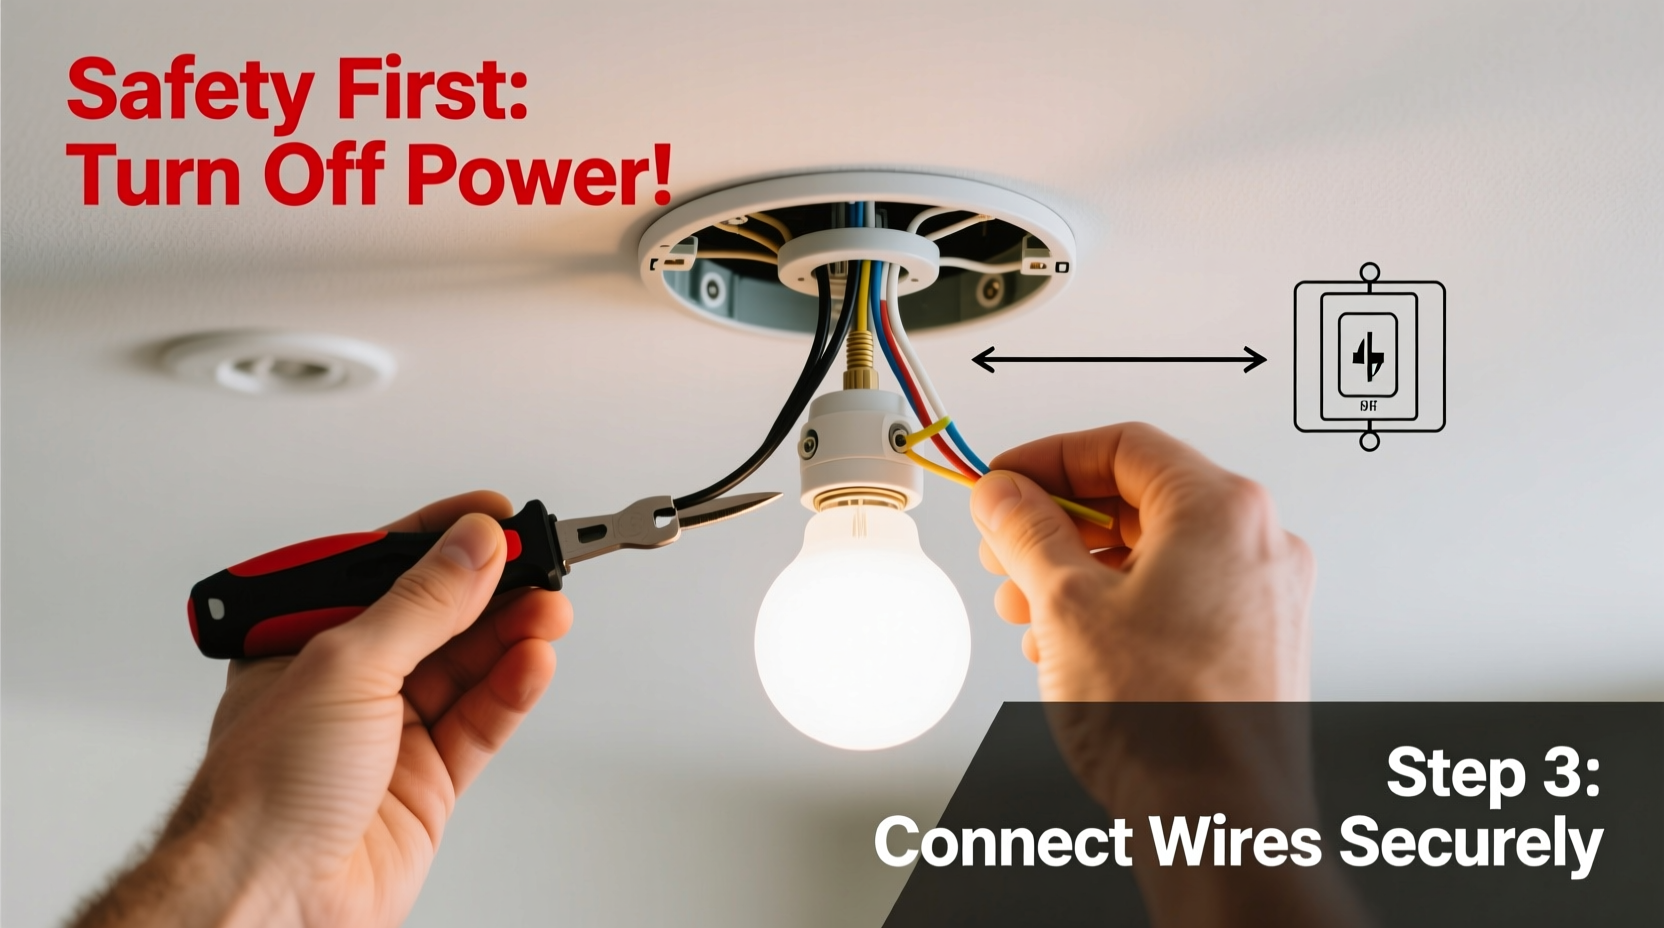
- Turn Off Power at the Breaker: Locate the correct circuit breaker and switch it off. Never rely solely on the wall switch—always cut power at the source.
- Verify Power Is Off: Use a non-contact voltage tester at the ceiling box to ensure no current is present.
- Remove the Old Fixture: Unscrew the mounting screws or canopy covering the wiring. Carefully disconnect the wires by unscrewing the wire nuts. Remove the old fixture.
- Inspect the Electrical Box: Confirm it’s secure and rated for the new fixture’s weight. If installing a heavy fixture like a chandelier, consider upgrading to a fan-rated or pancake box.
- Mount the New Bracket: Attach the included mounting bracket to the electrical box using the provided screws. This will support the new fixture.
- Connect the Wires: Match black to black (hot), white to white (neutral), and ground to ground. Twist each pair together clockwise and secure with a wire nut. Tuck connections neatly into the box.
- Attach the Fixture: Align the fixture base with the mounting bracket and fasten with screws. Ensure no wires are pinched.
- Install Bulbs and Cover: Insert appropriate bulbs (check wattage limits) and attach any shades or globes.
- Restore Power and Test: Turn the breaker back on and operate the switch. If the light doesn’t turn on, turn off power again and recheck connections.
Do’s and Don’ts When Mounting Light Fixtures
| Do | Don't |
|---|---|
| Always shut off power at the breaker panel | Rely only on the wall switch to cut power |
| Use a voltage tester to confirm wires are dead | Assume wires are safe without testing |
| Check the weight rating of the electrical box | Mount heavy fixtures to plastic or shallow boxes |
| Follow manufacturer’s installation instructions | Ignore included hardware or torque specifications |
| Tighten wire nuts securely and tuck wires safely | Leave exposed copper or loose strands in the box |
Real-World Example: Installing a Pendant Light in a Dining Area
Sarah, a homeowner in Portland, decided to upgrade her dining room with a modern pendant light. The previous fixture was a lightweight flush mount, but the new pendant weighed nearly 15 pounds. After turning off the power, she discovered the existing plastic electrical box was only rated for 10 pounds. Instead of risking collapse, she replaced it with a metal, fan-rated box secured directly to a ceiling joist. With the proper support in place, she completed the wiring confidently. The result? A stunning focal point that’s both safe and code-compliant.
This scenario underscores a common oversight: assuming all ceiling boxes are created equal. Upgrading the box added 20 minutes to the job but prevented potential hazards down the line.
Frequently Asked Questions
Can I install a light fixture without hiring an electrician?
Yes, in most cases. If you’re replacing an existing fixture with a similar type and the wiring is in good condition, it’s a suitable DIY task. However, if you’re adding a new circuit, relocating the box, or dealing with aluminum wiring, consult a licensed electrician.
What should I do if the wires in the ceiling don’t match the fixture?
In standard U.S. residential systems, black is hot, white is neutral, and green or bare copper is ground. If colors differ (e.g., red instead of black), use a voltage tester to identify the hot wire and proceed accordingly. When in doubt, consult an electrician.
Is it safe to use LED fixtures on older circuits?
Absolutely. LED fixtures draw less power and generate less heat than incandescent bulbs, making them ideal for older wiring systems. Just ensure the fixture is UL-listed and compatible with your dimmer switches if applicable.
Final Checklist Before You Begin
- ☑ Circuit breaker is turned off
- ☑ Voltage tester confirms no power at the box
- ☑ Ladder is stable and positioned safely
- ☑ New fixture is compatible with ceiling box weight limit
- ☑ All necessary tools and wire connectors are on hand
- ☑ Manufacturer’s instructions have been reviewed
- ☑ No water or dampness near the work area
Conclusion
Mounting a light fixture yourself is a practical way to refresh your space and save on labor costs. By respecting electrical safety, verifying structural support, and following a clear process, you can achieve results that are both functional and aesthetically pleasing. Whether you're updating a hallway sconce or installing a statement piece over your kitchen island, confidence comes from preparation and attention to detail.


 浙公网安备
33010002000092号
浙公网安备
33010002000092号 浙B2-20120091-4
Comments
No comments yet. Why don't you start the discussion?