
A diamond Apple Watch band instantly elevates your smartwatch from functional tech accessory to luxury statement piece. Whether it’s a custom pavé design, lab-grown stones, or a designer model from a high-end brand, the elegance comes with responsibility. A poorly installed or loosely secured band risks losing precious stones—or worse, losing the entire watch. Ensuring a perfect fit isn’t just about aesthetics; it’s about safety, longevity, and confidence in your daily wear.
This guide delivers expert-backed strategies for correctly installing and securely fastening a diamond Apple Watch band. From choosing compatible hardware to verifying structural integrity, these steps will help you enjoy both sparkle and peace of mind.
Understanding Your Diamond Band Design
Diamond bands vary significantly in construction. Some use full pavé settings across the length of the band, while others feature accent stones near the clasp or along the outer edges. The materials—stainless steel, titanium, ceramic, or even gold-plated links—affect how the band attaches to your Apple Watch and how durable it is over time.
Most diamond bands are designed to work with Apple’s standard lug system (the connectors on either side of the watch case). However, third-party luxury bands may use proprietary mechanisms or reinforced pins that require special tools or installation care. Always check whether the band is certified for your specific Apple Watch model—especially important if you own a newer Ultra, Series 9, or an older Series 4–6 model with slightly different lug widths.
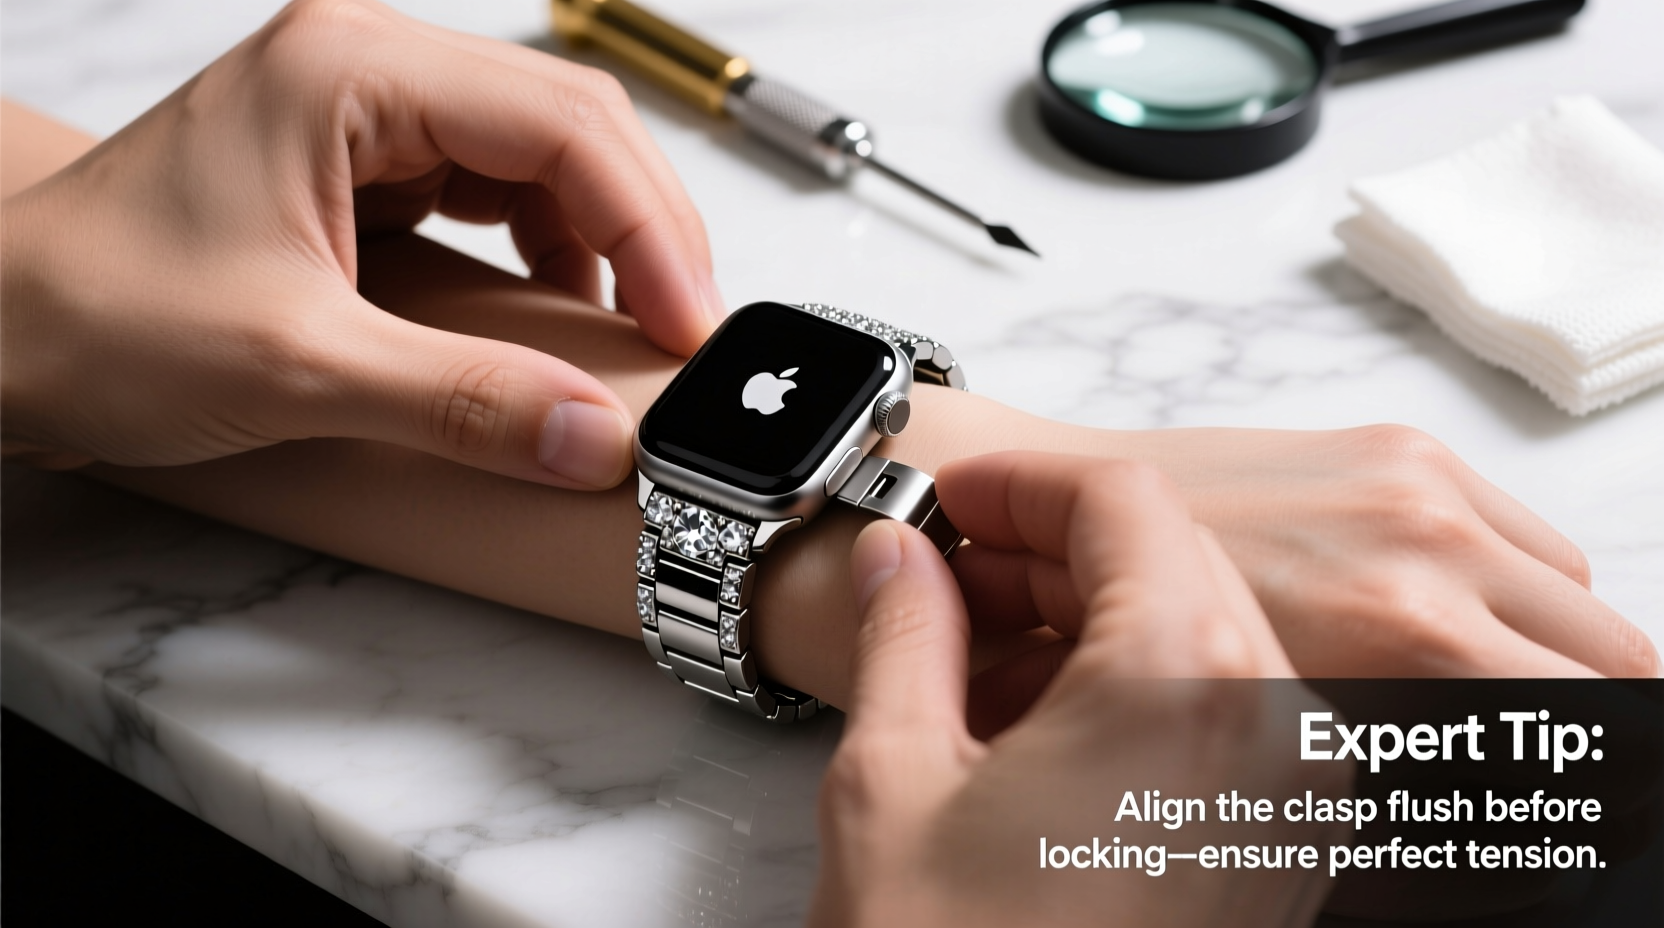
Step-by-Step Installation Process
Installing a diamond band requires precision. Rushing this process can damage the stones, scratch the watch case, or result in an insecure fit. Follow this sequence carefully:
- Power down your Apple Watch – While not always necessary, turning off the device prevents accidental screen activation during handling.
- Place the watch on a soft, lint-free surface – Use a microfiber cloth to avoid scratches from debris.
- Press the release button on your current band – Located on the back edge of the existing band connector, slide it toward the center of the watch until the band disengages.
- Align the new diamond band’s connector with the lug slot – Hold the band at a slight upward angle and insert the pin fully into the lug until you hear a soft click.
- Repeat on the opposite side – Ensure both sides are seated evenly and flush against the case.
- Gently tug on the band – Test stability by pulling lightly from multiple directions. There should be no wobble or lateral movement.
Take extra care when handling the diamond-embedded sections. Avoid pressing directly on the stones during installation, as excessive force can loosen prongs or misalign settings.
“Luxury watch bands demand the same attention as fine jewelry. One misaligned pin can compromise both security and appearance.” — Daniel Reyes, Master Watch Technician & Certified Apple Repair Specialist
Securing the Band: Pro Checks for Long-Term Safety
Once installed, perform a series of verification checks to ensure the band remains secure through daily activities like exercise, typing, or commuting.
Key Security Checks
| Check | Purpose | Frequency |
|---|---|---|
| Pin Lock Engagement | Ensures the spring pin is fully seated and locked in place | After every removal/reinstallation |
| Stone Integrity | Verifies no loose, chipped, or missing diamonds | Weekly visual inspection |
| Clasp Functionality | Confirms secure closure without slippage | Daily before extended wear |
| Band Alignment | Prevents uneven pressure that could stress connectors | Monthly or after impact |
If your diamond band uses a folding or deployant clasp, test its latch mechanism rigorously. These closures are stronger than standard buckles but can fail silently if internal springs weaken. Close the clasp and attempt to open it with one hand using only thumb pressure—it should resist easy release.
Common Mistakes That Compromise Security
Even experienced users make errors when excited about a new luxury band. Here are frequent oversights and how to avoid them:
- Forcing the connector: If the pin doesn’t slide in smoothly, double-check alignment. Forcing it can bend the pin or damage the lug.
- Ignoring moisture exposure: Sweat, chlorine, and saltwater can corrode metal settings over time, especially in lower-karat gold or plated finishes.
- Over-tightening adjustable links: Excessive tension on screw-in links may strip threads or distort the band’s natural curve.
- Sleeping or exercising with delicate designs: Impact from tossing in bed or gym equipment can knock stones loose.
One customer, Sarah K., learned this the hard way after wearing her diamond mesh band during a spin class. “I didn’t think sweat would matter,” she said. “But two days later, I found a tiny stone missing near the clasp. Now I switch to a sport band for workouts and reserve the diamond one for evenings.”
Do’s and Don’ts Summary
| Do | Don't |
|---|---|
| Clean gently with a soft brush and mild soapy water | Use ultrasonic cleaners unless approved by the manufacturer |
| Store separately in a padded jewelry box | Toss it into a bag with keys or other metal objects |
| Inspect connections weekly | Assume the band is ‘set and forget’ after installation |
| Rotate bands based on activity | Wear a diamond band 24/7 without breaks |
FAQ: Common Questions About Diamond Apple Watch Bands
Can I install a diamond band myself, or should I go to a professional?
You can safely install most diamond bands yourself if you follow proper technique and handle components gently. However, if the band uses non-standard hardware (e.g., threaded screws, hidden clasps), visiting an authorized service provider ensures correct torque and alignment without voiding warranties.
How do I know if a diamond band is high quality?
Look for hallmarks indicating material grade (e.g., “316L” for surgical steel), even stone distribution, secure prong settings, and smooth connector action. Reputable sellers provide certification for diamonds (natural or lab-grown) including cut, clarity, and carat weight per stone.
What should I do if a stone becomes loose?
Stop wearing the band immediately. Place it in a secure container and contact the manufacturer or a qualified jeweler. Attempting DIY repairs often leads to further damage. Most premium brands offer complimentary re-tipping services within the first year.
Final Recommendations for Lasting Elegance and Confidence
A diamond Apple Watch band blends cutting-edge technology with timeless luxury—but only when installed and maintained with care. Treat it not just as an accessory, but as an investment in personal style and craftsmanship. By following precise installation steps, conducting regular security checks, and respecting its limitations, you preserve both beauty and function.
Remember: the finest band is only as reliable as its weakest connection. Take five minutes each week to verify its condition. Rotate it with more resilient options for active days. And never underestimate the value of professional servicing when something feels off.


 浙公网安备
33010002000092号
浙公网安备
33010002000092号 浙B2-20120091-4
Comments
No comments yet. Why don't you start the discussion?