
Running Cat 6 cable through your home is one of the most effective ways to build a fast, reliable, and future-ready network. While Wi-Fi has improved dramatically, wired Ethernet still offers lower latency, higher consistency, and better performance for gaming, streaming, and remote work. Done correctly, a well-planned cable run can last decades without needing upgrades. But poor installation can lead to signal degradation, frustration, and costly rework. Follow these expert strategies to install Cat 6 cabling like a seasoned professional.
Plan Your Network Layout First
Before you pick up a drill or fish tape, map out your entire network. Identify every room that needs a connection—home office, living room, entertainment center, basement, or guest bedroom. Sketch a floor plan and mark each desired jack location. This prevents haphazard runs and ensures no room is overlooked.
Consider both current and future needs. Will you add smart home panels, security systems, or additional workspaces? Installing extra cables now costs little compared to opening walls later. A common rule: run at least two cables to critical locations like home offices or media centers—one for data, one as backup or for PoE (Power over Ethernet) devices.
Choose the Right Cable and Materials
Not all Cat 6 cable is created equal. For in-wall installations, use solid-core Cat 6 rated for plenum (CMP) or riser (CMR) spaces depending on your local building codes. Solid core offers better performance over long distances than stranded cable, which is more suited for patch cords.
- CMP (Plenum): Required for air-handling spaces (like drop ceilings used as return air pathways). Fire-resistant and low-smoke.
- CMR (Riser): Suitable for vertical runs between floors but not plenum spaces.
- PVC-jacketed: Only for non-wall use, such as surface-mounted raceways.
Also invest in quality accessories: RJ45 keystone jacks, wall plates, punch-down tools, and a reliable cable tester. Avoid “economy” jacks—they often fail certification tests even with perfect terminations.
“Consistent termination technique matters more than people think. A single untwisted pair over ½ inch can degrade throughput by up to 30%.” — Mark Tran, Network Infrastructure Consultant
Step-by-Step Guide to Running Cable Through Walls
Executing clean, invisible cable runs requires patience and the right sequence. Follow this proven process:
- Locate studs and obstacles: Use a stud finder and avoid electrical wiring. Never assume joists run parallel to walls—verify with a small inspection hole.
- Create access points: Drill through top or bottom plates from accessible areas like closets, basements, or attics. Keep holes at least 1¼ inches from the edge of a stud to prevent nail strikes.
- Fish the cable: Use a fiberglass fish tape. Attach the cable securely with electrical tape (not knots), and pull gently to avoid damaging conductors.
- Maintain bend radius: Never kink Cat 6. The minimum bend radius is four times the cable diameter (~1 inch). Sharp bends increase crosstalk and reduce performance.
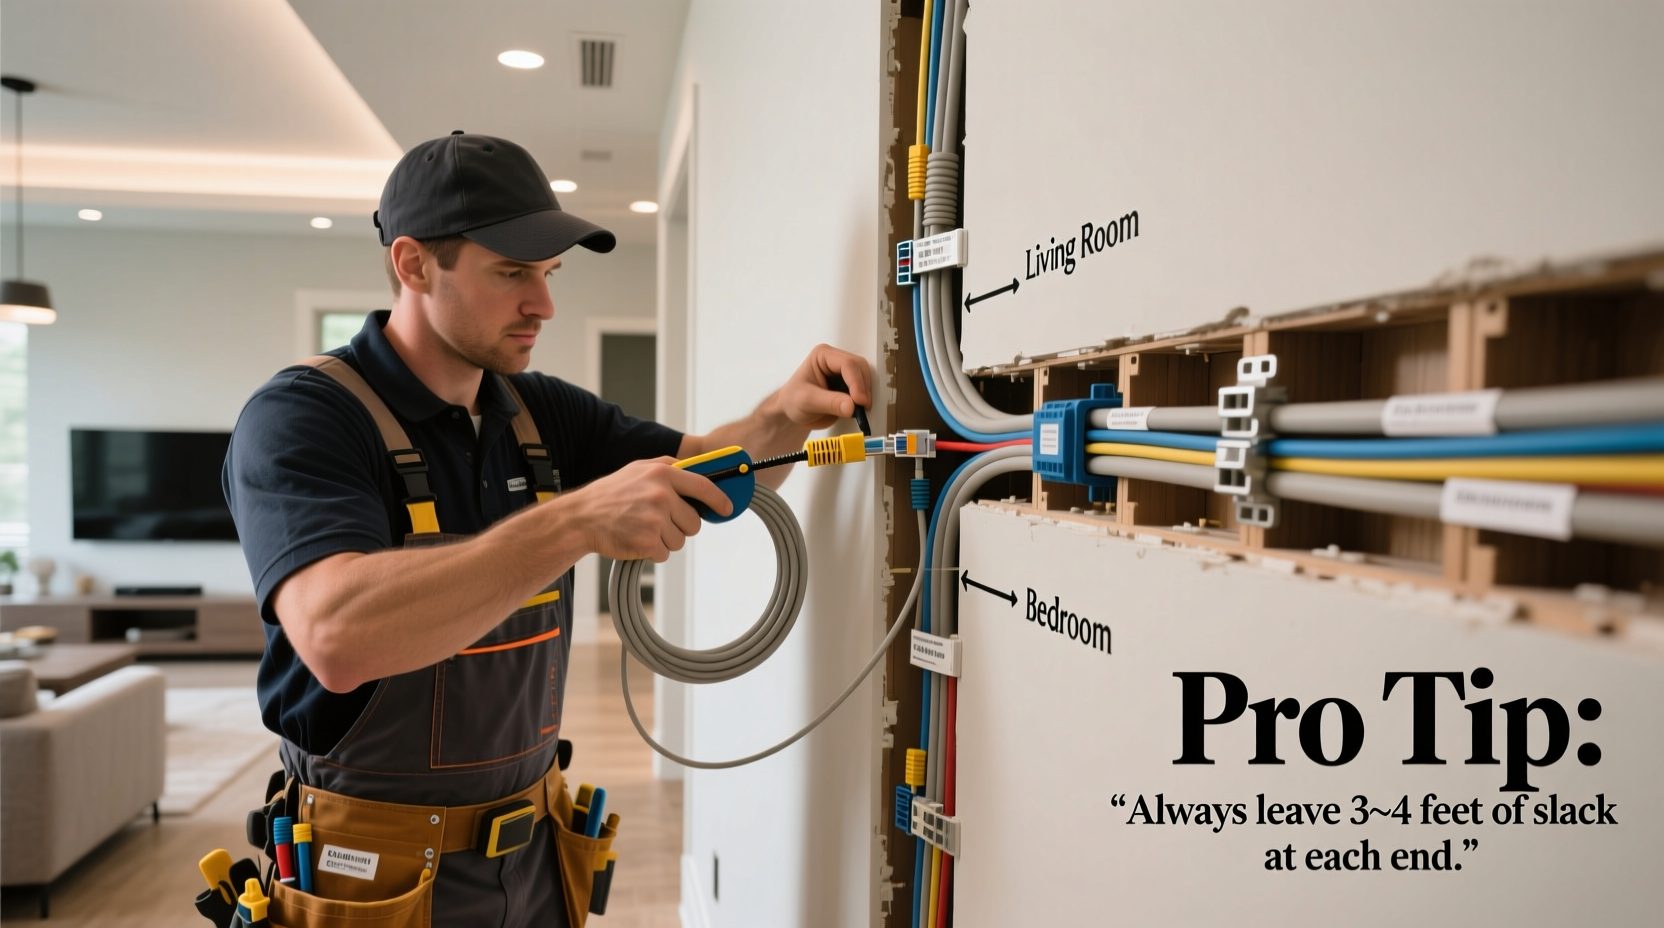
- Leave slack: Pull an extra 1–2 feet at each end for termination and future adjustments.
- Seal openings: Use fire-rated caulk or foam to seal holes through firewalls or between floors to meet code and improve energy efficiency.
Do’s and Don’ts of Cat 6 Installation
| Do’s | Don’ts |
|---|---|
| Keep cable away from power lines (minimum 12-inch separation) | Cross electrical wires at sharp angles—never run parallel |
| Use velcro straps instead of zip ties to avoid crushing the cable | Over-tighten ties, which deforms internal pairs |
| Test every run with a cable certifier before closing walls | Assume a cable works just because it clicks into a switch |
| Terminate with T568A or T568B standard—stick to one across all jacks | Mix wiring standards in the same building |
| Label every port and maintain a master log | Rely on memory or inconsistent naming |
Real-World Example: Wiring a Two-Story Home
John, a remote software developer in Austin, wanted gigabit speeds in his upstairs office and basement media room. He began by drawing a simple layout showing desired drops. From the attic, he drilled down into the top plate of the second-floor office, fished the cable using a glow rod, and fed it through the baseboard to the outlet location. For the basement, he ran cable from the attic through an interior closet wall, down into the basement ceiling, and along joists to the entertainment center.
He avoided a major mistake by rerouting one cable that ran within 6 inches of a circuit breaker panel. After testing, he found interference causing packet loss. By relocating the run just 18 inches away, the issue vanished. His final step was terminating all jacks, labeling them clearly, and testing each with a Fluke MicroScanner. Every link passed Gigabit Ethernet certification.
Essential Tools Checklist
Having the right tools streamlines the job and reduces damage to walls and cables. Here’s what professionals always carry:
- Fiberglass fish tape (25–50 ft)
- Stud finder with AC detection
- Drill with long spade bits (¾” and 1”) and flexible extension
- Punch-down tool (impact type recommended)
- Cable stripper and wire cutter
- Keystone jacks (Cat 6 shielded or unshielded based on environment)
- Wall plates (single, dual, or quad)
- Cable tester (basic continuity) or certifier (for professional-grade validation)
- Velcro straps and labels
- Drywall saw and patching supplies
FAQ: Common Questions About Cat 6 Installation
Can I run Cat 6 alongside electrical wiring?
You can, but only if they cross at 90-degree angles. Avoid running Ethernet parallel to high-voltage cables for more than a few inches. If unavoidable, maintain at least 12 inches of separation or use shielded Cat 6 (STP) and grounded outlets.
How long can a Cat 6 cable run be?
The maximum distance for reliable 1 Gbps performance is 100 meters (328 feet). Beyond that, consider a network switch to extend the reach. For 10 Gbps speeds, keep runs under 55 meters (~180 feet) to ensure stability.
Should I use shielded (STP) or unshielded (UTP) Cat 6?
UTP is sufficient for most homes. STP adds protection against electromagnetic interference and is worth considering near HVAC systems, utility rooms, or industrial-grade appliances. However, STP must be properly grounded at both ends—improper grounding worsens performance.
Final Tips for a Professional Finish
Once cables are pulled and tested, finalize your setup with clean terminations. Terminate each cable onto a keystone jack using a punch-down tool, following the T568B standard consistently. Mount jacks into wall plates and secure them with screws—don’t leave loose outlets dangling.
At the central hub (network closet or utility area), organize cables with labeled patch panels. Connect them to a managed gigabit switch. This makes future troubleshooting easy and gives your system a polished, scalable foundation.
Finally, document everything: take photos of each run, note cable lengths, and store a printed map with your router. Future-you will thank you during upgrades or repairs.
“Every great smart home starts with a wired backbone. Wi-Fi rides on top of Ethernet—build the foundation first.” — Sarah Lin, Smart Home Integration Specialist
Conclusion
Running Cat 6 cable through your home doesn’t require a contractor, but it does demand planning, precision, and respect for best practices. With the right tools, materials, and methodology, you can achieve performance that rivals commercial installations. Whether you’re cutting holes in drywall or routing through tight attic spaces, each decision shapes your network’s reliability for years to come.


 浙公网安备
33010002000092号
浙公网安备
33010002000092号 浙B2-20120091-4
Comments
No comments yet. Why don't you start the discussion?