
A properly functioning pool pump is the heart of any swimming pool system. When air infiltrates the suction side of the pump, it disrupts water flow, reduces filtration efficiency, and can even damage equipment over time. Air leaks are a common yet often misunderstood issue that homeowners face, especially during seasonal maintenance or after repairs. Left unattended, they lead to noisy operation, reduced circulation, and increased energy costs. The good news is that most air leaks are preventable—and usually fixable—with basic tools and a methodical approach.
How Air Leaks Affect Your Pool System
Air entering the pump system typically comes from the suction side—anywhere between the skimmer and the pump inlet. When air mixes with water before it reaches the pump, it creates turbulence, which reduces the pump’s ability to prime and circulate water effectively. This leads to several telltale signs:
- Loss of prime (pump won’t hold water)
- Gurgling or popping sounds from the pump
- Foam or bubbles in the return lines or pool surface
- Low water pressure in jets
- Increased wear on the pump motor due to cavitation
The presence of air forces the pump to work harder, shortening its lifespan and increasing electricity usage. According to the U.S. Department of Energy, inefficient pool pumps can account for up to 50% of a home’s outdoor energy use. Fixing air leaks isn’t just about convenience—it’s an energy-saving imperative.
“Even a small air leak can degrade pump performance by over 30%. Early detection and sealing are critical for long-term system health.” — Carlos Mendez, Certified Pool Operator and HVAC-Pool Systems Technician
Step-by-Step Guide to Locate Common Leak Points
Pinpointing the source of an air leak requires patience and attention to detail. Follow this timeline-based diagnostic process:
- Turn off the pump and relieve pressure. Shut down the system and close any valves on the discharge side to prevent backflow.
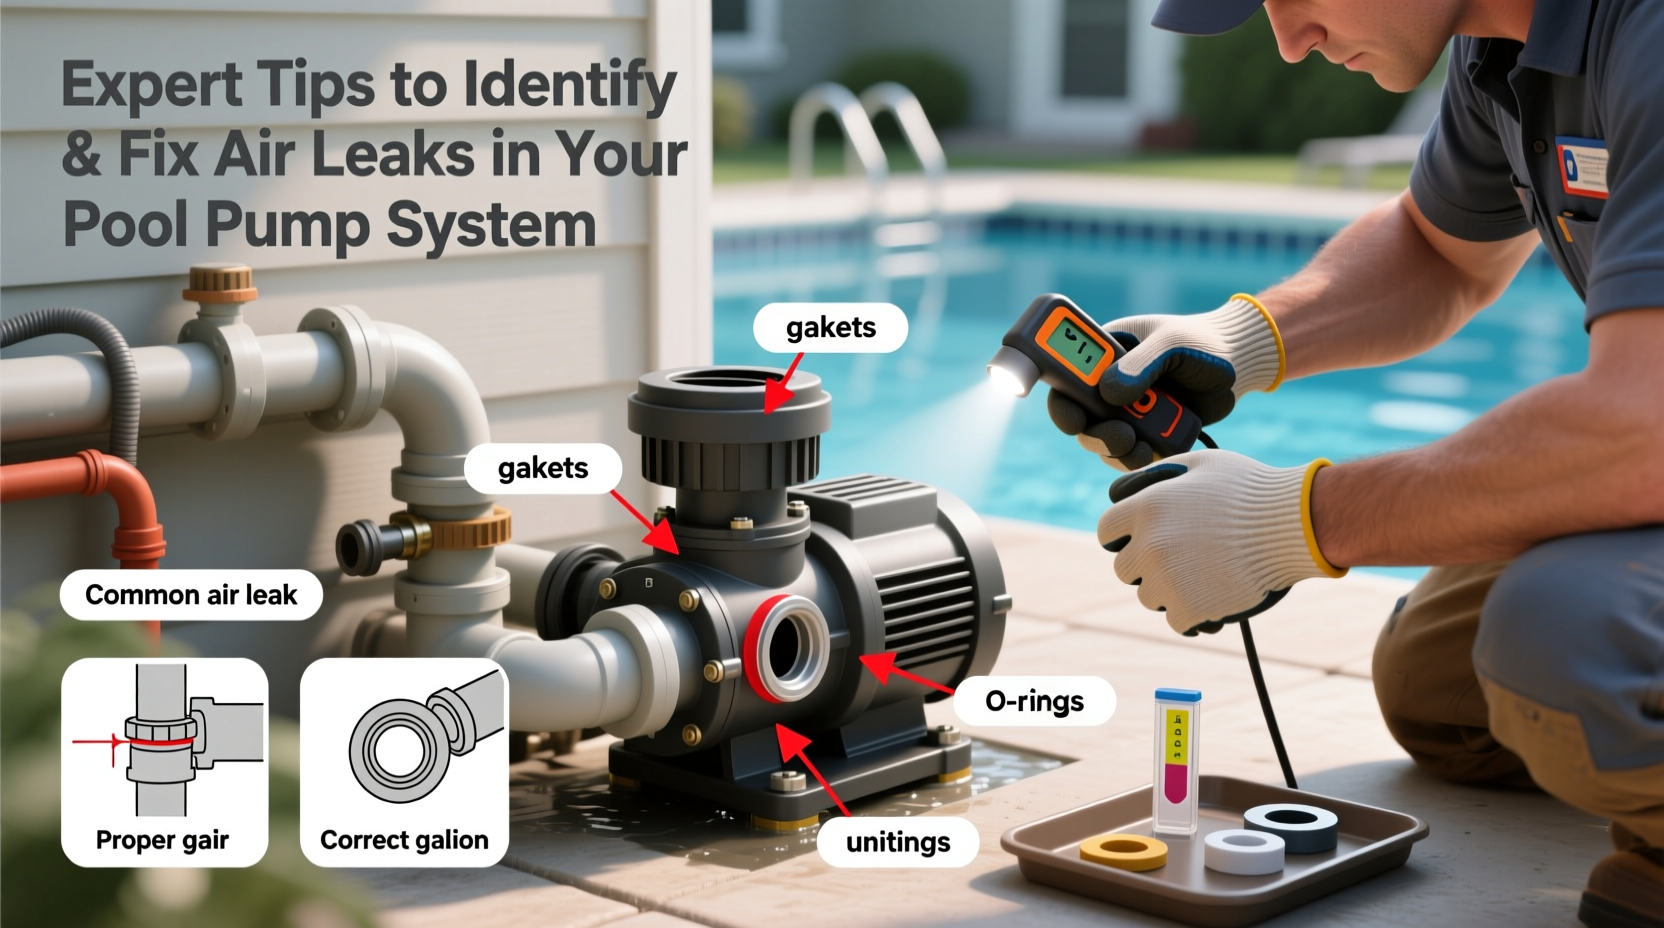
- Inspect the pump lid and O-ring. Remove the pump strainer cover and examine the O-ring for cracks, brittleness, or misalignment. Clean both the O-ring and the groove with a non-abrasive cloth.
- Check all threaded connections. Look at unions, plugs, and fittings on the suction line. Tighten hand-tight unions gently with a wrench—over-tightening can cause cracks.
- Examine the skimmer body and weir door. Cracks in the skimmer or a warped weir (the floating door) can allow air entry when water levels drop.
- Inspect PVC joints and glue seals. Use a flashlight to check for hairline fractures or poor solvent welding, especially near the pump and skimmer.
- Test with soapy water. With the pump running, apply a mixture of dish soap and water to suspected joints. Bubbles will form at the leak site.
Common Fix Solutions by Leak Location
Not all air leaks require professional help. Many can be resolved with DIY techniques using readily available materials. Below is a comparison of common leak points and their recommended fixes:
| Leak Location | Symptoms | DIY Fix | When to Call a Pro |
|---|---|---|---|
| Pump Lid O-Ring | Bubbles in strainer basket, wet housing | Clean or replace O-ring; lubricate with silicone grease | If housing is cracked |
| Union Fitting (Suction Side) | Gurgling noise, loose connection | Re-seat and tighten; apply pipe sealant if needed | If threads are stripped |
| Skimmer Body | Air only when water level is low | Seal cracks with underwater epoxy | If structural integrity is compromised |
| PVC Pipe Joint | Visible crack, dripping when off | Cut out and re-glue section with proper primer and cement | If multiple joints are failing |
| Drain Plug (Pump Housing) | Dripping or bubbling around plug | Tighten or replace plug with new O-ring | If plug hole is stripped |
Mini Case Study: Resolving a Persistent Priming Issue
A homeowner in Phoenix reported that their pool pump would lose prime every few hours, despite replacing the filter and cleaning the skimmer. Initial inspection revealed no visible water leaks. However, upon closer examination, the technician noticed fine bubbles forming around the pump union when the system was running. A soapy water test confirmed a micro-leak at the threaded joint.
The root cause? The original installer had used Teflon tape instead of a rubber gasket on a compression union—a common mistake on the suction side where negative pressure demands a perfect seal. After replacing the union with a proper rubber O-ring and tightening it evenly, the pump held prime consistently. Water clarity improved within 24 hours due to restored circulation.
This case underscores a key principle: not all leaks are wet. Air can enter without leaving a water trail, making visual inspection alone insufficient.
Preventative Maintenance Checklist
To avoid recurring air leaks, adopt a proactive maintenance routine. Use this checklist seasonally or after major weather events:
- ✅ Inspect the pump O-ring monthly for dryness or deformation
- ✅ Lubricate the O-ring with silicone-based grease (never petroleum-based)
- ✅ Ensure pool water level stays at mid-skimmer height
- ✅ Check for cracks in skimmer, plumbing, and pump housing
- ✅ Verify all unions and plugs are snug but not over-tightened
- ✅ Bleed air from the filter tank after priming
- ✅ Monitor pressure gauge for sudden drops indicating air ingress
Frequently Asked Questions
Can I use plumber’s tape on pool pump connections?
No—Teflon tape is designed for pressurized water systems, not vacuum conditions. On the suction side of a pool pump, use rubber gaskets or O-rings. Tape can create a false seal and degrade quickly under negative pressure.
Why does my pump only suck air when the water level is low?
Low water levels expose the skimmer intake, allowing air to be drawn directly into the system. Maintain water levels at the midpoint of the skimmer opening to ensure consistent submersion of the intake line.
Is it normal for some bubbles to come out of the returns?
A few small bubbles may appear briefly after turning the pump on, especially after maintenance. However, continuous foaming or large bubbles suggest an active air leak that needs investigation.
Final Thoughts and Action Steps
Identifying and fixing air leaks in your pool pump system doesn’t require advanced engineering skills—just observation, logic, and the right tools. By understanding how air enters the system and where to look, you can restore efficient operation, extend equipment life, and reduce energy waste. Small issues like a dried O-ring or a loose union can snowball into costly repairs if ignored.
Start with a thorough inspection using the soapy water method. Address each potential leak point systematically. Document your findings and any fixes applied—this log becomes invaluable for future troubleshooting. Remember, prevention is far more effective than repair.


 浙公网安备
33010002000092号
浙公网安备
33010002000092号 浙B2-20120091-4
Comments
No comments yet. Why don't you start the discussion?