
When your garage door sensors aren’t lighting up, the safety system is compromised, and your garage door won’t operate reliably. These small but critical components use infrared beams to detect obstructions. If the lights are off—either on both units or just one—it signals a problem that needs immediate attention. Ignoring it can lead to malfunction, security risks, or even damage to the opener. This guide walks you through diagnosing and fixing non-responsive sensors using practical, field-tested methods.
Understanding How Garage Door Sensors Work
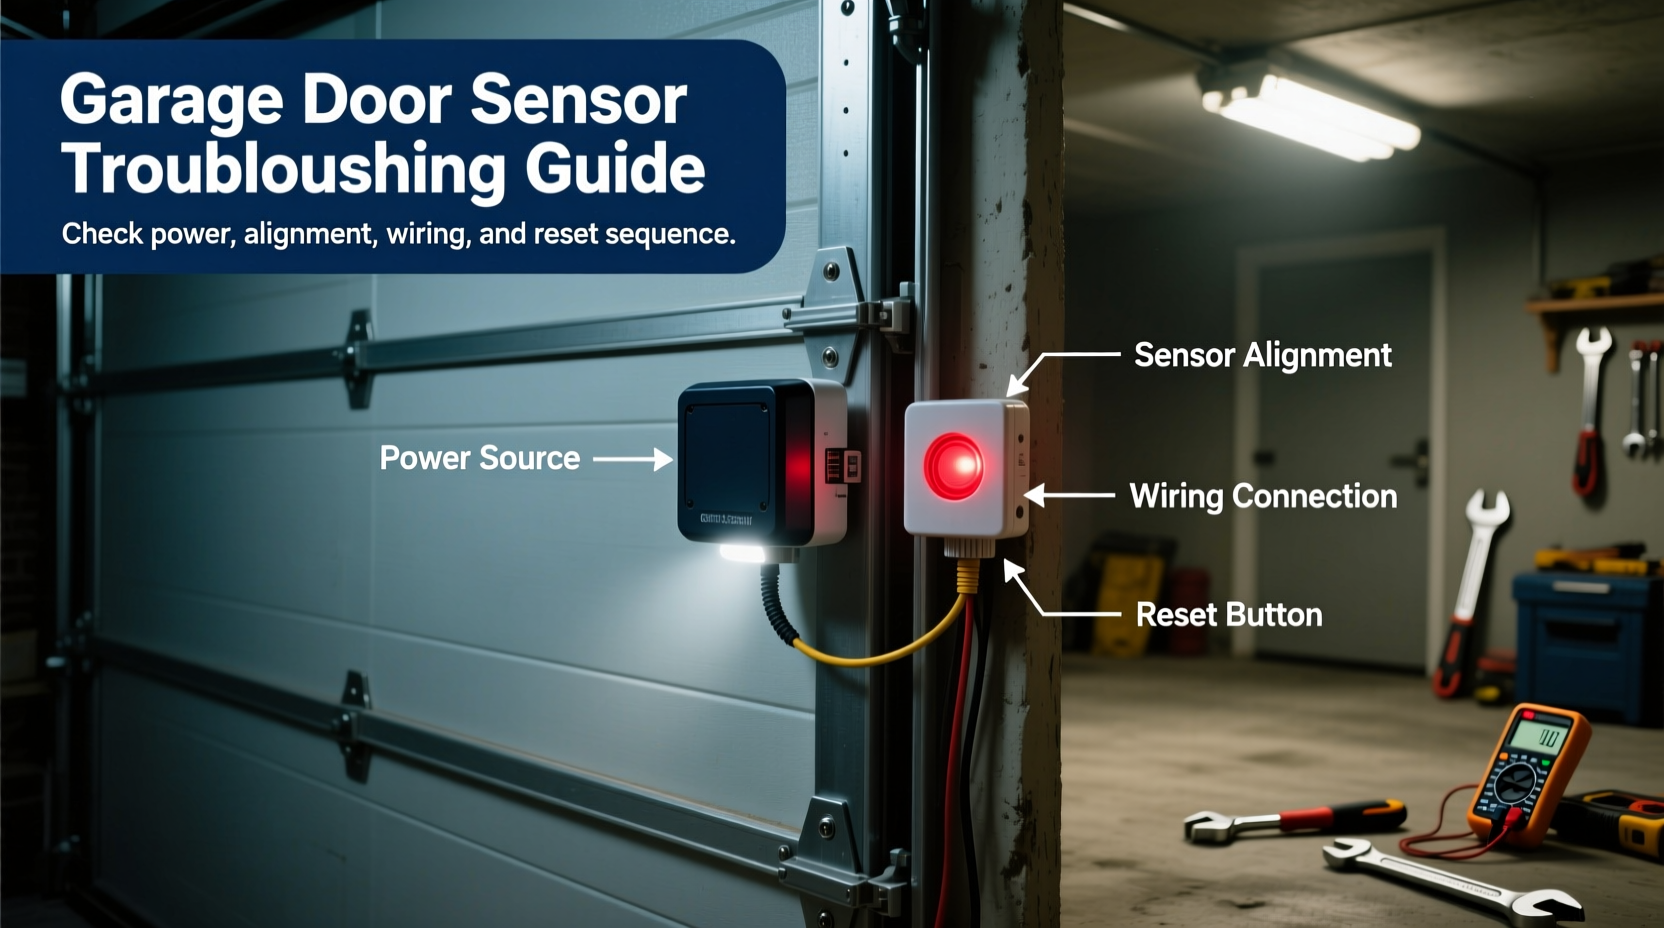
Garage door safety sensors are installed near the base of each side of the garage door tracks, about six inches above the floor. One unit emits an invisible infrared beam; the other receives it. When the beam is interrupted—by a person, pet, or object—the door reverses automatically. Each sensor has an LED indicator: typically green for the sender and amber or red for the receiver when properly aligned and powered.
If neither light is on, the issue likely lies in power delivery or wiring. If only one light is out, misalignment or a faulty unit may be the cause. The absence of illumination means the system cannot confirm a clear path, so the opener disables closing functions as a safety measure.
“Over 70% of garage door malfunctions tied to sensors stem from misalignment or loose wiring—not component failure.” — Mark Reynolds, Residential Automation Technician with 15 years of experience
Step-by-Step Troubleshooting Process
Follow this systematic approach to identify and resolve why your sensors aren’t lighting up. Start simple and progress to more involved checks.
- Verify Power Supply: Ensure the garage door opener is plugged in and receiving electricity. Check the circuit breaker or GFCI outlet if applicable. A tripped breaker can cut power to both the opener and sensors.
- Inspect Sensor Lights: Stand at floor level and look directly at each sensor’s LED. Lighting may be faint in bright garages. Note which light—if any—is illuminated.
- Check for Physical Obstructions: Wipe lenses with a soft cloth. Dust, cobwebs, or paint splatter can block the beam and interfere with operation—even if lights should be on.
- Examine Wiring Connections: Trace the low-voltage wires from each sensor back to the opener. Look for cuts, pinches (especially near brackets), or loose terminals at the motor head.
- Test Alignment: Misaligned sensors often result in no light on the receiving end. Adjust the mounting bracket screws slightly while observing the receiver light.
- Bypass Test (Use with Caution): Disconnect the sensor wires from the opener terminals and briefly touch them together. If the door closes, the sensors are the issue. Do not leave bypassed—this disables safety features.
Common Causes and Fixes
The root cause of dead sensor lights usually falls into one of five categories. Addressing these in order increases your chances of a quick fix.
| Issue | Symptoms | Solution |
|---|---|---|
| Loose Wiring | No lights, intermittent operation | Reconnect wires at sensor and opener; secure with wire nuts |
| Misalignment | One light off, door reverses unexpectedly | Adjust bracket screws until both LEDs are steady |
| Damaged Cables | Frayed insulation, chew marks (rodents) | Replace wiring run or use conduit for protection |
| Power Surge Damage | No response after storm or electrical spike | Test voltage; replace sensors if internal circuitry failed |
| Failed Sensor Unit | No light despite power and correct wiring | Replace both sensors (they work as a pair) |
Real-World Example: The Weekend Projector That Caused Chaos
A homeowner in Denver installed a projector screen in the garage, lowering it from the ceiling every weekend. After a month, the garage door refused to close. The sensors showed no lights. Initial checks revealed clean lenses and firm wiring. Upon closer inspection, the screen’s metal housing was blocking the infrared beam path. Even though the physical obstruction wasn’t touching the sensors, the repeated vibration from the screen motor had loosened the receiver’s wire connection. Re-seating the terminal and rerouting the cable away from moving parts resolved the issue permanently.
This case illustrates how secondary systems can indirectly affect sensor performance—highlighting the importance of reviewing recent changes in the garage environment.
Do’s and Don’ts When Handling Sensor Repairs
- Do test both sensors simultaneously—use a smartphone camera to see the IR beam (it appears as a faint purple glow).
- Do label wires before disconnecting to avoid mix-ups.
- Do replace sensors in pairs—mixing old and new units can cause compatibility issues.
- Don’t attempt to power sensors directly from household current—they operate on 5–24V DC from the opener.
- Don’t ignore flickering lights—this indicates unstable connections that will worsen over time.
- Don’t mount sensors higher than recommended—children and pets must be detectable within the safety zone.
Preventive Maintenance Checklist
Regular upkeep prevents most sensor failures. Perform this checklist every three months:
- ✅ Clean sensor lenses with a microfiber cloth
- ✅ Confirm both LED indicators are lit and steady
- ✅ Inspect wiring for wear, especially near hinges or rollers
- ✅ Verify alignment by gently jiggling the sensor—light should not flicker
- ✅ Test door reversal by placing a rolled towel in the closing path
- ✅ Tighten mounting screws to prevent vibration shift
Frequently Asked Questions
Why are both garage door sensor lights off?
When neither sensor lights up, the most common causes are a loss of power to the opener, a tripped breaker, or a wiring fault between the sensors and the motor unit. Begin by checking the outlet and breaker, then inspect the low-voltage wires for disconnections or damage.
Can I replace garage door sensors with a different brand?
While universal sensors exist, it’s best to use manufacturer-recommended models. Compatibility issues with voltage, signal type, or connector design can prevent proper function. If substituting, ensure the replacement matches the opener’s specifications exactly.
Is it safe to operate the garage door if sensors aren’t working?
No. Operating the door without functional sensors bypasses a critical safety feature designed to prevent injury or property damage. The door may close on obstacles without reversing. Repair or replace faulty sensors before resuming normal use.
Final Steps and Long-Term Reliability
Fixing non-lighting garage door sensors often takes less than 30 minutes when the problem is caught early. Most issues are mechanical or connection-based—not requiring part replacements. However, if troubleshooting fails after verifying power, wiring, and alignment, invest in a new sensor set. Modern kits cost under $40 and include detailed installation guides.
Consider upgrading to models with enhanced diagnostics, such as dual-color LEDs that distinguish between power and signal status. Some smart openers also integrate app alerts when sensors go offline—adding peace of mind.
“The fastest repair isn’t always the cheapest part swap. Nine times out of ten, it’s a loose wire or dirty lens.” — Luis Mendez, Certified Door Technician, Overhead Door Systems


 浙公网安备
33010002000092号
浙公网安备
33010002000092号 浙B2-20120091-4
Comments
No comments yet. Why don't you start the discussion?