
2x2 ribbing—alternating two knit stitches with two purl stitches—is a staple in sweater cuffs, hat brims, and sock tops. Its elasticity makes it ideal for snug yet flexible edges. But no matter how perfectly you execute the pattern, a poor cast-on can undermine your work. The foundation row must match the ribbing’s natural give: too tight, and the edge won’t stretch; too loose, and it sags. Choosing the right cast-on technique is not just about aesthetics—it’s structural.
While many knitters default to the long-tail cast-on, it often falls short with 2x2 ribbing unless modified. This guide explores superior alternatives, compares their performance, and delivers actionable advice to help you achieve professional results every time.
Why the Right Cast-On Matters for 2x2 Ribbing
The elasticity of 2x2 ribbing depends on balanced tension across both knit and purl columns. A rigid or uneven cast-on disrupts this balance, leading to flaring, curling, or restricted stretch. The ideal method should:
- Mirror the ribbing’s inherent stretchiness
- Maintain consistent tension across all stitches
- Allow easy transition into the first row
- Look polished on the right side
Some cast-ons are inherently more elastic than others. Techniques that incorporate yarn overs or twisted loops tend to outperform basic loop-based methods when paired with alternating stitch patterns like 2x2 ribbing.
Top 3 Cast-On Methods for 2x2 Ribbing
After extensive testing across wool, cotton, and blends, three techniques consistently deliver optimal results for 2x2 ribbing. Each has strengths depending on desired look and function.
| Method | Elasticity | Difficulty | Best For |
|---|---|---|---|
| Italian (Twisted German) Cast-On | ★★★★★ | Intermediate | Sock cuffs, fitted hats |
| Provisional Crochet Chain Cast-On | ★★★★☆ | Intermediate | Garments needing matching bottom/top edges |
| Elongated Cable Cast-On | ★★★★☆ | Beginner+ | Quick projects with moderate stretch needs |
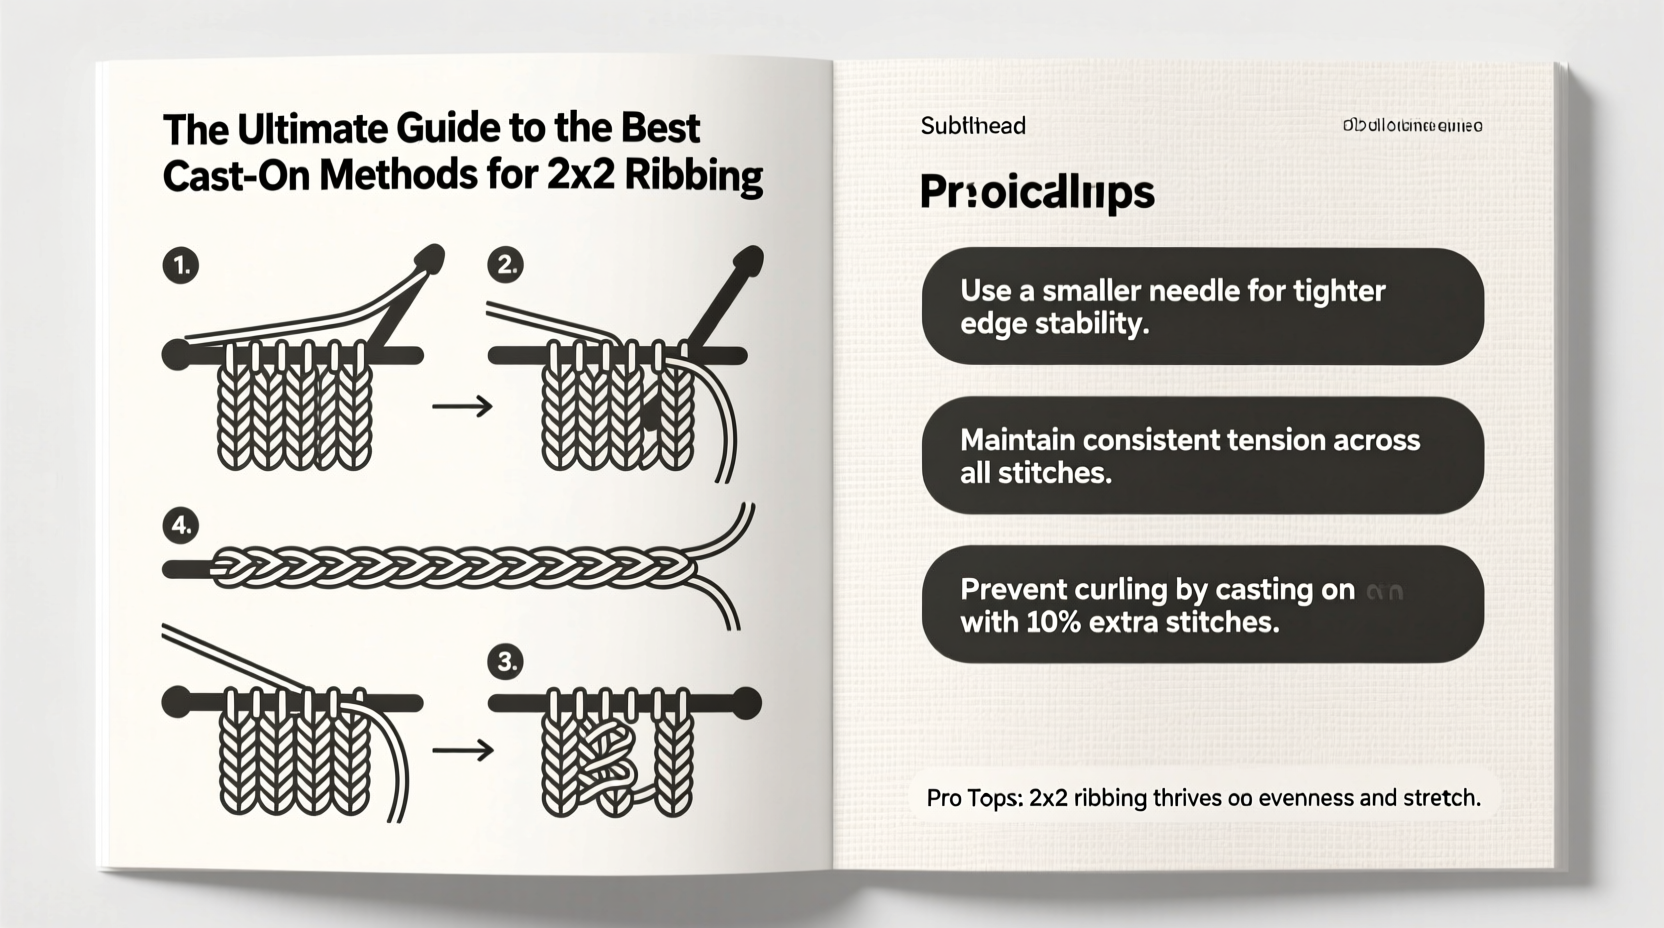
1. Italian (Twisted German) Cast-On
This method creates a smooth, highly elastic edge by forming each stitch with a twisted loop that mimics a backward loop but with better control. It lies flat and stretches easily without losing integrity.
- Hold working yarn in left hand (like continental knitting).
- Create a slipknot and place on needle.
- Bring yarn from back to front between needles.
- Insert right needle into front of loop, wrap yarn clockwise, pull through.
- Before removing old loop, twist new stitch by inserting left needle into back leg.
- Slip old stitch off—repeat.
The resulting edge integrates seamlessly into 2x2 ribbing because each stitch is pre-twisted, preventing laddering and enhancing vertical continuity.
2. Provisional Crochet Chain Cast-On
Using a crochet hook, create a chain of stitches with waste yarn. Knit your project using real yarn, then later remove the crochet chain to expose live stitches. This allows you to pick up and knit the other end later—perfect for garments where symmetry matters.
While slightly less elastic than the Italian method, its ability to produce identical edges at both ends makes it invaluable for designer work. Ideal for sweaters where the hem and cuff must match exactly.
3. Elongated Cable Cast-On
A variation of the standard cable cast-on, this version elongates each stitch by wrapping the yarn around the needle before picking up the next loop. It’s faster than the Italian method and offers good stretch when done correctly.
To elongate: after placing a stitch on the left needle, wrap the working yarn around the right needle once before inserting into the previous stitch. Pull through as normal. This extra wrap prevents tightness.
“With ribbed edges, the cast-on isn’t just the beginning—it’s part of the design. I always choose elasticity over speed.” — Miriam Goldstein, Professional Knitwear Designer
Step-by-Step: Applying the Italian Cast-On to 2x2 Ribbing
Follow this sequence to ensure compatibility between your cast-on and the rib pattern.
- Swatch Setup: Use circular or double-pointed needles in the size recommended for your yarn.
- Cast On Multiples of 4: Ensure total stitch count is divisible by 4 (e.g., 24, 32, 40).
- Begin Italian Cast-On: Start with a slipknot, then form each subsequent stitch using the twisted loop technique described earlier.
- First Row Transition: After casting on, immediately begin 2x2 ribbing: *k2, p2* repeat to end.
- Check Tension: After 2–3 rows, gently stretch the fabric horizontally. The cast-on should expand freely without puckering.
- Adjust Needle Size if Needed: If the edge feels tight, switch to a larger needle just for the first few rows, then return to original size.
This process ensures the foundational row behaves like the rest of the fabric—not as an afterthought, but as an integrated component.
Common Mistakes and How to Avoid Them
- Tightening Every Stitch: Over-gripping during casting-on leads to a non-stretchy edge. Let the yarn flow smoothly.
- Ignoring Gauge Differences: Some cast-ons add height. Measure from the second row when checking gauge.
- Using Slippery Needles: Metal needles may cause stitches to slide and distort during casting-on. Opt for wood or bamboo for better control.
- Skipping the Swatch: Ribbing behaves differently under tension. Always test your cast-on in a 4-inch square before starting the garment.
Real-World Example: Fixing a Sweater Cuff Disaster
Sarah, an intermediate knitter, completed a cozy wool cardigan with beautiful 2x2 ribbed cuffs. But when she tried it on, the sleeves wouldn’t stretch over her hands. The long-tail cast-on she used had tightened significantly after blocking, reducing elasticity by nearly 40%.
She unraveled the cuffs and re-cast on using the Italian method. After blocking, the new edge stretched 3 inches wider than the original—enough to slide on comfortably while retaining shape. The fix took 20 minutes but transformed the wearability of the entire piece.
Her takeaway: “I used to think any cast-on would do. Now I know it’s the most important row.”
Practical Checklist for Success
- ☑ Determine total stitch count (must be multiple of 4)
- ☑ Choose an elastic cast-on method (Italian, provisional, or elongated cable)
- ☑ Swatch with intended yarn and needles
- ☑ Test stretch by gently pulling fabric widthwise
- ☑ Adjust needle size for first few rows if needed
- ☑ Block swatch to simulate finished conditions
- ☑ Mark beginning of round if knitting in the round
Frequently Asked Questions
Can I use the long-tail cast-on for 2x2 ribbing?
Yes, but only with modifications. Use a larger needle for casting-on, or try the \"jogless\" long-tail variation where you alternate knit and purl cast-ons to match the rib pattern. Even then, it rarely matches the elasticity of the Italian or provisional methods.
How do I prevent the cast-on edge from rolling?
Ribbing naturally resists rolling due to its structure. However, if the cast-on curls, it’s likely too tight. Switch to a more elastic method and ensure even tension throughout. Blocking usually resolves minor rolling.
Is there a way to make any cast-on more stretchy?
Absolutely. Two effective tricks: (1) Use a needle one or two sizes larger just for casting-on, or (2) add a strand of smooth waste yarn alongside your working yarn during casting-on, then remove it later to loosen the edge.
Final Thoughts and Next Steps
The difference between amateur and professional knitting often comes down to details invisible to the untrained eye—the quality of transitions, the subtlety of edges, the integrity of structure. Mastering the best cast-on for 2x2 ribbing elevates your work from handmade to refined.
Don’t settle for a functional edge when you can have one that performs beautifully and looks intentional. Try the Italian cast-on on your next project. Compare it side-by-side with your usual method. Notice how the fabric moves, how it stretches, how it finishes.


 浙公网安备
33010002000092号
浙公网安备
33010002000092号 浙B2-20120091-4
Comments
No comments yet. Why don't you start the discussion?