
Sanding sheetrock is a critical step in achieving seamless, paint-ready walls. Whether you're repairing a small patch or finishing an entire room, proper sanding eliminates ridges, smoothes joints, and ensures a flawless final appearance. Done poorly, it can leave visible seams, dust everywhere, and hours of rework. The right tools, technique, and attention to detail make all the difference. This guide walks through every aspect of effective sheetrock sanding—from equipment selection to cleanup—so you can achieve professional-grade results without frustration.
Essential Tools for Sanding Sheetrock
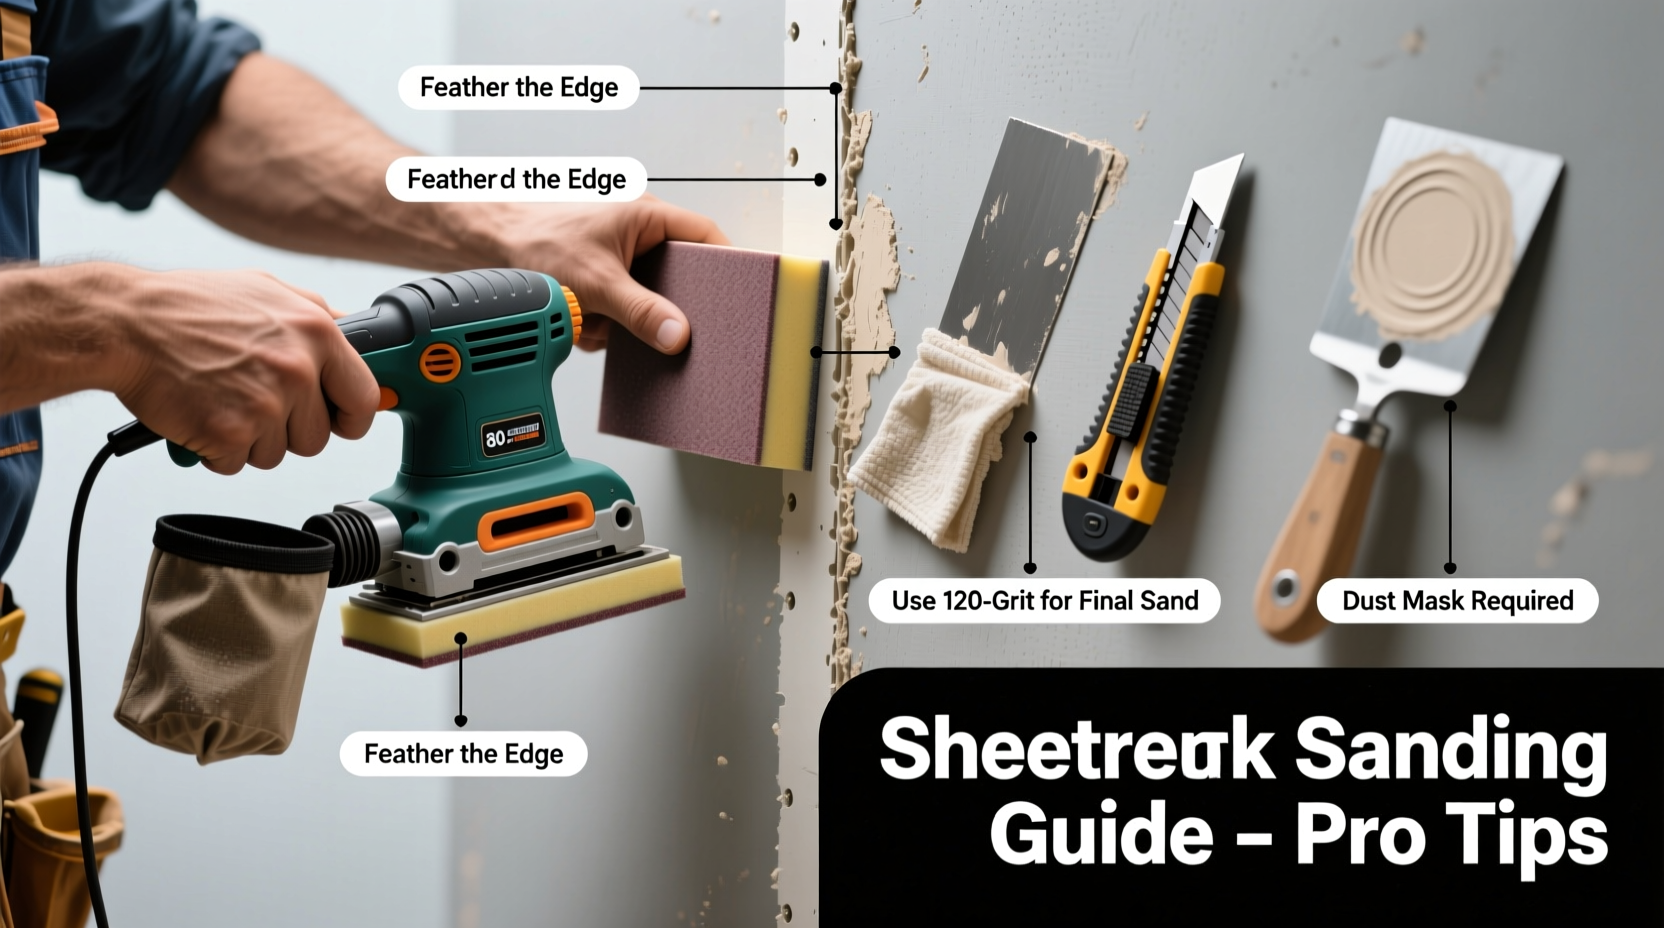
The quality of your finish depends heavily on the tools you use. While some may be tempted to cut corners, investing in the right equipment saves time, reduces dust, and delivers better results.
- Drywall sanding pole (pole sander): Ideal for large flat areas, this tool extends your reach and applies even pressure across wide surfaces.
- Hand sanding block: Offers precision for edges, corners, and around outlets where larger tools can't fit.
- Corner sanding tool: Specifically designed for inside and outside corners, preventing over-sanding and maintaining clean angles.
- Sanding screens and pads: Available in various grits (typically 120–220), these attach to poles or blocks and last longer than traditional paper.
- Vacuum-assisted sander: A high-end option that connects to a shop vac, minimizing airborne dust significantly.
- Dust mask or respirator: Essential for health protection, especially when working in enclosed spaces.
- Work lights: Shine at an angle to reveal imperfections invisible under normal lighting.
Step-by-Step Guide to Sanding Sheetrock Joints
After mudding tape over seams and fasteners, allow the joint compound to dry completely—usually 24 hours—before sanding. Follow this sequence for optimal results:
- Inspect the surface: Run your hand over the joints and look at the wall under angled light. Identify high spots, ridges, or excess mud.
- Start with coarse grit (120): Attach a 120-grit screen to your pole sander and lightly sand raised areas. Avoid aggressive pressure; let the grit do the work.
- Switch to medium-fine grit (150–180): Once major imperfections are gone, refine the surface with a finer screen to prepare for painting.
- Sand edges and corners by hand: Use a corner sponge or hand block to maintain crisp lines without damaging adjacent drywall.
- Feather the edges: Blend the compound smoothly into the surrounding wall so no lip remains. The transition should be gradual and invisible.
- Clean and inspect again: Wipe the area with a damp cloth or vacuum, then recheck under angled light. Touch up if needed.
When to Stop Sanding
Over-sanding is a common mistake. Stop when:
- The joint compound is flush with the drywall surface.
- No ridges or humps remain under touch or light inspection.
- The tape is still fully covered—never expose mesh or paper tape.
“Sanding isn’t about removing as much material as possible—it’s about creating a seamless transition from joint to wall.” — Mark Reynolds, Master Drywaller with 30+ years in residential finishing
Do’s and Don’ts of Sheetrock Sanding
| Do’s | Don’ts |
|---|---|
| Use proper PPE: N95 mask, goggles, and long sleeves | Work without eye or respiratory protection |
| Change sanding screens regularly to maintain effectiveness | Continue using clogged or worn-out screens |
| Work in stages: coarse, then fine grit | Jump straight to fine grit on thick mud buildup |
| Keep the sander flat and moving to avoid gouging | Press down hard or linger in one spot |
| Vacuum or wipe down walls before priming | Leave dust residue on the surface |
Minimizing Dust: Practical Tips for Cleaner Sanding
Drywall dust is fine, pervasive, and difficult to clean. It settles on furniture, electronics, and HVAC systems. While eliminating it entirely is impossible, you can drastically reduce it.
Effective strategies include:
- Use a vacuum sander: These systems capture up to 90% of dust at the source. Though more expensive, they pay off in cleanup time and indoor air quality.
- Damp sponge finishing: After dry sanding, lightly go over the surface with a damp sponge (not soaking) to remove fine particles and further smooth the finish.
- Sand in sections: Focus on one wall or area at a time, clean immediately, and cover floors with drop cloths taped at the edges.
- Wet sanding (limited use): Some professionals use wet-dry sanding techniques with water-mist sprayers to suppress dust. Caution: don’t oversaturate, as moisture can weaken drywall paper.
Mini Case Study: Renovating a Basement Family Room
A homeowner in Columbus, Ohio, finished a basement remodel involving 12 new drywall panels. Initially, he used a standard pole sander without a vacuum attachment. Within two hours, fine dust coated every surface upstairs. After consulting a contractor friend, he rented a HEPA-filter vacuum sander, sealed stairwell access with plastic, and worked section by section. The second half of the job produced 70% less mess, required only one thorough wipe-down, and allowed him to prime the next day without deep cleaning vents or electronics.
Checklist: Preparing for a Successful Sheetrock Sanding Job
Before starting, ensure you have everything ready. Use this checklist to stay organized and efficient:
- ✅ All joint compound fully dried (minimum 24 hours)
- ✅ Pole sander, hand block, and corner tools assembled
- ✅ Sanding screens in 120, 150, and 180 grit
- ✅ Shop vac or vacuum sander connected and functional
- ✅ N95 respirator, safety goggles, and gloves available
- ✅ Plastic sheeting and painter’s tape for room sealing
- ✅ Drop cloths covering floors and furniture
- ✅ Work light positioned to cast shadows on imperfections
- ✅ Damp sponge and microfiber cloths for final wipe-down
Frequently Asked Questions
Can I sand sheetrock the same day I apply mud?
No. Most joint compounds require at least 24 hours to dry completely, especially in humid environments. Sanding too soon creates gummy buildup on your screen and risks tearing the tape. Always wait until the compound is chalky-white and cool to the touch.
What grit sandpaper should I use for final smoothing?
For the final pass, use 180–220 grit. This range removes fine scratches left by coarser papers and prepares the surface for primer and paint without over-sanding.
Is it safe to breathe drywall dust occasionally?
No level of exposure is completely safe. Drywall dust contains gypsum, silica, and paper fibers. Short-term exposure can irritate eyes and lungs; long-term inhalation increases respiratory risks. Always wear a certified respirator rated for fine particles.
Mastering the Finish
Sanding sheetrock well separates amateur repairs from professional craftsmanship. It demands patience, the right tools, and a methodical approach. Rushing leads to uneven surfaces, visible seams, and extra coats of paint that still won’t hide flaws. By following the steps outlined here—using appropriate grits, controlling dust, and inspecting under angled light—you’ll create walls that look factory-smooth and ready for any finish.


 浙公网安备
33010002000092号
浙公网安备
33010002000092号 浙B2-20120091-4
Comments
No comments yet. Why don't you start the discussion?