
Diesel engines rely on precision fuel delivery to maintain power, efficiency, and emissions compliance. At the heart of this system are the fuel injectors—high-pressure components responsible for atomizing and delivering diesel into the combustion chamber at exact moments. Over time, carbon buildup, wear, or contamination can compromise their function, leading to poor performance, increased fuel consumption, or even engine damage. Accurately diagnosing and testing diesel injectors is not just a maintenance task—it’s a necessity for ensuring long-term reliability and peak operation.
Understanding Diesel Injector Function and Failure Modes
Diesel injectors operate under extreme conditions, often exceeding 30,000 psi in modern common rail systems. Their job is to deliver a fine mist of fuel in precise quantities and timing. When they fail or degrade, symptoms may be subtle at first but progressively worsen. Common failure modes include:
- Clogging: Caused by contaminated fuel or carbon deposits restricting nozzle flow.
- Leaking: Internal or external leakage due to worn seals or cracked bodies.
- Sticking: Solenoid or pintle components fail to move freely, disrupting spray patterns.
- Electrical faults: Damaged wiring, connectors, or internal coil failures in electronic injectors.
- Wear: Gradual erosion of internal components affecting pressure regulation and timing.
Because these issues affect combustion efficiency, early detection through systematic testing prevents cascading problems like damaged pistons, DPF clogging, or turbocharger stress.
Step-by-Step Diagnostic Process
Diagnosing diesel injectors requires both observational skills and technical tools. Follow this structured approach to isolate issues efficiently.
- Observe Engine Behavior: Note symptoms such as rough idle, misfires, excessive smoke (white, black, or blue), hard starting, or reduced power.
- Scan for DTCs: Use an OBD-II scanner compatible with diesel systems to retrieve fault codes (e.g., P0201–P0208 for injector circuit faults).
- Perform Cylinder Cutout Test: Disable each injector one at a time using scan tool functionality. A healthy cylinder will show a noticeable drop in RPM; no change suggests poor contribution from that injector.
- Check Fuel Pressure and Volume: Verify rail pressure matches specifications using a gauge or live data. Low pressure can mimic injector problems.
- Inspect Electrical Signals: Using an oscilloscope, examine voltage and current waveforms during injection events. Look for consistent rise times, solenoid saturation, and decay patterns.
- Remove and Bench Test Injectors: For definitive results, remove injectors and test off-engine using specialized equipment.
“Most diesel drivability complaints trace back to fuel delivery issues—but never assume it’s the injector without verifying control signals and fuel supply.” — Mark Reynolds, ASE-Certified Diesel Technician
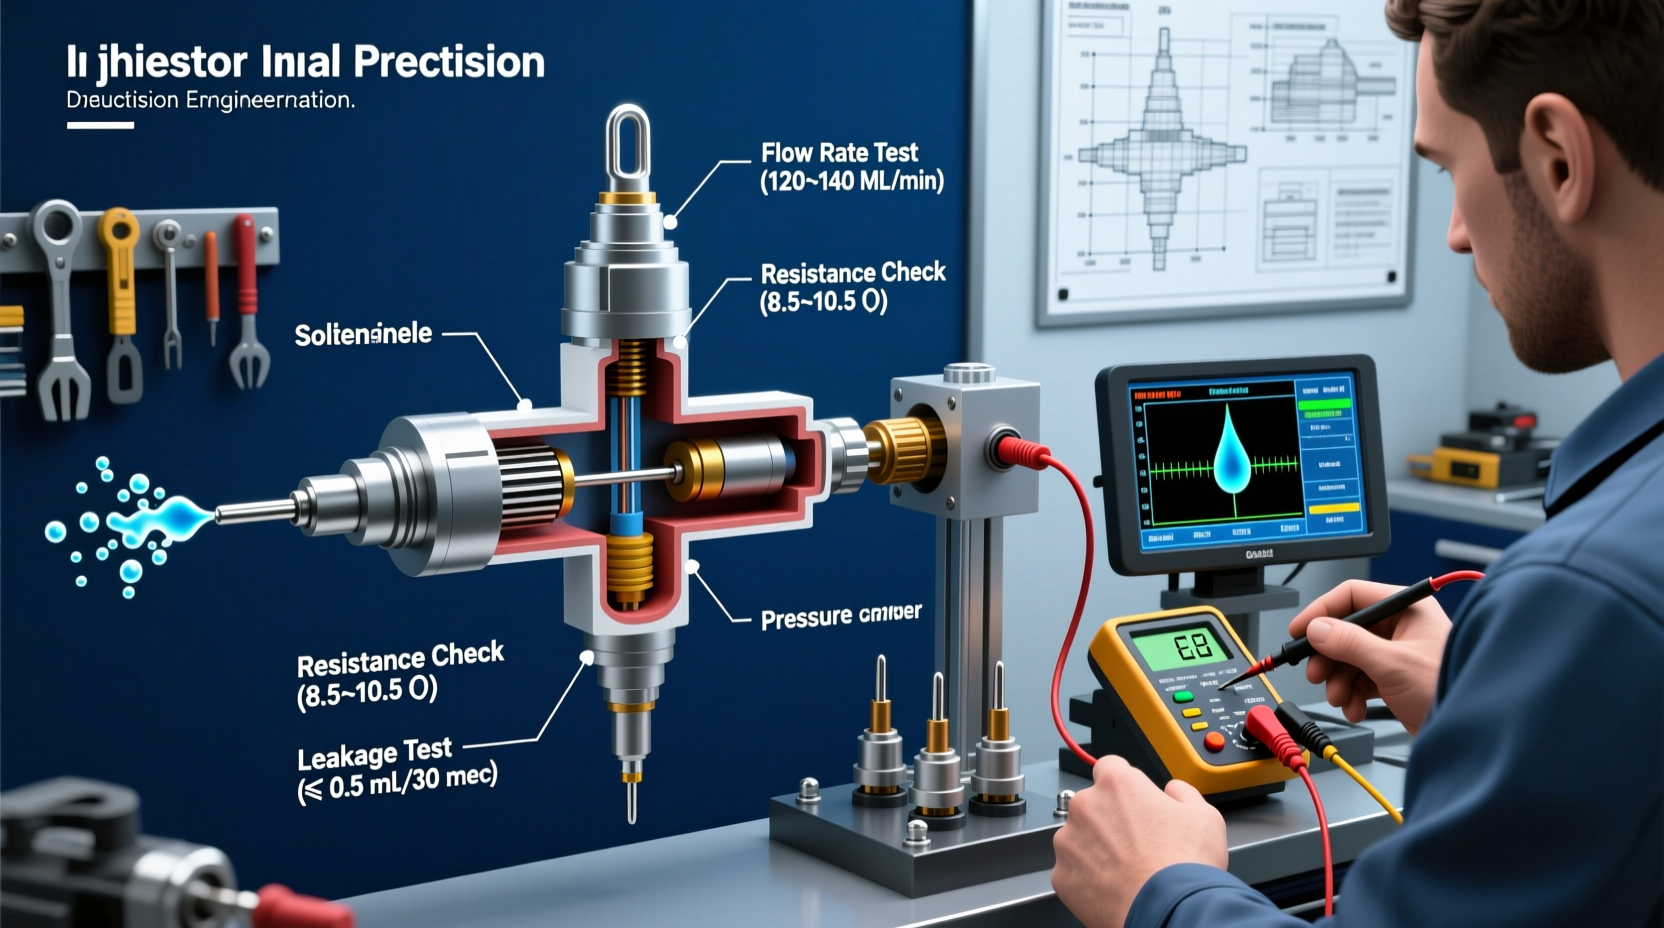
Bench Testing Methods and Equipment
Once removed, diesel injectors can be evaluated using several bench tests that simulate real operating conditions. These methods provide objective data beyond what onboard diagnostics offer.
Flow Rate Testing
A calibrated test rig measures the volume of fuel delivered per stroke or over a set time. Results are compared against manufacturer specs. Significant deviations indicate clogging or internal leakage.
Spray Pattern Analysis
Injectors are fired into a clear chamber or onto a test card. A healthy spray should be symmetrical, fine-misted, and free of dribbling or uneven dispersion. Distorted patterns suggest nozzle wear or blockage.
Leak-Down Testing
This evaluates sealing integrity. After pressurizing the injector, pressure loss is measured over time. Excessive drop indicates internal leaks past needle valves or seat wear.
Coil Resistance and Inductance Checks
Using a multimeter, measure resistance across the injector’s terminals. Compare values to OEM standards (typically 0.2–3 ohms for solenoid types). Out-of-range readings suggest winding damage.
| Test Type | Purpose | Acceptable Result | Common Issue Detected |
|---|---|---|---|
| Flow Rate | Measure fuel output consistency | ±5% of spec | Clogging, wear |
| Spray Pattern | Assess atomization quality | Even cone, no streams | Nozzle erosion |
| Leak-Down | Check internal sealing | <5% drop in 10 sec | Needle valve leak |
| Coil Resistance | Verify electrical health | Within OEM range | Short/open circuit |
Real-World Case Study: Restoring Performance in a 6.7L Cummins
A 2016 Ram 3500 with 180,000 miles exhibited rough idle, white smoke on startup, and a Check Engine Light. Initial scan revealed P0203 (Injector Circuit Malfunction – Cylinder 3) and misfire counts spiking on cold start.
The technician performed a cylinder cutout test via scan tool. Disabling injector 3 caused no RPM fluctuation, while others dropped engine speed by 60–80 RPM. Suspecting either electrical or mechanical failure, the connector and harness were inspected—no visible damage. Oscilloscope analysis showed normal voltage but truncated current ramp-up, suggesting high resistance in the coil.
The injector was removed and tested on a bench flow rig. Flow rate was within 4% of spec, and spray pattern was clean. However, resistance measurement read 4.8 ohms—well above the 0.6–0.9 ohm specification. The injector was replaced, and post-repair testing confirmed smooth idle, eliminated smoke, and cleared all codes.
This case highlights that electrical faults can mimic mechanical ones—and underscores the need for comprehensive diagnostics beyond simple code reading.
Preventive Maintenance Checklist
To avoid premature injector failure, follow this routine:
- Use high-quality diesel fuel with detergents or add approved fuel conditioner every 5,000 miles.
- Replace fuel filters at manufacturer intervals—never extend beyond recommended mileage.
- Drain water from fuel separator daily in heavy-use applications.
- Inspect injector harnesses annually for chafing, moisture, or loose connections.
- Monitor engine performance trends using scan tools during regular service.
- Address warning lights immediately—especially fuel system or glow plug indicators.
- Keep intake system clean to reduce soot recirculation that contributes to injector fouling.
Frequently Asked Questions
Can I clean diesel injectors instead of replacing them?
Yes, in early stages of coking or minor flow restriction, professional ultrasonic cleaning combined with chemical flushing can restore performance. However, mechanically worn or electrically failed injectors cannot be reliably repaired and should be replaced.
How often should diesel injectors be tested?
For commercial vehicles or high-mileage trucks, annual inspection or every 100,000 miles is prudent. For personal use, testing is typically reactive—triggered by symptoms or warning lights. Proactive testing during major services (e.g., turbo or EGR work) is also wise.
Are aftermarket diesel injectors reliable?
Quality varies widely. Reputable remanufactured units from certified suppliers can perform as well as OEM, especially when rebuilt to original tolerances. Avoid budget no-name brands, as inconsistent calibration can lead to imbalance and long-term issues.
Conclusion: Precision Diagnosis Leads to Long-Term Reliability
Maintaining optimal diesel engine performance starts with trustworthy fuel delivery. Diagnosing and testing injectors isn’t about guesswork—it’s about applying methodical procedures, using accurate tools, and interpreting data correctly. From roadside troubleshooting to lab-grade bench analysis, each step ensures your engine runs cleanly, efficiently, and dependably.


 浙公网安备
33010002000092号
浙公网安备
33010002000092号 浙B2-20120091-4
Comments
No comments yet. Why don't you start the discussion?