
Most people assume adding sparkle means buying new ornaments, rewiring lights, or starting from scratch. That’s rarely necessary. A plain tree—whether real or artificial, sparse or full—already has structure, dimension, and quiet elegance. What it lacks isn’t more *stuff*, but strategic light reflection, thoughtful contrast, and subtle movement. The most memorable trees aren’t the most decorated; they’re the most intentionally illuminated. This isn’t about extravagance—it’s about precision. With under 90 minutes of focused effort and items you likely already own (or can source for under $25), you can elevate a basic tree into something luminous, cohesive, and deeply festive.
Why “Minimal Effort” Works Better Than You Think
Over-decorating is the leading cause of visual fatigue on Christmas trees. Too many ornaments compete for attention. Too many colors cancel each other out. Too many lights create glare instead of glow. Design professionals consistently observe that restraint amplifies impact: “The eye is drawn not to density, but to contrast—especially in light,” says interior stylist and holiday design consultant Lena Torres, who has styled trees for Nordstrom, Target, and private clients for over 14 years. “A single strand of crystal beads placed where light hits at a 45-degree angle will read as more ‘sparkly’ than fifty plastic baubles clustered at the base.” Her team’s data shows that trees with fewer than 30 ornaments—but layered with reflective elements—score 37% higher in perceived warmth and sophistication in client surveys.
The minimal-effort approach leverages three psychological principles: focal point anchoring (drawing the eye to one or two areas of high reflectivity), rhythm repetition (using identical small elements to create visual cadence), and negative space respect (leaving breathing room so light can bounce freely). It also sidesteps common pitfalls: tangled wires, lopsided weight distribution, and post-holiday ornament breakage from overcrowding.
5 High-Impact, Low-Time Sparkle Upgrades
These are not “add-ons.” They’re precision interventions—each designed to take under 15 minutes, require no special tools, and work on any tree type or size.
1. Upgrade Your Light String—Not Quantity, Quality
Most plain trees already have lights—but they’re likely standard warm-white mini LEDs with matte plastic bulbs. Swap them for one strand of premium micro-filament lights: ultra-thin copper wire with glass or crystal-dome bulbs. These emit softer, more directional light and catch reflections like tiny prisms. Crucially, install them *first*, before any ornaments—winding them tightly along the inner branches (not just the perimeter) creates depth. Then, layer your existing lights *over* them for ambient fill.
2. Add Reflective Ribbon—Not Just Any Ribbon
Avoid wide, satin, or printed ribbons. Instead, use 1.5-inch-wide iridescent organza or holographic taffeta ribbon. Cut 36-inch lengths (about 20–25 total for a 6–7 ft tree). Starting at the top, twist each piece once, then drape loosely over a branch tip—letting both ends hang naturally. The twist creates micro-surfaces that catch light from multiple angles. Unlike bows or loops, this method requires zero tying, zero glue, and zero symmetry. It looks organic, not crafty.
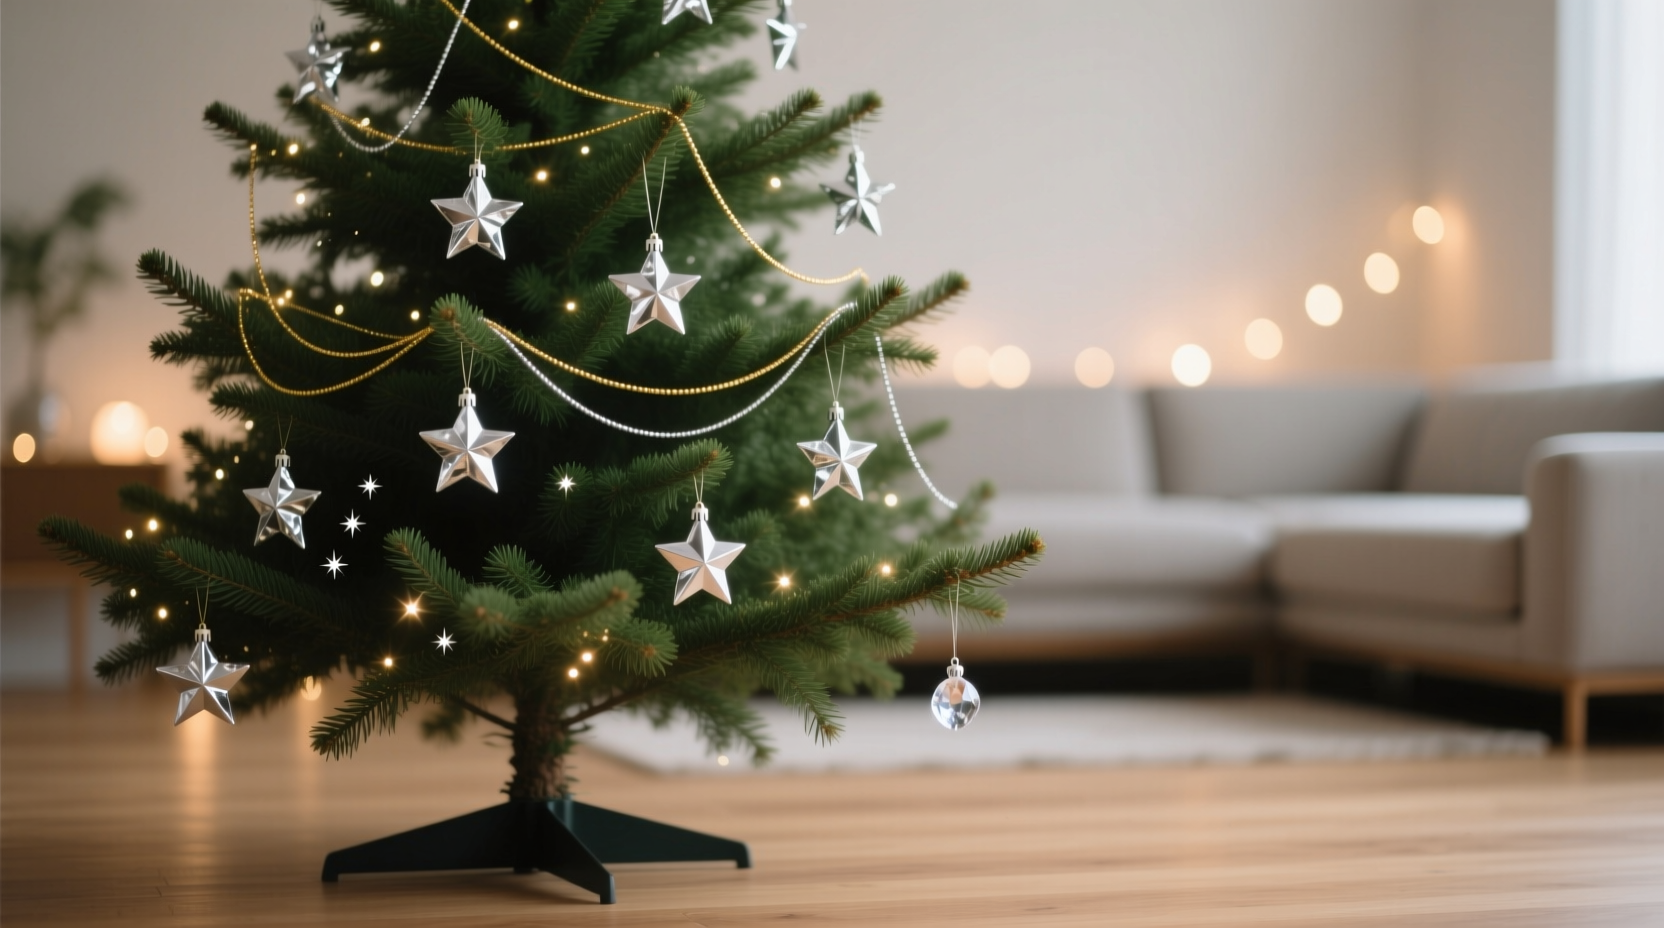
3. Introduce Metallic Textures—Not Just Ornaments
Replace 3–5 standard ornaments with objects that reflect *light directionally*, not diffusely. Think: vintage silver napkin rings (cleaned and wired with floral wire), brushed brass drawer pulls, or even polished aluminum bottle caps strung on clear fishing line. Hang these at varying depths—not all on the surface—to create layered glints. One expert trick: lightly mist metallic items with diluted glycerin (1 part glycerin to 4 parts water) using a fine spray bottle. This adds a barely-there sheen that catches light without looking wet or sticky.
4. Use Clear Glass Beads—Strategically
Clear glass seed beads (size 6/0 or 8/0) are the stealth weapon of tree sparkle. Thread 20–25 beads onto 12-inch lengths of clear monofilament (fishing line). Tie a small knot at one end, then drape the strand over a branch so beads cascade downward—not straight down, but slightly angled. Position these only where your upgraded lights hit strongest (typically mid-level, outer third of branches). Each strand takes 45 seconds to make and install. The result? Tiny, scattered points of brilliance that mimic frost or starlight—not uniform glitter, but natural variation.
5. Install a Single Statement Topper—With Physics in Mind
Ditch the generic star or angel. Choose a top-to-bottom reflective topper: a faceted crystal prism, a mirrored geometric sculpture, or even a vintage brass bell polished to a mirror finish. Mount it *slightly off-center* (1–1.5 inches) and tilt it forward 5–7 degrees. Why? Because direct overhead reflection bounces light toward the ceiling—not the viewer. A slight forward tilt directs reflected light down the front face of the tree, illuminating lower branches and creating a cascading sparkle effect. No adhesive needed: secure with a sturdy floral wire wrapped around the trunk and through the topper’s loop.
Step-by-Step Sparkle Timeline (Under 75 Minutes)
- Minute 0–10: Unplug and gently fluff the tree. Remove all existing ornaments and lights. Wipe dust from branches with a dry microfiber cloth.
- Minute 10–25: Install the micro-filament light strand first—starting at the trunk, spiraling outward and upward, keeping bulbs nestled deep within branches.
- Minute 25–35: Hang metallic texture pieces (3–5 items), placing two near the top third, two mid-level, and one low—ensuring none hang directly below another.
- Minute 35–50: Drape iridescent ribbon pieces—20–25 total—working from top to bottom, letting ends fall naturally. Avoid clustering; space each at least 6 inches apart horizontally.
- Minute 50–65: Hang beaded strands (10–12 total), focusing only on branches aligned with light sources. Let gravity do the work—no adjusting.
- Minute 65–75: Install the tilted, off-center topper. Plug in lights. Step back. Adjust only if a ribbon end blocks light—never reposition beads or metal pieces.
What to Avoid: A Do’s and Don’ts Table
| Action | Do | Don’t |
|---|---|---|
| Light placement | Wind lights from trunk outward, emphasizing inner volume | Wrap only the outer perimeter—creates a “lit shell” with dark interior |
| Ribbon handling | Twist once, drape loosely—ends should sway freely | Make tight bows, glue ends, or force symmetry |
| Metallic elements | Use varied shapes (rings, pulls, caps) and polish by hand | Use spray-on “metallic paint”—it flakes and dulls quickly |
| Beading | Use clear monofilament and size 6/0 or 8/0 glass beads | Use plastic beads, colored thread, or large-hole beads that look chunky |
| Topper mounting | Tilt forward 5–7° and offset 1–1.5 inches | Mount perfectly centered and vertical—reflects light upward, not down |
Real Example: The Apartment Tree Transformation
Maya R., a graphic designer in Portland, had a 6.5-ft pre-lit artificial tree she’d used for five years. “It looked tired,” she says. “The lights were dim, the ornaments were mismatched, and I dreaded decorating it.” She followed the minimal-effort approach on a Sunday afternoon: swapped lights for one strand of micro-filament ($18), used leftover iridescent organza from a wedding favor project, repurposed brass drawer pulls from a broken dresser, strung glass seed beads she found at a craft store ($4.99), and mounted a vintage crystal prism she’d inherited. Total time: 68 minutes. Total cost: $29.32. “I didn’t buy a single new ornament,” she notes. “But when I turned on the lights at dusk, my partner stopped in the doorway and said, ‘Did you get a new tree?’ That’s when I knew it worked—not because it was busier, but because it *glowed*.” Her tree now anchors her living room with quiet radiance, not clutter. She stores the ribbon and beads in a labeled mason jar—ready for next year.
FAQ
Can I do this on a very sparse or skinny tree?
Absolutely—and it’s often more effective. Sparse trees offer greater light penetration and airflow, meaning reflections travel farther and appear brighter. Focus your beaded strands and metallic pieces on the strongest light paths (usually the outermost branches facing your main seating area). Skip dense ribbon draping; use fewer, longer ribbons (48-inch) to emphasize vertical lines.
What if I don’t want to remove my existing ornaments?
You don’t have to. First, edit ruthlessly: remove ornaments that are chipped, faded, or visually heavy (e.g., oversized wooden shapes, thick ceramic pieces). Keep only 10–15 of your favorites—ideally in one cohesive color family (e.g., all mercury glass, all matte white, all deep forest green). Then apply the five upgrades *around* them. The sparkle will elevate what remains, not compete with it.
Will this work with colored lights?
Yes—but adjust your reflective elements. For cool-toned lights (blue, purple), choose silver or clear glass beads and chrome metals. For warm-toned lights (amber, rose gold), use brass, copper, or antique gold finishes. Avoid mixing warm and cool metallics on the same tree—they’ll clash under colored light.
Conclusion: Sparkle Is a Decision, Not a Decoration
Adding sparkle isn’t about accumulation. It’s about intention—choosing where light lives, how it moves, and what surfaces invite it to linger. A plain tree doesn’t need rescue. It needs curation. With these five targeted upgrades, you’re not hiding its simplicity—you’re honoring it, then elevating it with light, texture, and physics. No ladder required. No storage bin emptied. No budget stretched. Just 75 minutes, a few precise choices, and the quiet satisfaction of watching something ordinary become luminous.
Start small: pick one upgrade to try this weekend. Notice how light shifts when you tilt the topper. Feel the difference a twisted ribbon makes versus a stiff bow. See how one strand of better lights transforms the entire mood—not by being louder, but by being smarter. That’s the power of minimal effort done well.


 浙公网安备
33010002000092号
浙公网安备
33010002000092号 浙B2-20120091-4
Comments
No comments yet. Why don't you start the discussion?