
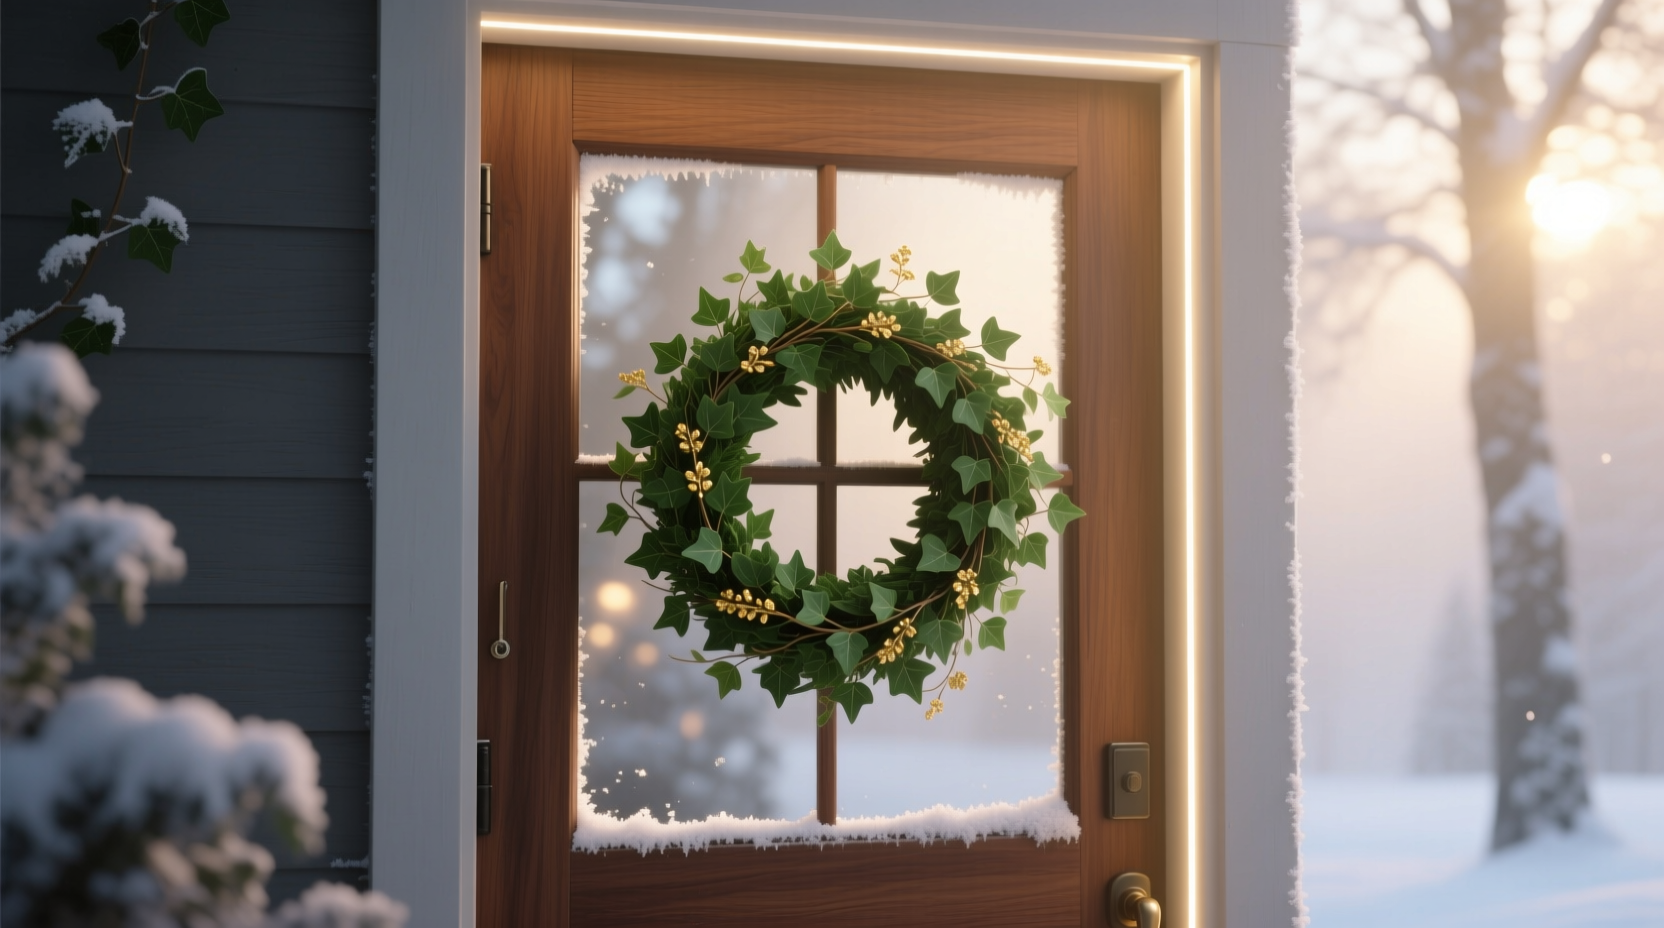
A beautifully lit wreath can transform your front door into a warm and inviting focal point, especially during the evening hours. However, traditional lighting methods—like string lights draped over the front of the wreath—often create glare, distract from the design, or expose tangled cords that spoil the aesthetic. The solution lies in subtle backlighting: a technique that gently illuminates the wreath from behind, casting a soft halo effect while keeping all components hidden. When done correctly, the light appears almost magical—there, but with no visible source.
This guide walks you through the practical steps, materials, and design considerations needed to achieve clean, wire-free backlighting for any door-mounted wreath. Whether you're enhancing seasonal decor or creating year-round curb appeal, these methods prioritize elegance, safety, and simplicity.
Why Backlighting Works Better Than Front Lighting
Front-facing lights may seem like the easiest option, but they come with drawbacks. Exposed bulbs reflect off glossy leaves, berries, or metallic elements, creating hotspots that overpower the wreath’s natural texture. Wires crisscrossing the face disrupt visual balance, and over time, weather exposure can degrade low-quality strands.
Backlighting solves these issues by shifting the light source behind the wreath, where it's concealed from view. The result is a gentle glow that outlines the shape, enhances depth, and integrates seamlessly with your home’s exterior. This method mimics professional display lighting used in retail and hospitality—subtle, atmospheric, and intentional.
“Good lighting doesn’t draw attention to itself—it draws attention to the object.” — Marcus Lin, Residential Lighting Designer
Choosing the Right Light Source
The foundation of invisible backlighting is selecting fixtures that are compact, energy-efficient, and easy to conceal. Not all lights are suitable for this application. Here’s what to look for:
- Low-profile design: Slim LED strips or puck lights mount flush against the wall or door frame.
- Warm color temperature: 2700K–3000K creates a welcoming ambiance without harshness.
- Dimmable output: Allows control over brightness to prevent over-illumination.
- Weather resistance: Look for IP65-rated or higher for outdoor durability.
- Low heat emission: Prevents damage to wreath materials and surrounding surfaces.
LED strip lights are often the best choice due to their flexibility, adhesive backing, and ability to be cut to length. Alternatively, small magnetic or screw-mounted LED spotlights can be positioned strategically behind the wreath.
Step-by-Step Installation Guide
Follow this sequence to install a seamless backlighting system in under an hour. No electrician required—just basic tools and attention to detail.
- Remove the wreath temporarily. Take it down to access the mounting area and plan light placement.
- Mark the backlit zone. Hold the wreath up to the door and trace its outline lightly with a pencil or removable tape. This defines where light should concentrate.
- Clean and dry the surface. Wipe the door or wall behind the wreath area with rubbing alcohol to ensure strong adhesion for LED strips.
- Measure and cut LED strips. Cut the strip to fit along the top edge or full perimeter of the traced outline. Most strips have designated cut lines every few inches.
- Peel and stick the lights. Apply the adhesive-backed strip along the top inner edge of the wreath’s shadow line. For stronger hold, use silicone adhesive at ends.
- Route the power cord discreetly. Run the cable vertically up the door frame, under trim, or behind siding. Use plastic clips or paintable conduit if needed.
- Rehang the wreath. Position it so it fully covers the lights. Ensure the foliage is dense enough to block direct visibility of the source.
- Connect and test. Plug in the lights (or connect to a hardwired transformer) and observe the effect from multiple angles and distances.
- Adjust as needed. Reposition lights slightly if shadows are uneven or hotspots appear.
For battery-powered options, place the pack inside a nearby exterior junction box, under eaves, or in a decorative cover painted to match the house. Solar-powered variants work well in sunny entryways and eliminate wiring altogether.
Managing Wires and Power Sources
Invisible wiring is just as important as the lighting itself. Even the most elegant setup fails if cords dangle down the doorframe. Consider these routing strategies:
- Use existing architectural features: Route cables behind door hinges, within corner joints, or under window/door trim.
- Employ paintable raceways: Flat, low-profile cord covers can be painted to match your door or wall color.
- Bury low-voltage lines: If installing permanently, run 12V wiring underground or through attic spaces to an exterior outlet.
- Go wireless: Choose rechargeable or solar-powered LED systems to eliminate cords entirely.
| Power Option | Visibility Risk | Installation Difficulty | Best For |
|---|---|---|---|
| Plug-in with exposed cord | High | Low | Temporary seasonal use |
| Plug-in with raceway | Low | Medium | Long-term displays |
| Battery-powered | Very Low | Low | Rented homes, quick setups |
| Solar-powered | Negligible | Medium | Sunny porches, eco-friendly installs |
| Hardwired low-voltage | None | High | Permanent landscape lighting systems |
Real Example: A Portland Homeowner’s Holiday Upgrade
Sarah M., a homeowner in Portland, Oregon, struggled each holiday season with tangled Christmas lights on her front door wreath. “Every year, I’d spend more time untangling wires than enjoying the decoration,” she said. After researching alternatives, she installed a 60cm warm-white LED strip along the top edge of her doorframe, just above the wreath mounting point.
She routed the cord up the side of the door trim and into a small solar panel mounted on her roofline. The system charges during the day and automatically turns on at dusk. Now, her wreath glows softly each evening without a single visible wire. “It looks like the wreath is floating in light,” she said. “And I only set it up once—now it works all season.”
Her total cost was under $50, and installation took less than 45 minutes. She now uses the same setup for spring and fall wreaths, swapping out the foliage while keeping the lighting intact.
Design Tips for Glare-Free Illumination
Even with proper placement, poor lighting choices can create unwanted reflections. Follow these guidelines to maintain a soft, diffused glow:
- Aim lights upward or inward: Angle spotlights toward the center of the wreath or slightly upward to bounce light off the wall behind.
- Use frosted or diffused lenses: These spread light evenly and reduce pinpoint brightness.
- Limit brightness: More light isn’t better. Start dim and increase only until the outline is gently defined.
- Match ambient lighting: Ensure the wreath glow complements existing porch lights rather than competing with them.
- Test at night: View the effect after dark from the sidewalk and street level to judge visibility and balance.
“The goal is not to illuminate the wreath completely, but to suggest its presence with light.” — Lena Cho, Architectural Lighting Consultant
Checklist: Backlighting Your Wreath Like a Pro
Before you begin, gather your tools and confirm each step:
- ☐ Measure wreath diameter and determine backlight zone
- ☐ Select low-profile, weather-resistant LED lights (warm white, dimmable)
- ☐ Choose power method: plug-in, battery, solar, or hardwired
- ☐ Clean mounting surface with alcohol wipe
- ☐ Cut and position LED strip along top or perimeter edge
- ☐ Route cord through trim, raceway, or hidden path
- ☐ Rehang wreath to fully conceal lights
- ☐ Test illumination at night from multiple viewing angles
- ☐ Adjust brightness or reposition if glare or gaps occur
- ☐ Secure all connections and protect outdoor electronics
Frequently Asked Questions
Can I use this method on a glass front door?
Yes, but with adjustments. On transparent doors, backlighting may shine through and create a bright patch indoors. To avoid this, use shorter LED segments focused only on the outer rim, or attach a thin opaque backing (like black foam board) behind the wreath to contain the light.
Will the lights damage my wreath or door over time?
Modern LED lights emit minimal heat and are safe for prolonged contact with most materials. However, avoid placing lights directly against dried floral elements that may be flammable. Always follow manufacturer guidelines and inspect connections annually for wear.
What if my wreath isn’t dense enough to hide the lights?
If gaps allow light to show through the front, consider adding a backing layer of burlap, felt, or artificial foliage to increase opacity. Alternatively, shift the lights slightly inward so only the outer edge is illuminated, creating a silhouette effect instead of full coverage.
Final Thoughts: Elevate Your Entry with Invisible Light
Subtle backlighting transforms a simple wreath into a statement piece—one that catches the eye without revealing its secrets. By hiding wires, minimizing glare, and using thoughtful placement, you achieve a professional-grade finish that enhances your home’s character after dark.
The beauty of this technique lies in its simplicity and repeatability. Once installed, the same system can serve multiple wreaths across seasons. No more wrestling with tangled cords or replacing burnt-out bulbs. Just quiet, consistent elegance that welcomes guests and enriches your streetscape.


 浙公网安备
33010002000092号
浙公网安备
33010002000092号 浙B2-20120091-4
Comments
No comments yet. Why don't you start the discussion?