
False eyelashes can elevate your makeup look from simple to stunning in minutes. But for many, the process ends in frustration—glue clumps, misalignment, or lashes peeling off after five minutes. The good news? With the right tools, technique, and a little patience, you can apply falsies flawlessly every time. This guide walks you through each stage of the process, focusing on precision and glue control to help you avoid the most common pitfalls.
Why Glue Disasters Happen (And How to Prevent Them)
The root cause of most false lash failures isn’t poor application—it’s improper glue handling. Many people use too much adhesive, apply it incorrectly, or rush the bonding process. Eyelash glue is designed to be strong but flexible, forming a secure bond only when activated properly. Applying excess glue leads to seepage, drying issues, and visible residue along the lash line.
Additionally, not all glues are created equal. Some dry too quickly, others take forever to set. Choosing the right formula for your skill level and working efficiently once the glue is applied are critical for success.
Your False Lash Application Checklist
Before you begin, gather everything you need. Being prepared prevents mid-application fumbling that can ruin placement. Here’s what to have ready:
- Falsies (pre-cut or strip lashes)
- Eyelash adhesive (preferably clear or dark if matching liner)
- Tweezers or lash applicator tool
- Small scissors (for trimming)
- Concealer or eyeshadow brush (for pressing band)
- Mirror (preferably magnifying or lighted)
- Makeup remover on a cotton swab (for cleanup)
- Primer (optional, for longer hold)
Having these items within reach ensures a smooth, uninterrupted process. Never start applying lashes without testing their fit first.
Step-by-Step Guide: Flawless Lash Application Without Glue Mess
- Prepare Your Natural Lashes
Remove any mascara buildup and ensure your eyelids are clean and dry. If you wear eyeliner, apply it before adding lashes. Avoid oily products near the lash line, as they weaken adhesive grip. For extra staying power, consider using an eyelid primer. - Test Fit and Trim the Lashes
Hold the lash strip against your lash line to check length. Most store-bought lashes are too long for average eyes. To trim, start from the outer edge and snip small sections until the lash aligns with the outer corner of your eye. Use small, sharp scissors and cut along the band—not the fibers—to maintain volume. - Shape the Band for Comfort
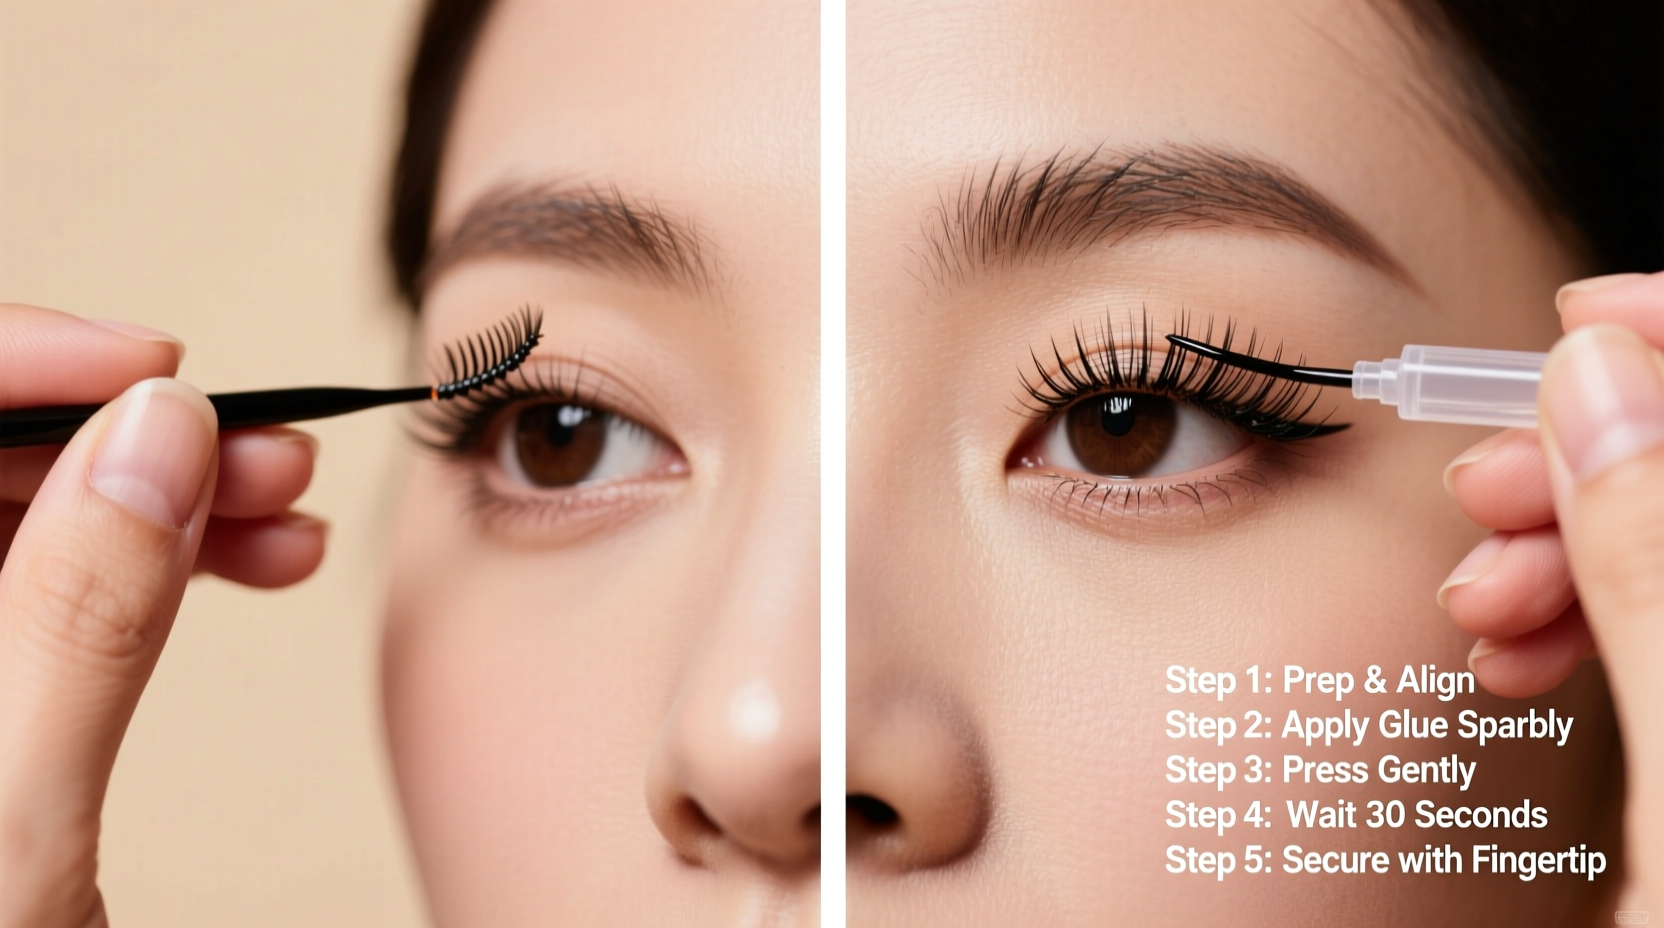
Gently bend the lash strip into a C-shape by rolling it between your fingers. This mimics the natural curve of your eyelid and improves adhesion. A stiff, flat band won’t sit flush and will lift at the corners. - Apply Glue Correctly—Less Is More
Squeeze a tiny amount of glue onto the back of your hand or a palette. Using the tip of a toothpick or the end of a bobby pin, spread a thin, even layer along the lash band. Focus especially on the inner and outer corners, which tend to lift. Wait 30–45 seconds for the glue to become tacky. This step is crucial: applying glue immediately causes sliding; waiting too long makes it brittle. - Position with Precision
Look down into a mirror placed on a flat surface. This angle gives the clearest view of your lash line. Using tweezers or an applicator, place the center of the lash strip first—this acts as an anchor. Then adjust the inner and outer edges so the band sits as close to your natural lashes as possible, without touching them. Do not press down yet. - Secure the Bond Gradually
Starting from the center, gently press the band into place using a clean concealer brush or the handle of an eyeliner pencil. Apply light pressure along the entire band, paying special attention to the corners. Avoid using your fingers—they can introduce oil and disturb alignment. - Blend with Natural Lashes
Once secure, apply a coat of mascara to merge your real and false lashes. This creates a seamless look and adds stability. Alternatively, use a heated eyelash curler briefly to shape both layers together—do this carefully to avoid damaging the falsies. - Clean Up Excess Glue
If glue has squeezed out at the corners, dip a cotton swab in micellar water or makeup remover and gently wipe it away. Be careful not to tug the lashes. For stubborn bits, wait until the glue dries slightly, then lift it with the edge of a bobby pin.
Do’s and Don’ts of False Lash Glue Use
| Do’s | Don’ts |
|---|---|
| Use a pea-sized drop of glue | Don’t squeeze glue directly onto lashes |
| Wait 30–45 seconds before applying | Don’t apply lashes immediately after gluing |
| Store glue in a cool, dry place | Don’t leave the tube open or exposed to air |
| Seal glue with tape after use | Don’t shake or pump the glue bottle |
| Use dark adhesive with black lash bands | Don’t reuse dried-out glue |
Proper glue management extends both the life of your adhesive and the wear time of your lashes. A well-sealed tube can last up to six months, but exposure to humidity or air shortens its shelf life dramatically.
Real Example: From Frustration to Flawless in One Weekend
Sophia, a 28-year-old marketing professional, had given up on false lashes after multiple failed attempts. “Every time I tried, the glue would ooze out, and one side would pop up by lunchtime,” she said. After watching several tutorials and still struggling, she decided to slow down and follow a structured method.
She began by switching to a latex-free adhesive recommended for sensitive eyes. She practiced trimming her lashes to fit her almond-shaped eyes and started waiting 40 seconds after applying glue before positioning. Using a small flat brush to press the band instead of her fingers made a noticeable difference.
“The third try worked perfectly. I wore them to dinner, and no one could tell they weren’t my real lashes. Now I do them in under five minutes.”
Sophia’s breakthrough wasn’t about talent—it was about consistency, the right tools, and respecting the glue’s drying time.
“Most glue disasters stem from impatience. Let the adhesive do its job. Tacky is better than wet.” — Lena Torres, Professional Makeup Artist and Lash Technician
Choosing the Right False Lashes and Adhesive
Not all lashes are suited for beginners. Heavy, dramatic styles require more precision and stronger glue, making them harder to manage. Start with lightweight, crisscross-style strips that mimic natural volume. Look for lashes with flexible bands—they conform better to the eyelid and reduce lifting.
When selecting glue, consider your needs:
- Quick-dry formulas (e.g., Duo Quick Set): Ideal for experienced users who work fast.
- Latex-free options: Best for sensitive eyes or those prone to irritation.
- Clear vs. black glue: Clear is invisible but less precise; black blends with liner and hides minor imperfections.
- Weld or Strip Lash Adhesive: Offers industrial-strength hold for heavy-duty wear.
For best results, replace your glue every 4–6 weeks if used weekly. Old adhesive loses viscosity and bonding strength, leading to premature fallout.
FAQ: Common Questions About Glue-Free Disaster Lash Application
Can I reuse false lashes after removing them?
Yes, high-quality strip lashes can be reused 5–10 times if removed carefully. Gently peel from the outer edge using oil-free remover, clean the band with alcohol, and store flat in its case. Avoid pulling or tugging, which damages the band.
Why do my lashes keep lifting at the corners?
This usually happens due to insufficient glue at the ends, improper trimming, or failure to wait for tackiness. The outer corners move more with blinking, so they need extra attention during application. Try reinforcing with a second tiny dot of glue after initial placement.
Is there a way to apply lashes without any glue?
Glue-free magnetic lashes exist, but they require magnetic eyeliner and may not hold as securely. For most people, traditional adhesive offers better comfort and longevity. However, if you’re allergic to standard glues, magnetic options are a viable alternative.
Final Tips for Long-Lasting, Natural-Looking Lashes
Mastering false eyelash application is less about perfection and more about consistency. Even professionals make small adjustments after placement. The key is building a repeatable routine that minimizes variables like glue amount and drying time.
Practice on days when you don’t need a perfect result. Try different lash styles and adhesives to find your ideal combination. Over time, the process becomes intuitive, and you’ll spend less time fixing and more time enjoying your enhanced look.


 浙公网安备
33010002000092号
浙公网安备
33010002000092号 浙B2-20120091-4
Comments
No comments yet. Why don't you start the discussion?