
False eyelashes can elevate your makeup look from everyday natural to red-carpet glam in minutes. But for many beginners, the process is frustrating—glue squishes out, lashes shift, and cleanup becomes more effort than the application itself. The good news? You don’t need professional training or expensive tools to achieve clean, seamless lash placement. With the right techniques and a few clever hacks, you can apply falsies confidently and avoid glue mess entirely—even if it’s your first time.
The key lies not just in the product but in preparation, timing, and method. From choosing the right lash style to mastering glue control, this guide breaks down every step with practical solutions designed specifically for beginners. Whether you're prepping for a photoshoot, a night out, or simply want to enhance your daily look, these tips will help you skip the sticky frustration and go straight to stunning results.
Why Glue Mess Happens (And How to Prevent It)
Glue overflow is one of the most common issues when applying false lashes, especially for new users. It typically occurs due to over-application, incorrect drying time, or improper lash alignment. When too much adhesive is used, it seeps out from under the band as pressure is applied during placement. Similarly, placing lashes too soon after applying glue—or waiting too long—can lead to sliding or clumping, both of which increase the chance of excess glue spreading across the eyelid.
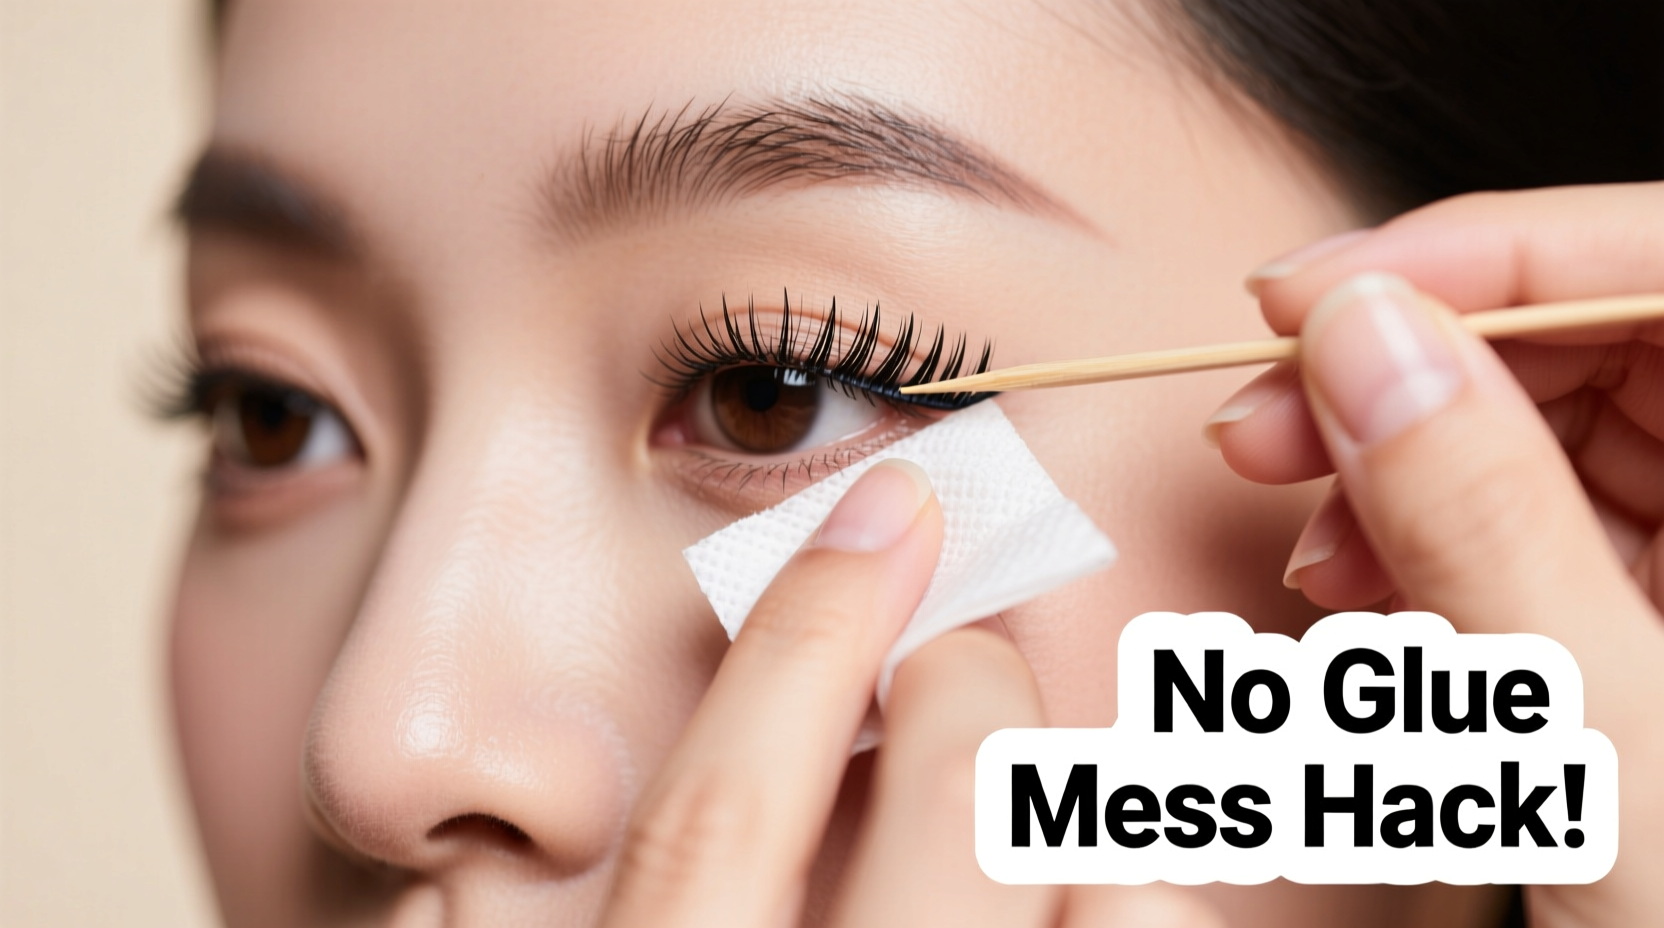
To prevent this, start by understanding the behavior of lash glue. Most latex-based adhesives become tacky within 30 seconds of air exposure. That’s the ideal window for application—not immediately after squeezing, and not after it’s fully dried. Using a toothpick or bobby pin instead of your fingertip gives you far greater control over the amount of glue applied, minimizing waste and mess.
Step-by-Step Guide: Clean Application from Start to Finish
Follow this detailed sequence to apply false lashes cleanly and efficiently. Each stage is designed to minimize errors and maximize comfort.
- Choose the Right Lash Style: Opt for lightweight, strip lashes with flexible bands. Beginners should avoid dramatic, densely packed styles that are harder to position accurately.
- Measure and Trim: Hold the lash strip against your lash line. If it extends past your outer corner, trim small sections from the outer end—not the inner—to maintain the natural curve.
- Pre-Curl Natural Lashes: Use an eyelash curler on your real lashes before applying falsies. This helps blend the two layers seamlessly and prevents the false lashes from folding under.
- Apply a Thin, Even Layer of Glue: Squeeze a pea-sized drop onto the back of your hand. Dip a toothpick into the glue and run it evenly along the lash band. Focus on the center and outer corners—these areas need more hold.
- Wait 30 Seconds: Let the glue become tacky. This is crucial. Fresh glue is wet and slippery; wait until it loses its shine.
- Use Tweezers or a Lash Applicator: Grip the lash near the center with tweezers. Look down into a mirror placed on a flat surface to see your lash line clearly.
- Place the Center First: Align the middle of the lash band with the center of your natural lash line. Gently press down. Then adjust the inner and outer corners.
- Press and Seal: Use the handle of a spoolie or a clean cotton swab to gently press the band along the entire lash line, ensuring full contact without pushing glue outward.
- Blend with Mascara (Optional): Once secure, lightly coat both real and false lashes with a coat of mascara to fuse them together visually.
This method prioritizes precision over speed. Taking an extra minute to wait for tackiness and place the center first dramatically reduces the risk of misalignment and glue squeeze-out.
Beginner Hacks to Avoid Glue Drips and Smears
Even with proper technique, small mistakes happen. These tested hacks make the learning curve much smoother—and keep your eyelids clean.
- Hack #1: Use Magnetic Lashes as Practice Tools – Before committing to glue, try magnetic lashes. They teach you positioning and placement without any adhesive involved. Once you’re comfortable aligning them correctly, transitioning to glue-on styles feels much easier.
- Hack #2: Apply Glue with a Baking Wand or Pin – Instead of smearing glue with your finger or the nozzle tip, use a bobby pin or a silicone baking wand. These allow surgical precision, especially useful for curved lash bands.
- Hack #3: Pre-Line Your Eyelid – Draw a thin line of waterproof eyeliner along your lash line before applying glue. This creates a barrier that makes cleanup easier if minor overflow occurs. Plus, it hides the lash band beautifully.
- Hack #4: Chill the Glue – Store your lash glue in the fridge (not freezer) between uses. Cooler glue dries slower and gives you more working time, reducing rushed movements that cause mess.
- Hack #5: Use a Credit Card Edge as a Shield – Slide a small piece of card (cut from an old gift card) under your lower lashes while applying. This catches stray glue and protects your under-eye area from smudges.
Do’s and Don’ts: Common Mistakes vs. Best Practices
| Do’s | Don’ts |
|---|---|
| Do use a lint-free applicator for glue | Don’t apply glue directly from the tube onto lashes |
| Do wait 20–30 seconds for glue to get tacky | Don’t apply lashes immediately after gluing |
| Do store lashes in their original tray after use | Don’t throw used lashes on a counter or wipe them with oil |
| Do clean lash bands with micellar water after removal | Don’t reuse lashes with warped or stiffened bands |
| Do practice placement without glue first | Don’t force lashes into place if they don’t align |
Following these guidelines helps build muscle memory and ensures consistent results. Over time, you’ll develop a rhythm that makes application feel effortless.
Real Example: Sarah’s First-Time Success Story
Sarah, a college student preparing for her first formal event, had always avoided false lashes. “I tried once and ended up with glue in my eye and one lash stuck to my brow,” she recalls. Determined to get it right, she followed a simplified version of this guide: she trimmed her lashes to fit, used a toothpick to apply glue sparingly, waited 30 seconds, and placed the center first while looking down into her bathroom mirror.
“It clicked when I stopped rushing,” she says. “Once I let the glue get sticky and used tweezers, it was like magic. No mess, no panic. I even re-applied them the next day and got faster.” Her confidence grew so much that she now applies falsies weekly for class presentations. Her only regret? Not trying sooner.
“Most beginners fail not because they lack skill, but because they rush the tackiness phase. Wait for the glue to set up—that’s the secret professionals won’t tell you.” — Lena Park, Celebrity Makeup Artist
Checklist: Your No-Mess False Lash Routine
Print or save this checklist for quick reference each time you apply lashes:
- ☐ Choose lightweight, flexible-band lashes
- ☐ Trim to fit your eye shape (outer corner only)
- ☐ Curl natural lashes and apply base mascara (optional)
- ☐ Apply a thin layer of glue using a toothpick or pin
- ☐ Wait 25–30 seconds until glue is tacky (not wet)
- ☐ Position center of lash on center of lash line
- ☐ Adjust inner and outer edges with tweezers
- ☐ Press entire band gently with a spoolie or swab
- ☐ Clean up edges with a pointed concealer brush if needed
- ☐ Store used lashes properly for future wear
Using this checklist turns application into a repeatable ritual. Within three tries, most beginners report noticeable improvement in accuracy and cleanliness.
Frequently Asked Questions
Can I use regular craft glue instead of lash adhesive?
No. Craft glues contain chemicals unsafe for use near the eyes and may cause irritation or allergic reactions. Always use eyelash-specific adhesive, preferably hypoallergenic and latex-free if you have sensitive skin.
How do I remove glue residue without damaging my lashes?
Soak a cotton pad with micellar water or an oil-free eye makeup remover. Hold it over your closed eye for 15–20 seconds to dissolve the glue, then gently slide the lash off. Avoid pulling or tugging. For leftover residue on the band, wipe lightly with a Q-tip.
How many times can I reuse false lashes if I clean them properly?
High-quality strip lashes can last 15–20 wears when handled carefully. After each use, remove any leftover glue with tweezers or a clean spoolie, store them in their original case, and avoid exposing them to moisture or heat. Handmade silk or mink lashes tend to last longer than synthetic ones.
Mastery Starts with One Clean Application
Applying false eyelashes without glue mess isn’t about perfection on the first try—it’s about consistency, patience, and using smarter methods. The hacks shared here eliminate guesswork and reduce frustration, making the process accessible even if you’ve never touched a pair of falsies before. What matters most is building confidence through repetition. Each attempt refines your technique, improves your hand-eye coordination, and brings you closer to that flawless, fluttery look you want.
You don’t need special tools or years of experience. Just a steady hand, the right prep, and a willingness to slow down and let the glue work for you. Once you master the 30-second rule and precise placement, you’ll wonder why you ever struggled.


 浙公网安备
33010002000092号
浙公网安备
33010002000092号 浙B2-20120091-4
Comments
No comments yet. Why don't you start the discussion?