
False lashes can elevate any makeup look from subtle to striking with just one application. But even a perfectly placed set can be ruined by telltale signs: glue seeping out at the corners, visible adhesive along the band, or that dreaded “blink test fail” where your eyes look unnatural every time you close them. The good news? With the right technique, tools, and a bit of patience, it’s entirely possible to wear falsies that look seamless, feel lightweight, and move naturally with your eyes.
The secret lies not in expensive lashes alone, but in understanding how to prep, position, and secure them so they become an invisible extension of your natural lash line. Whether you're a beginner struggling with clumpy glue or a seasoned user tired of midday slippage, mastering these methods will transform your false lash experience into something effortless and elegant.
Choose the Right Lashes for Your Eye Shape and Comfort
Not all false lashes are created equal—nor do they suit every eye shape. Selecting a pair that complements your natural lid structure is the first step toward avoiding awkward blinking and visible gaps. Heavy, overly dramatic styles may press down on the lids, causing discomfort and unnatural movement, while poorly curved lashes won’t follow your eye’s natural arc, leading to lifting at the edges.
For most people, medium-volume strip lashes with a flexible band offer the best balance between impact and comfort. Look for terms like “feathered,” “wispy,” or “natural glam” if you want definition without weight. If you have hooded eyes, opt for lashes that are longer in the center to open up the eye. Almond-shaped eyes can carry more drama at the outer corners, while round eyes benefit from elongated outer tails to create lift.
Prepare Your Lashes and Eyelids Properly
Skipping prep is one of the biggest reasons glue shows and lashes shift during wear. Just as you’d prime your face before foundation, your eyelids need preparation to ensure strong adhesion and smooth blending.
Begin by removing any oils or residue from your lids. Use a gentle micellar water or oil-free makeup remover to wipe the lash line clean. Avoid moisturizers or creamy eye products near the base of your lashes—they’ll prevent glue from sticking properly. Once dry, apply your eyeshadow and liner *before* adding falsies. Doing so creates a seamless transition between your real and false lashes, minimizing the chance of exposed glue.
Next, prep the false lashes themselves. Gently bend the lash band over the back of your hand or a pen to soften its stiffness. This makes it more pliable and better able to conform to your eye’s curve. Then, apply a thin layer of lash adhesive to the band and wait 30–45 seconds. This crucial pause allows the glue to become tacky, which improves grip and reduces the likelihood of sliding or excess squeeze-out when pressed onto the lid.
“Waiting for the glue to get tacky isn’t optional—it’s what separates amateur applications from pro-level results.” — Dana Reyes, Celebrity Makeup Artist
Step-by-Step Guide: Applying False Lashes Without Visible Glue
Applying false lashes with precision takes practice, but following a structured method ensures consistent results. Here’s a proven seven-step process designed to eliminate glue visibility and blinking issues:
- Trim the lash strip to size. Hold the lash against your lash line and measure from the inner to outer corner. Snip off any excess from the outer end using small scissors. Never cut from the inner edge unless absolutely necessary, as this area is more delicate.
- Shape the band. Press the lash band gently over a rolled tissue or pencil to give it a slight curve that matches your eye socket. This helps it sit flush against your lid.
- Apply adhesive evenly. Squeeze a thin line of latex-free lash glue along the entire band. Use a toothpick or bobby pin to spread it into a uniform layer—thicker than a thread but thinner than a pencil lead.
- Wait for tackiness. Let the glue rest for 30–45 seconds. You should feel slight resistance when lightly touching the band with your fingertip.
- Lift your natural lashes. Curl your natural lashes and apply one coat of mascara. This gives you something to anchor the false lashes to and prevents them from slipping under your own lashes.
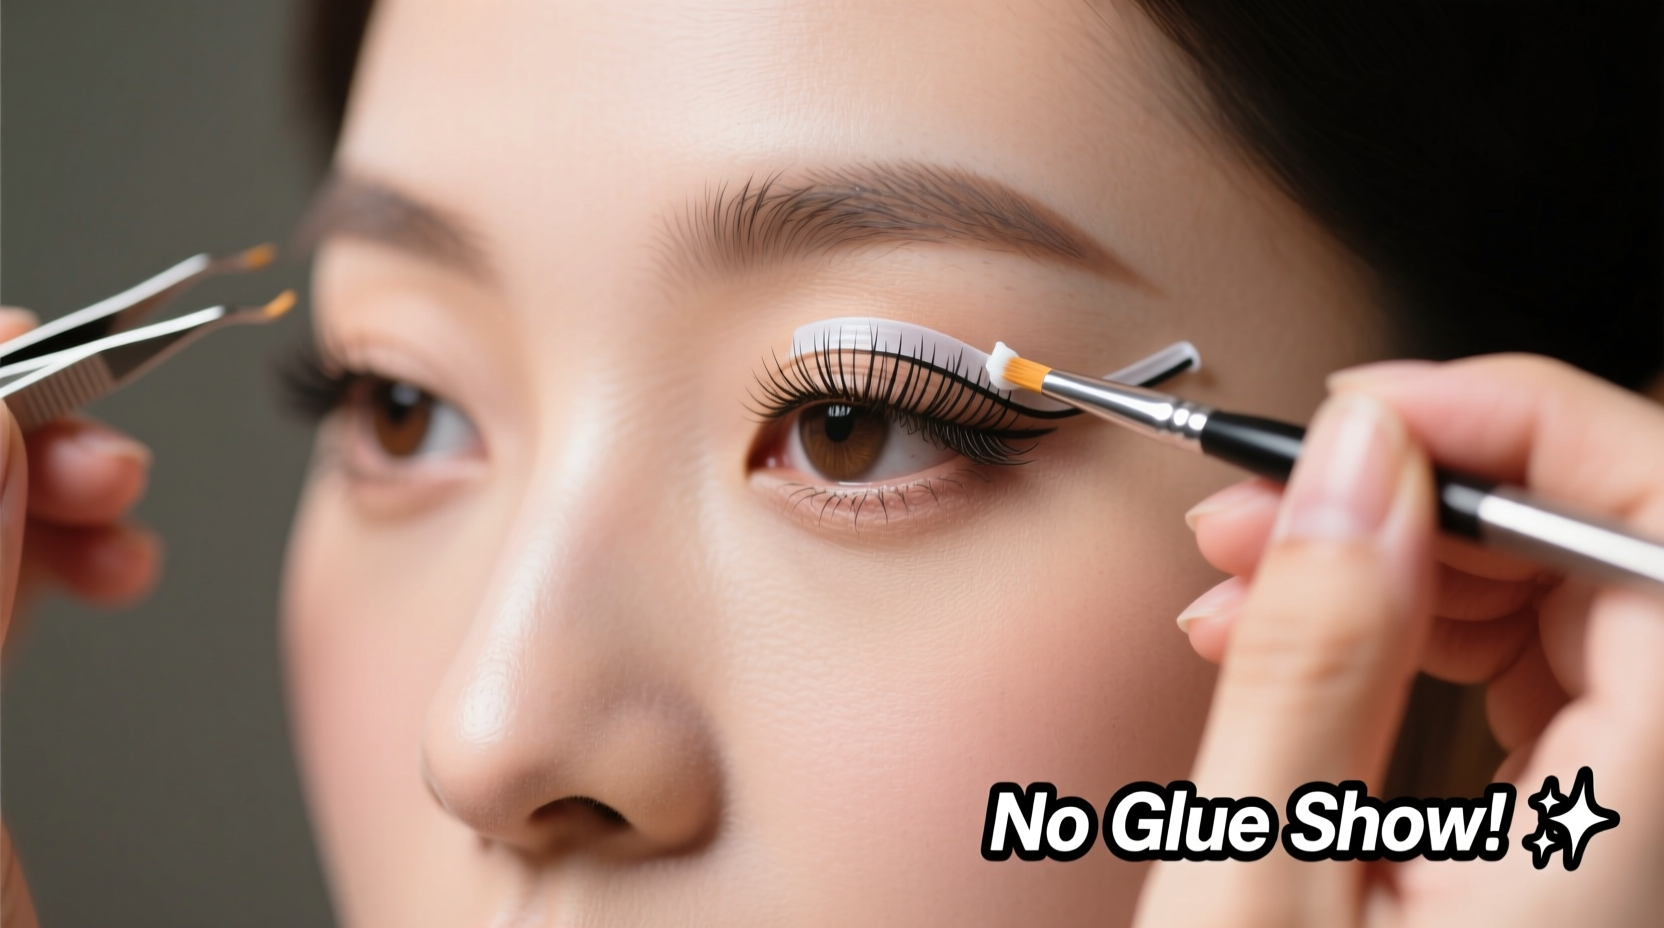
- Place with precision. Using tweezers or a lash applicator, position the center of the lash strip on the center of your natural lash line. Then, gently press down the outer and inner corners. Don’t close your eye fully yet—keep it slightly open to maintain alignment.
- Seal the edges. Once positioned, lightly press along the entire band with a clean spoolie or cotton swab. Pay special attention to the inner and outer corners, where glue tends to peek out. If needed, use a flat brush dipped in concealer or eyeshadow to camouflage any tiny spots of adhesive.
After placement, blink slowly several times in front of a mirror. Watch for any lifting or tugging. If the lashes feel heavy or restrict movement, they may be too long or too thick for your lid type.
Do’s and Don’ts When Wearing False Lashes
Avoiding glue exposure and awkward blinks often comes down to small habits. The table below outlines key behaviors that make or break your lash look.
| Do | Don’t |
|---|---|
| Use latex-free, clear-drying glue for invisible bonds | Apply too much glue—excess causes oozing and delays drying |
| Let glue become tacky before applying | Press lashes down immediately after gluing (causes shifting) |
| Apply mascara *before* falsies, not after | Clump natural and false lashes together with post-application mascara |
| Store lashes in their case after cleaning with alcohol | Re-use lashes beyond 5–6 wears (warping leads to poor fit) |
| Use a magnifying mirror for precise placement | Force lashes onto oily or unclean lids |
Real Example: From Frustration to Flawless in One Evening
Sophia, a 29-year-old marketing executive, had given up on false lashes after multiple failed attempts. “Every time I wore them, my coworkers would say, ‘Did you put your lashes on crooked?’ Or worse, I’d catch a reflection and see white glue poking out like little flags,” she recalls. Determined to fix it before a wedding, she followed the tacky-glue method and trimmed her lashes to match her eye width. She also switched from black glue (which highlighted imperfections) to a clear formula.
Using tweezers and a handheld mirror, she applied the lashes one eye at a time, starting with the center. To her surprise, they stayed put all night—and no one mentioned her lashes at all. “That silence was the biggest compliment,” she says. “They looked so natural, nobody realized they weren’t mine.”
Expert Tips for Long-Lasting, Comfortable Wear
Even with perfect application, minor adjustments can enhance comfort and appearance throughout the day. Professionals rely on a few insider tricks to keep falsies looking fresh from morning to night.
- Layer with eyeliner. After applying lashes, run a thin line of gel or pencil liner along the upper lash line to fill any tiny gaps between your natural lashes and the band. This camouflages residual glue and creates a fuller effect.
- Use magnetic lashes as an alternative. For those who struggle with glue consistency, magnetic lashes eliminate adhesive altogether. Just ensure the magnets align precisely with your lash line to prevent uneven pressure.
- Carry a mini lash repair kit. Keep a travel-sized glue, tweezers, and Q-tip in your bag. If a corner lifts, gently re-adhere it without removing the entire strip.
- Remove with care. Soak a cotton pad with oil-free makeup remover and hold it against the lash band for 20 seconds. This softens the glue and lets you peel the lashes off without pulling on your natural lashes.
“The goal isn’t just to wear false lashes—it’s to forget you’re wearing them. That happens when they move like your own.” — Lena Park, Editorial Makeup Designer
Frequently Asked Questions
Why does my lash glue show even when I use a small amount?
Visible glue often occurs when the adhesive isn’t allowed to become tacky before application. Wet glue spreads under pressure and squeezes out from under the band. Additionally, if your lash band doesn’t conform to your eye shape, gaps form where glue becomes exposed. Trimming and pre-bending the band usually solves this.
How can I stop my eyes from feeling heavy or stiff when wearing falsies?
Heavy sensation usually means the lashes are too dense or too long for your lid structure. Try lighter, shorter styles with thinner bands. Also, ensure you’re not applying multiple layers of mascara on top of the falsies—that adds unnecessary weight and restricts natural movement.
Can I reuse false lashes without compromising the look?
Yes, high-quality strip lashes can be reused 5–8 times if cleaned and stored properly. After removal, gently peel off dried glue and wipe the band with a cotton swab dipped in rubbing alcohol. Let them dry completely before placing them back in their tray. Over time, fibers may lose their curl, so retire them once they appear frayed or misshapen.
Final Thoughts: Confidence Starts with Comfort
Flawless false lashes aren’t about perfection—they’re about intention. Taking a few extra minutes to trim, wait for tackiness, and place with precision pays off in both appearance and comfort. When done right, no one should notice you’re wearing falsies—except maybe to compliment your stunning eyes.
And you shouldn’t have to choose between glamour and ease. By choosing the right style, preparing your base, and following a mindful application process, you can enjoy dramatic volume without visible glue or mechanical blinking. These techniques aren’t reserved for professionals; they’re accessible to anyone willing to refine their routine.


 浙公网安备
33010002000092号
浙公网安备
33010002000092号 浙B2-20120091-4
Comments
No comments yet. Why don't you start the discussion?