
Applying false lashes can elevate your makeup game instantly, but many people struggle with discomfort, redness, or even infections due to improper technique—especially when the lash band or adhesive comes into contact with the delicate skin of the eyelid. The key to flawless, irritation-free application lies in precision, preparation, and understanding the anatomy of your eye area. When done correctly, false lashes should sit seamlessly on your natural lash line, not on your eyelid. This guide breaks down exactly how to achieve that result safely and consistently.
Why Avoiding Contact With the Eyelid Matters
The skin on your eyelid is among the thinnest and most sensitive on the body. Introducing glue, synthetic fibers, or pressure from lash bands onto this area can lead to inflammation, allergic reactions, or chronic conditions like contact dermatitis. Additionally, placing lashes too close to the lid can disrupt your natural lash growth cycle and increase the risk of ingrown lashes or styes.
Eyelash adhesive contains chemicals like cyanoacrylate, which are designed to bond quickly—but not on bare skin. When glue dries directly on the eyelid, it can cause tightness, flaking, and micro-tears, especially during removal. Over time, repeated exposure may weaken the skin’s elasticity and contribute to premature aging around the eyes.
“Proper lash placement isn’t just about aesthetics—it’s a form of ocular hygiene. Keeping adhesives and foreign materials off the eyelid reduces the risk of both short-term irritation and long-term damage.” — Dr. Lena Patel, Cosmetic Dermatologist & Ocular Health Specialist
Step-by-Step Guide: Applying False Lashes Without Touching the Eyelid
Success starts with preparation and ends with precision. Follow this detailed process to ensure your false lashes enhance your eyes—not irritate them.
- Choose the Right Lash Style
Select lashes with a thin, flexible band. Thicker or rigid bands are harder to place accurately and more likely to rest on the eyelid. Opt for hand-made silk or mink-style lashes, which often have lighter, more pliable bases. - Measure and Trim to Fit
Hold the lash strip against your lash line, starting from the outer corner toward the inner. Mark where the lash extends past your natural lash line and trim only from the outer end using small scissors. A properly fitted lash won’t require stretching or tugging to fit, minimizing the chance of misplacement. - Curl Your Natural Lashes
Use an eyelash curler before applying falsies. This lifts your natural lashes upward, creating a “shelf” that helps the false lash sit flush along the lash line rather than drooping onto the lid. - Apply Eyeliner as a Guide (Optional)
Using a gel or liquid eyeliner, draw a thin line directly along your upper lash roots. This serves two purposes: it camouflages the lash band once applied, and it gives you a visual boundary—anything above this line risks touching the eyelid. - Apply Glue Strategically
Squeeze a small amount of latex-free adhesive onto the back of your hand. Using a toothpick or the applicator tip, apply a very thin layer along the lash band. Wait 30 seconds until the glue becomes tacky. Avoid coating the ends excessively, as excess glue increases the likelihood of spillage onto the eyelid. - Use Tweezers or a Lash Applicator Tool
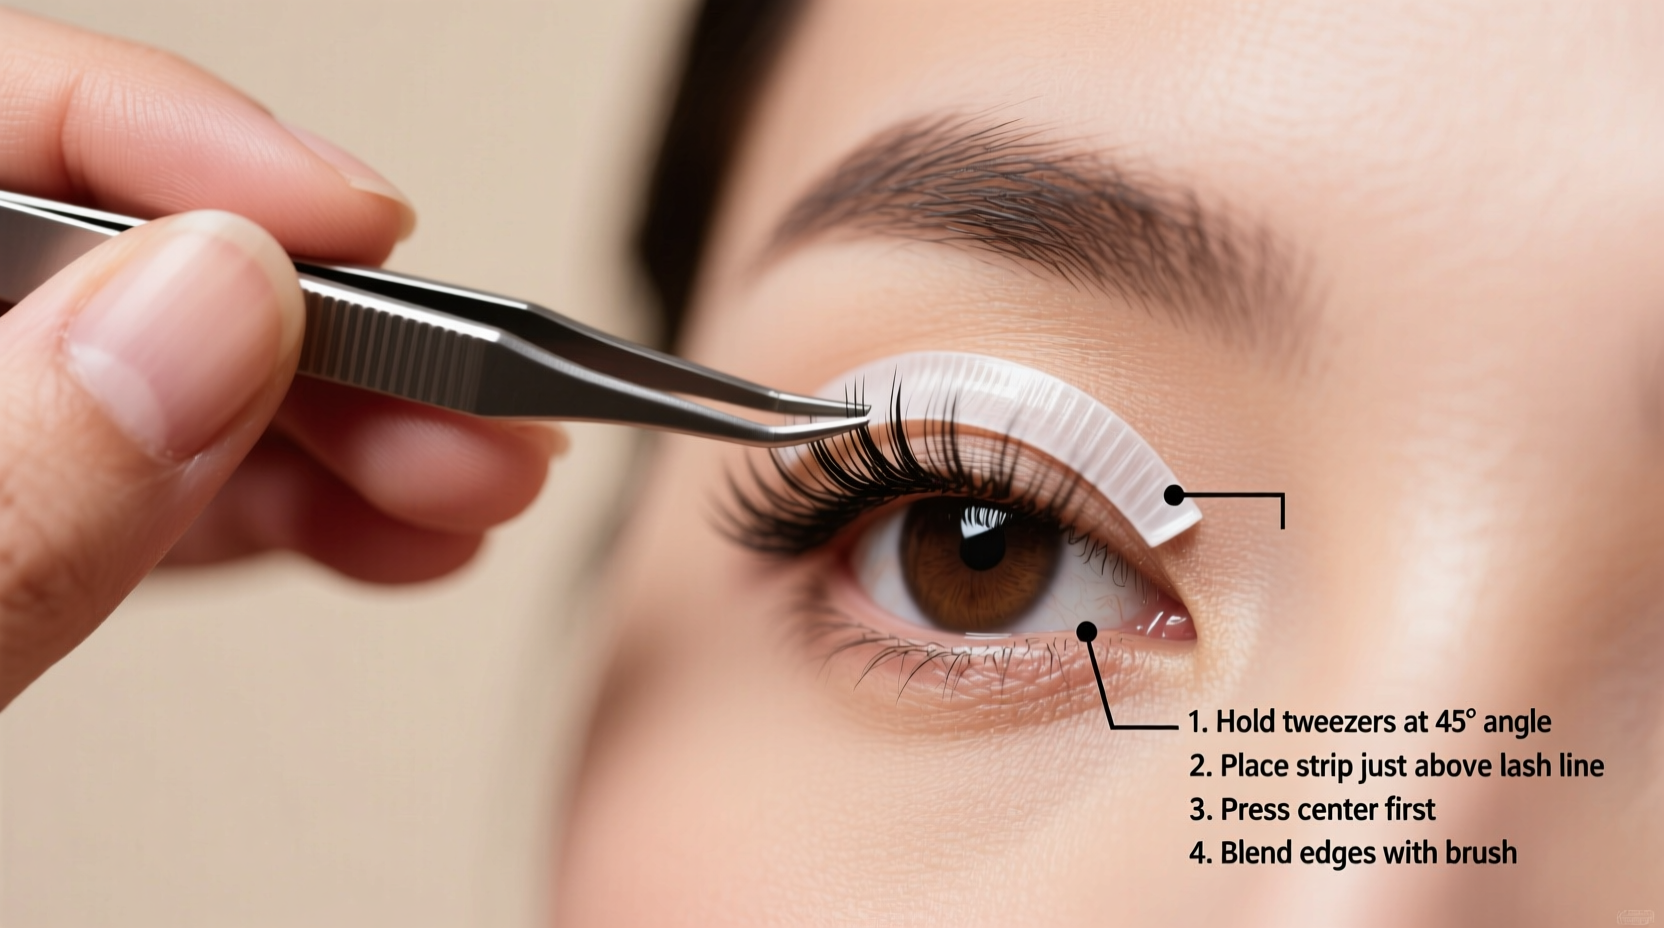
Never use your fingers. Grip the lash strip at the center using tweezers or a magnetic applicator. Position the center of the lash first—this ensures symmetry and control. Aim to place the band directly on top of your natural lashes, not below or above them. - Lower the Lash Gently Into Place
With your free hand, gently pull your upper eyelid taut by sliding a finger just above the brow bone. This stabilizes the area and exposes the lash line. Lower the lash straight down so the band aligns perfectly with your natural lash base. Do not press down into the eyelid. - Secure the Corners
Once the center is set, release the center grip and lightly press the inner and outer corners into place using the tip of your tool. If needed, use a clean spoolie or angled brush to blend your natural lashes with the falsies. - Avoid Blinking Immediately
Keep your eyes closed for 15–20 seconds after placement to allow the glue to set without shifting. Rapid blinking can cause the lash to slide downward onto the lid.
Do’s and Don’ts: Common Mistakes That Lead to Lid Contact
Mistakes in application technique are the primary reason lashes end up on the eyelid. Use this table to identify and correct habits that compromise safety and comfort.
| Do’s | Don’ts |
|---|---|
| Do apply glue sparingly and let it become tacky before use. | Don’t use excessive glue, which can ooze onto the eyelid. |
| Do place the lash band directly on your natural lashes. | Don’t position the band below the lash line where it rests on bare skin. |
| Do use tools for precision placement. | Don’t rely on fingers, which lack fine motor control near the eye. |
| Do prep your natural lashes with curling and light mascara. | Don’t apply heavy mascara, which clumps and prevents seamless blending. |
| Do check alignment in a magnifying mirror post-application. | Don’t assume placement is correct without verification. |
Real-Life Example: From Frustration to Flawless Application
Sophia, a 28-year-old makeup enthusiast, had been applying false lashes for years but consistently experienced redness and swelling by midday. She assumed it was an allergy to the glue—until she visited a dermatologist who pointed out that her lashes were being placed too low, directly on her eyelid. After switching to a thinner lash band and adopting the \"center-first\" method with tweezers, she noticed immediate improvement. By focusing on alignment with her natural lash roots instead of the lid itself, she eliminated irritation completely. Now, she wears falsies daily for work and events without any discomfort.
Her breakthrough came not from changing products, but from refining technique—a reminder that skill often trumps product choice when it comes to eye safety.
Essential Tools and Products for Safe Application
The right tools make all the difference in achieving precise, lid-safe lash application. Here’s what to include in your kit:
- Fine-tipped tweezers or lash applicator: Offers superior control compared to fingers.
- Latex-free lash adhesive: Reduces risk of allergic reaction; dries clear and flexible.
- Small scissors: For trimming lashes to fit your eye shape.
- Magnifying mirror: Allows you to see the lash line clearly and confirm placement.
- Gel eyeliner: Creates a visual guide and hides the lash band.
- Spoolie brush: Blends natural and false lashes seamlessly.
Checklist: Apply False Lashes Safely in 10 Steps
Use this checklist every time you apply false lashes to maintain consistency and avoid eyelid contact:
- Wash hands thoroughly.
- Cleanse eyelids and remove any oil or residue.
- Curl natural lashes.
- Trim lashes to fit eye width.
- Apply a thin coat of adhesive to the band.
- Wait 30 seconds for glue to become tacky.
- Hold eyelid taut using brow bone as anchor.
- Place center of lash first, aligning with natural lash root line.
- Press outer and inner corners gently into place.
- Close eyes and wait 20 seconds for full adhesion.
FAQ: Common Questions About Lash Placement Safety
Can false lashes damage my natural lashes if they touch the eyelid?
Yes. When false lashes are improperly placed on the eyelid, the added weight pulls on nearby natural lashes, potentially causing traction alopecia—a condition where lashes thin or fall out due to constant stress. Additionally, adhesive residue on the lid can clog follicles and disrupt growth.
How do I know if my lashes are sitting on my eyelid?
If you feel pressure, tightness, or a foreign-body sensation shortly after application, the band is likely resting on bare skin. Visually, you’ll notice a visible gap between the lash band and your natural lash roots, or the lashes may appear to \"float\" above your real lashes. In a magnifying mirror, the band will be clearly separated from your lash line and touching pale skin instead.
Are there specific lash styles better suited for avoiding eyelid contact?
Absolutely. Look for lashes labeled “invisible band,” “feathered edge,” or “hand-stacked.” These typically feature ultra-thin, nearly transparent bands that conform easily to the lash line. Avoid theatrical or strip lashes with thick, dark plastic bases—they’re more prone to lifting and pressing into the lid.
Conclusion: Master Precision, Protect Your Eyes
Applying false lashes without touching your eyelid is not just a matter of technique—it’s an act of care. Every time you place a lash accurately, you protect the fragile skin around your eyes, preserve your natural lashes, and enhance your look with confidence. It takes practice, patience, and the right tools, but the payoff is lasting comfort and beauty.


 浙公网安备
33010002000092号
浙公网安备
33010002000092号 浙B2-20120091-4
Comments
No comments yet. Why don't you start the discussion?