
Applying false lashes can elevate your makeup game, adding drama and definition to your eyes with minimal effort—once you’ve mastered the technique. But for beginners, the process often comes with frustration: tweezers poking the eye, glue smudging onto the lid, or lashes landing too close to the skin instead of blending seamlessly with natural lashes. The key to avoiding discomfort and achieving a polished result lies in precision, preparation, and proper tools.
The goal isn’t just to attach lashes—it’s to place them directly on top of your natural lash line without letting the band or adhesive touch the sensitive skin of your eyelid. This not only prevents irritation but also creates a more natural, lifted appearance. With the right approach, even those with shaky hands or limited dexterity can confidently apply falsies at home.
Why Avoiding Contact with the Eyelid Matters
Touching your eyelid with false lashes or their adhesive can lead to several issues. First, the skin around the eyes is delicate and highly absorbent. Glue residue or pressure from improper placement may cause redness, swelling, or allergic reactions over time. Second, when the lash band rests on the lid rather than above it, the lashes appear bulky and unnatural, breaking the smooth curve of your eye shape.
Additionally, eyelid contact increases the risk of premature fallout. As your eye moves or blinks, friction between the lid and the lash band weakens the bond. This leads to one side lifting early in the day, requiring constant readjustment. By placing the lashes correctly—on the natural lash line—you anchor them where movement is minimized and adhesion is strongest.
“Proper lash application starts with understanding anatomy. The lash line is not on the skin; it’s nestled just above the roots of your natural lashes.” — Lena Park, Celebrity Makeup Artist & Lash Educator
Step-by-Step Guide to Applying False Lashes Without Touching the Lid
Success begins before you pick up the lash strip. Follow this detailed sequence to ensure accuracy and comfort every time.
- Choose the Right Lash Style: Opt for lightweight, wispy strips labeled “beginner-friendly” or “natural.” Heavy dramatic lashes are harder to control and more likely to drag down or shift during application. <
- Trim the Lash Band to Fit Your Eye Shape: Hold the lash strip against your lash line and measure the length. Most false lashes are designed for larger eyes, so trimming 1–3mm from the outer edge ensures a better fit and prevents the ends from extending past your natural corners, which can make alignment difficult.
- Pre-Curl Natural Lashes (Optional): Use an eyelash curler to lift your natural lashes slightly. This creates space between your lashes and the lid, making it easier to slide the false lash underneath without contact.
- Apply Minimal Adhesive: Squeeze a thin line of latex-free lash glue along the band. Wait 30 seconds until the glue becomes tacky. Using too much glue increases drying time and raises the chance of squeeze-out onto the lid.
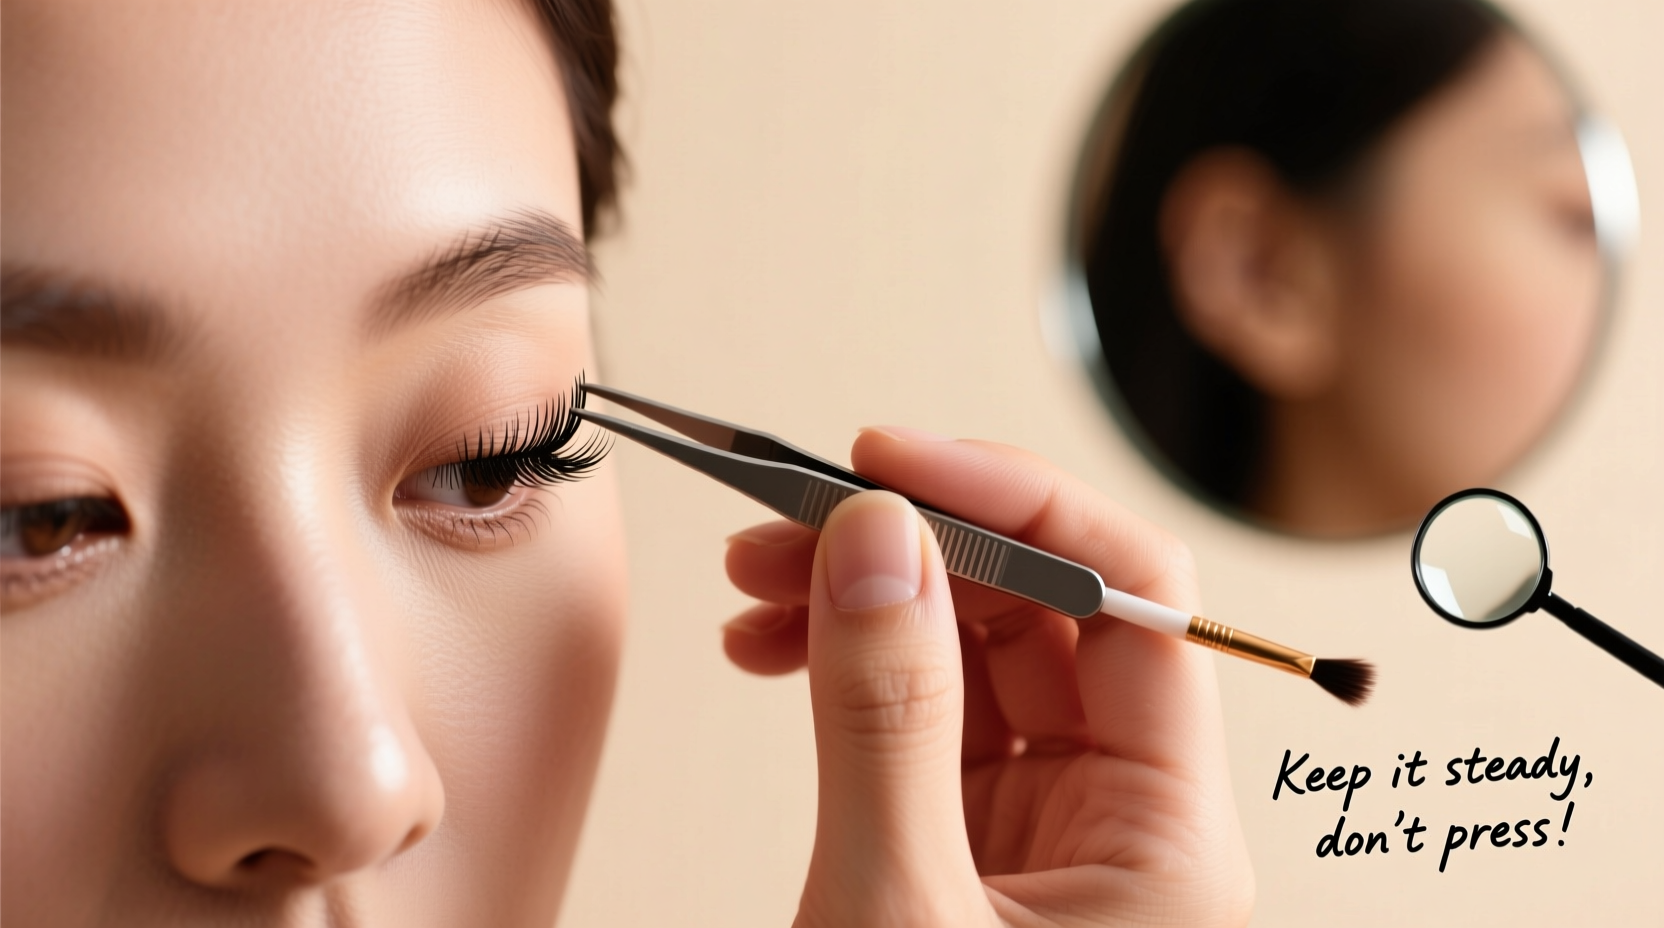
- Use the Correct Tools: A fine-tipped tweezer or metal lash applicator gives far greater control than fingers. Fingers tend to press too hard and obscure visibility.
- Position from the Center Outward: Look straight ahead into a well-lit mirror. Place the center of the lash strip first, aligning it with your pupil. Once secured, gently press the inner and outer corners into place using the tip of your tool—not your fingertip.
- Let Gravity Work for You: Keep your chin slightly raised and eyes open while looking down into the mirror. This angle lifts the eyelid away from the lash line, giving you clear access to the root area without touching skin.
- Secure Without Pressing Down: After placement, use the flat side of your tweezers to lightly press along the band, focusing only on areas where the lash meets your natural lashes. Avoid pressing toward the lid.
- Blend with Mascara (After Drying): Wait two minutes for the glue to set completely, then apply one coat of mascara to fuse natural and false lashes together. Do not tug upward, as this can dislodge the strip.
- Check Alignment in Natural Light: Step away from the mirror and assess symmetry under daylight. Adjust if needed before continuing with the other eye.
Essential Tools and Products for Precision Application
The right tools reduce guesswork and improve stability. Here's what to keep in your kit:
- Metal Lash Applicator: Offers superior grip and precision compared to plastic tools.
- Latex-Free Lash Glue: Less irritating and ideal for sensitive eyes. Black glue blends with liner for invisible hold.
- Small Mirror with Magnification: Allows you to see the lash line clearly without leaning too close.
- Tweezers with Slanted Tip: Useful for adjusting small sections of the band post-application.
- Lint-Free Applicator Stick or Bobby Pin: Can be used to nudge the lash into place if your main tool slips.
| Tool | Best For | Avoid If |
|---|---|---|
| Metal Applicator | Precise placement, especially near the inner corner | You have extreme hand tremors (practice first) |
| Finger Application | Quick fixes or experienced users only | You're a beginner—hard to avoid lid contact |
| White Lash Glue | Drying visibility (you can see when it’s tacky) | Wearing dark liner—it won't blend |
| Black Lash Glue | Invisible finish with winged liner | You need to adjust placement frequently (harder to see) |
Common Mistakes That Lead to Lid Contact
Even with good intentions, certain habits sabotage clean application. Recognizing these pitfalls helps prevent recurring errors.
- Looking Up During Application: This pulls the eyelid taut and pushes it upward, bringing it into direct contact with the approaching lash strip.
- Using Too Much Glue: Excess adhesive spreads beyond the band and sticks to the lid, creating a sticky trap that bonds skin to lash.
- Waiting Too Long Before Applying: Letting glue dry fully causes brittleness, leading to poor adhesion and last-minute reapplication attempts that increase lid contact.
- Starting at the Inner Corner: This narrow area is hardest to reach and most prone to poking. Begin in the center for stability.
- Holding the Lash Too Far from the Band: Gripping the fluttery part reduces control. Always hold near the base for accurate positioning.
Mini Case Study: From Frustration to Flawless in One Week
Sophie, a 26-year-old office worker, had tried false lashes three times before giving up. Each attempt ended with red, irritated eyes and lashes glued to her lid. She assumed she “just wasn’t cut out” for falsies. After watching a tutorial emphasizing head position and tacky glue timing, she committed to daily dry runs—placing lashes without adhesive—for five minutes each morning.
On day four, she applied glue for the first time using a metal tool and started from the center. To her surprise, both lashes stayed perfectly aligned all evening. Over the next week, she refined her technique by trimming bands beforehand and switching to black glue for a seamless look with her eyeliner. Now, she applies lashes in under six minutes and wears them twice a week.
Her breakthrough came not from buying expensive products, but from changing her posture and trusting the process. “I realized I was fighting my own anatomy,” she said. “Once I stopped trying to ‘press’ them on and let the glue do the work, everything clicked.”
Beginner Checklist for Safe, Lid-Free Application
Follow this checklist each time you apply false lashes to stay consistent and avoid mistakes:
- ☐ Trim lashes to fit eye width
- ☐ Curl natural lashes (optional but helpful)
- ☐ Apply a thin line of glue to the band
- ☐ Wait 20–30 seconds for tackiness
- ☐ Position yourself: chin up, eyes open, looking down into mirror
- ☐ Place center of lash first using tweezers or applicator
- ☐ Secure inner and outer edges without pressing into lid
- ☐ Wait 2 minutes before blinking heavily or applying mascara
- ☐ Check symmetry and adjust if necessary
Frequently Asked Questions
Can I wear false lashes every day without damaging my eyes?
Yes, as long as you apply them correctly and remove them gently each night. Daily wear increases the risk of buildup and irritation, so always cleanse the eye area thoroughly and take breaks weekly to let natural lashes recover.
What should I do if the glue touches my eyelid?
If glue lands on your lid before it dries, carefully wipe it off with a cotton swab dipped in micellar water. Never peel it once set. In the future, use less glue and wait for it to become tacky before applying.
How do I know if my lashes are placed too close to the lid?
If you feel pressure when blinking, see a visible gap between the lash band and your natural lashes, or notice the strip folding toward your brow, it’s likely sitting on the lid. Remove and reposition higher along the lash root line.
Final Tips for Lasting Confidence
Mastering false lashes takes patience, not perfection. The goal isn’t to mimic airbrushed looks seen online, but to enhance your features comfortably and safely. Focus on consistency: practice regularly, refine your angles, and listen to your eyes—if something feels wrong, it probably is.
Over time, muscle memory will replace hesitation. You’ll learn how much glue works for you, which tools feel most natural, and how to adapt based on your eye shape. And remember: even professionals had clumsy first tries. What separates success from surrender is persistence.
“The best beauty tricks aren’t about talent—they’re about repetition. Ten applications in, you’ll wonder why you ever struggled.” — Marcus Reed, Editorial Makeup Director at Glow Magazine


 浙公网安备
33010002000092号
浙公网安备
33010002000092号 浙B2-20120091-4
Comments
No comments yet. Why don't you start the discussion?