
False eyelashes can transform a look from everyday to dramatic in seconds. But for many, the process of applying them feels intimidating—especially when it involves small tools like tweezers that require precision. What if you don’t have tweezers? Or what if you simply struggle with their use due to shaky hands, poor grip, or accessibility issues? The good news is that you can successfully apply false lashes using only your fingers. With the right technique, preparation, and a bit of practice, you’ll achieve salon-quality results without ever touching a tool.
This guide breaks down the entire process into manageable steps, shares pro tips, and includes real-world insights to help you master finger-only lash application confidently and consistently.
Why Skip the Tweezers?
Tweezers are often recommended for applying false lashes because they offer control and precision. However, not everyone finds them comfortable or effective. Some people report that tweezers make the lash band too rigid, increasing the risk of poking the eye. Others struggle with dexterity, especially those with arthritis, hand tremors, or limited fine motor skills. In fact, makeup artists working with clients who have physical limitations often adapt techniques to rely solely on fingertips.
Fingers provide a natural sense of pressure and flexibility. When used correctly, they allow for subtle adjustments during placement, making it easier to align the lash band precisely along the natural lash line. Plus, fingers are always available—no need to hunt for tools or worry about sterilization between uses.
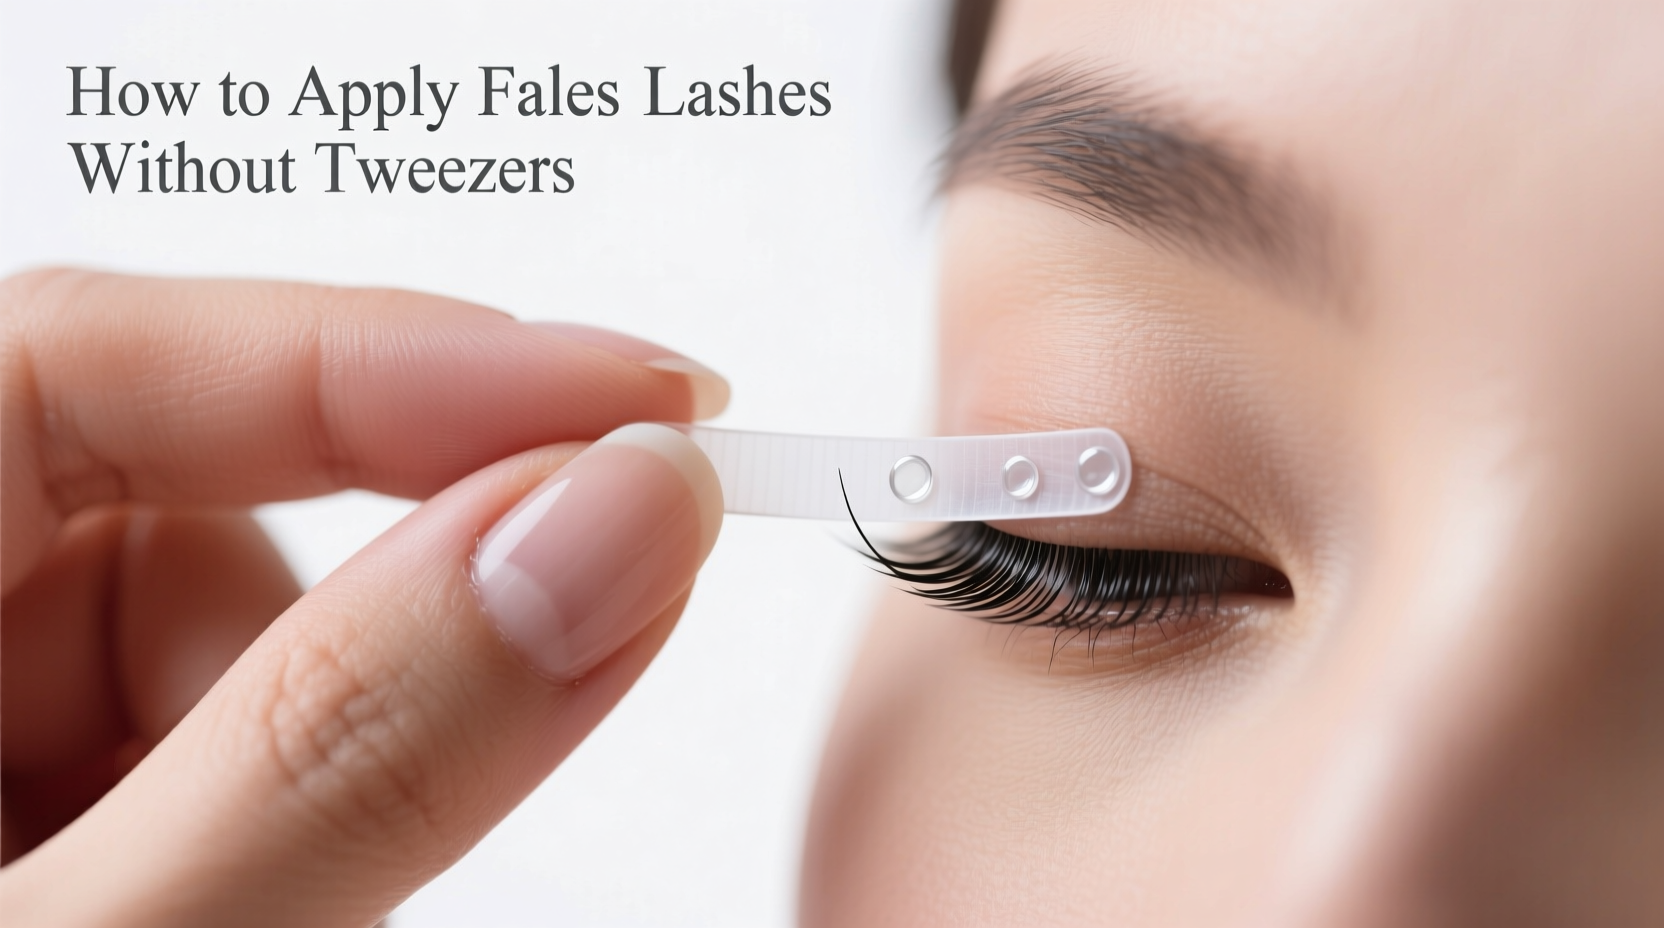
Step-by-Step Guide to Applying False Lashes with Fingers
Success lies in preparation and patience. Follow this detailed timeline to apply false lashes flawlessly using only your fingers.
- Choose the Right Lash Style
Opt for lightweight, flexible bands—feathered strips or wispy styles work best. Avoid thick, stiff lashes as they’re harder to manipulate without tools. Pre-cut individual clusters can also be easier to place with fingers than full strips. - Trim the Lash Band (If Needed)
Hold the lash strip against your eyelid to measure fit. If it extends past the outer corner, gently pinch and tear the excess using your thumbnail and index finger. Tear rather than cut to maintain a soft edge that blends seamlessly. - Apply Adhesive Evenly
Squeeze a thin line of lash glue along the band using the applicator tip. Then, use your clean fingertip (preferably ring finger for gentler touch) to lightly smear the glue into an even layer. This ensures better adhesion and prevents clumping. - Wait 30–45 Seconds for Tackiness
Set the lash down and let the glue become tacky. This is crucial—fresh glue is too slippery, while over-dried glue won’t stick. Use this time to prep your eyes: close them slightly and look down into a mirror placed on a table. - Pick Up the Lash with Your Fingertips
Use your thumb and index finger to gently lift the lash by the center of the band. Avoid grabbing the fibers; focus on the band itself. Keep your grip light but firm enough to hold position. - Position the Center First
Align the center of the lash band with the center of your natural lash line—the point where your iris ends when looking straight ahead. Gently press the center down using the pad of your index finger. Hold for 2–3 seconds to secure adhesion. - Secure the Inner Corner
Using the same finger or switch to your middle finger, nudge the inner edge of the lash band toward the tear duct. Press lightly and adjust until it sits flush against your lid without lifting. - Anchor the Outer Edge
Slide your fingertip outward along the lash line, pressing the outer third into place. If needed, use your pinky to stabilize your hand against your cheek for extra control. - Blend and Adjust
Once secured, open your eyes and check alignment. If one side lifts, reapply gentle pressure with your fingertip. You can also use your finger to press your natural lashes upward into the false band, creating a seamless blend. - Repeat on the Other Eye
Follow the same process for the second eye. Take your time—rushing increases misalignment risk.
Essential Tools and Products for Finger Application
While no tweezers are used, having the right supporting products makes all the difference. Here’s what to keep in your kit:
- Flexible false lashes: Look for names like “invisible band,” “featherweight,” or “handmade silk.” These bend easily under finger pressure.
- Latex-free lash glue: Ideal for sensitive eyes and provides strong hold without excessive stiffness.
- Small angled brush or toothpick: Optional for adjusting glue or nudging the band—use only if needed, not required.
- Mirror with magnification: A well-lit, zoom-enabled mirror helps you see edges clearly without leaning too close.
- Sealing spray or clear mascara: To lock everything in place and blend natural and false lashes together.
| Product Type | Recommended for Finger Application | Not Recommended |
|---|---|---|
| Lash Band Material | Invisible nylon, thin cotton | Thick plastic, wired edges |
| Adhesive Type | Clear, latex-free, quick-dry | Black glue (hardens fast), old/dried glue |
| Lash Length | Natural to medium (10–12mm) | Extra-long dramatic styles (14mm+) |
| Application Aid | Finger-friendly packaging | Bulk packaging requiring tweezers to remove |
Common Mistakes and How to Avoid Them
Even experienced users encounter hiccups when relying on fingers alone. Awareness of these pitfalls improves success rate significantly.
- Applying glue and placing immediately: Fresh glue is slippery. Waiting 30 seconds allows it to become tacky and grip better.
- Pressing too hard: Excessive force can crease the band or shift placement. Use light, repeated touches instead.
- Ignoring lash direction: Make sure the curled side faces upward before applying—flipping it backward ruins the look.
- Skipping the fit check: Always hold the lash against your lid first. An ill-fitting band will never lie flat, no matter how carefully applied.
- Forgetting to seal the ends: The outer and inner corners are prone to lifting. Reinforce them with a tiny dot of glue after initial placement if needed.
“Fingers give you tactile feedback that tweezers can’t. You feel the resistance, the alignment, and the bond forming in real time.” — Lena Torres, Professional Makeup Artist & Beauty Educator
Real-World Example: Maria’s Morning Routine
Maria, a 34-year-old teacher with mild carpal tunnel syndrome, used to avoid false lashes entirely. “I’d buy them, try once, get frustrated, and toss them,” she says. After watching a tutorial on finger application, she decided to give it another shot. She chose a pair of lightweight, pre-trimmed lashes with a clear band and used a latex-free adhesive.
Following the center-first method, she applied the glue, waited, and used her index finger to press each lash into place. It took her about eight minutes the first time—but both lashes stayed perfectly aligned throughout parent-teacher conferences. “I felt confident and put together without needing help or special tools,” she recalls. Now, she applies them three times a week and even teaches her students’ moms the technique during school beauty workshops.
Frequently Asked Questions
Can I reuse false lashes applied with fingers?
Absolutely. As long as you remove them gently by peeling from the outer edge using your fingers and clean off any residual glue, most high-quality lashes can be reused 5–10 times. Store them in their original case to preserve shape.
My lashes keep lifting at the corners—what am I doing wrong?
This usually happens due to improper trimming or insufficient glue tack. Trim the band so it ends just before your outer lash line, and ensure the glue is tacky before application. After placing, use your fingertip to press the corner down for five seconds.
Are individual lashes easier to apply with fingers than full strips?
Yes, for many. Individual clusters or mini-flares allow incremental placement and blending with natural lashes. They’re less likely to shift once set and offer more customization. Start with 3–5 clusters per eye for a natural boost.
Final Tips for Success
- Always do a dry run—place the lash without glue first to memorize positioning.
- Keep your hands steady by resting your elbow on a flat surface.
- If glue gets on your skin, wait for it to dry and peel gently—don’t rub.
- For added drama, apply mascara to your natural lashes before and after attaching falsies to fuse the layers.
Conclusion: Master the Art of Tool-Free Glamour
Applying false lashes without tweezers isn’t a compromise—it’s a skill that empowers anyone to achieve flawless results using only what they already have: their hands. By choosing the right products, mastering timing and pressure, and practicing mindful technique, you can create stunning, long-lasting eye looks anytime, anywhere.
Whether you're managing physical limitations, traveling without tools, or simply prefer a more intuitive approach, finger application opens up new possibilities in your beauty routine. Start with simple styles, follow the steps, and build confidence with each use.


 浙公网安备
33010002000092号
浙公网安备
33010002000092号 浙B2-20120091-4
Comments
No comments yet. Why don't you start the discussion?