
Stringing tiny LED tea lights through garlands transforms ordinary greenery into glowing centerpieces, ideal for holidays, weddings, or seasonal displays. But one persistent challenge remains: how to secure the lights so they stay in place without marring the garland or leaving behind tangled wires and stubborn adhesive. Many resort to hot glue or tape, only to find residue, drooping strands, or frayed foliage after removal. The solution lies not in stronger adhesives, but in smarter attachment methods that prioritize both aesthetics and preservation.
The key is selecting techniques that blend invisibility with stability. Whether you're decorating a mantel, staircase, or outdoor boughs, the goal is consistent illumination with zero visual clutter. With the right tools and approach, you can achieve a professionally lit display that looks effortless—yet holds up through weeks of use and dismantles cleanly afterward.
Choose the Right Type of LED Tea Lights
Not all LED tea lights are created equal when it comes to garland integration. Some are designed with discreet mounting features, while others are better suited for flat surfaces. For seamless garland lighting, focus on three critical attributes: size, weight, and built-in attachment points.
- Size: Opt for mini or micro LED tea lights (typically under 1.5 inches in diameter). Larger units disrupt the natural flow of foliage and are harder to conceal.
- Weight: Lightweight models reduce strain on delicate stems and prevent sagging over time.
- Attachment design: Look for tea lights with small slots, loops, or grooves around the base. These allow for threading wire or string without adhesives.
Battery-powered models with remote switches or timers add convenience, especially for hard-to-reach installations. Avoid flickering bulbs if aiming for a polished look—steady warm white or soft amber tones mimic candlelight more authentically.
Stealth Attachment Methods That Work
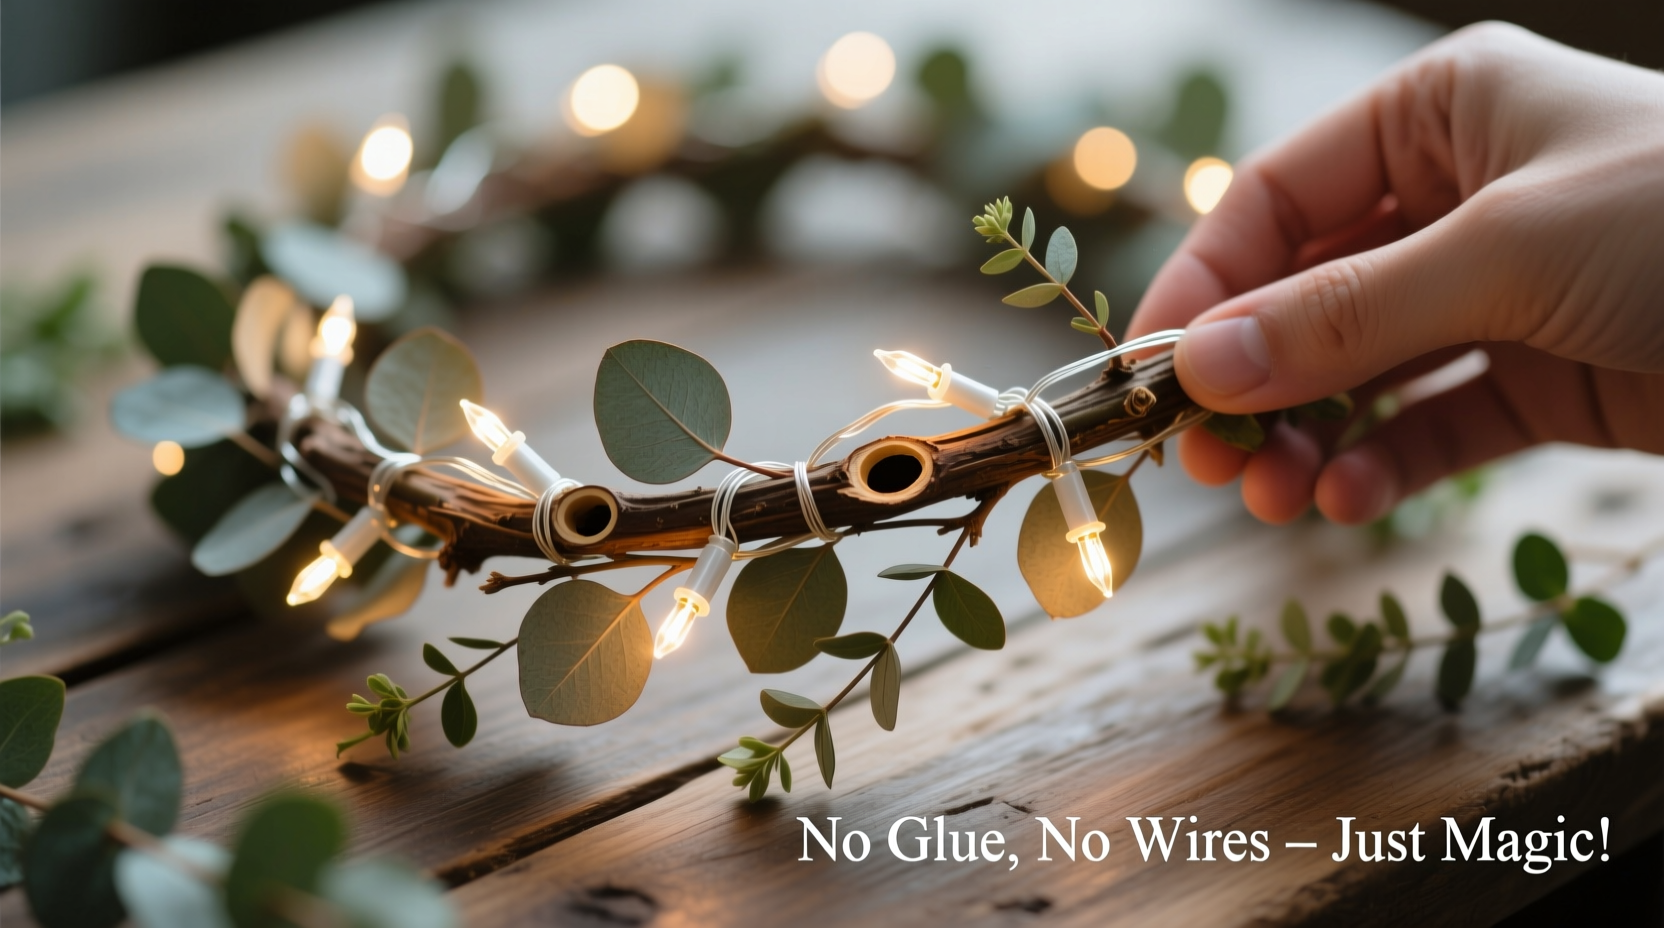
The best attachment techniques keep wires hidden and avoid direct contact between adhesives and foliage. Below are four proven methods that deliver clean, durable results.
1. Floral Wire Weaving
Floral wire (preferably 22–26 gauge) is thin, flexible, and nearly invisible once threaded through dense garland. Use it to loop around the base of each tea light and twist tightly around a nearby stem or branch.
- Cut an 8-inch piece of floral wire.
- Slide it under the lip or groove of the tea light’s base.
- Wrap both ends around a sturdy section of the garland, twisting securely at the back.
- Tuck excess wire into the foliage.
This method allows precise placement and repositioning. If using green-coated wire, match it to the garland tone for maximum concealment.
2. Clear Monofilament Thread (Fishing Line)
For ultra-light tea lights, clear monofilament thread acts like invisible string. Tie a double knot around the base, then anchor the line to inner branches using a surgeon’s knot or two half-hitches.
Advantages include near-total invisibility and flexibility in positioning. However, this method works best with heavier garlands where internal structure can support tension.
3. Miniature Zip Ties (Low-Profile)
Use extra-small black or green zip ties (1–2 inches long) to fasten tea lights to thicker stems. Slide the tie through any existing slot in the light’s casing, wrap it around the branch, and trim the tail flush.
While slightly more visible than wire, matte-finish micro ties blend well and provide strong hold. They’re especially effective on pine, eucalyptus, or artificial garlands with rigid frames.
4. Magnetic Anchoring (For Metal Supports)
If your garland is draped over a metal rod, railing, or frame, consider magnetic tea lights. These have small magnets embedded in their base, allowing them to cling securely without any fasteners.
Pair with a thin wire armature inside the garland for additional anchoring points. This hybrid method keeps lights aligned and eliminates dangling wires entirely.
| Method | Visibility | Holding Strength | Removal Cleanliness | Best For |
|---|---|---|---|---|
| Floral Wire | Low (if matched) | High | Excellent | All garland types |
| Monofilament Thread | Nearly Invisible | Moderate | Excellent | Dense, structured garlands |
| Mini Zip Ties | Moderate | Very High | Good (if trimmed) | Outdoor or heavy-duty use |
| Magnetic Base | None (on surface) | Depends on surface | Perfect | Metal-supported displays |
Wiring Strategy: Hide Cords Like a Pro
Even with perfectly attached lights, exposed power cords ruin the illusion. The secret is routing wires along the underside of the garland, using the natural depth of foliage as camouflage.
Begin by planning your cord path from the power source to the farthest light. Always run the main strand along the back or bottom edge of the garland, where shadows naturally conceal it. Secure every 6–8 inches using one of the non-residue methods above—never tape directly to walls or woodwork unless using removable adhesive hooks.
For battery packs, tuck them into a hollowed-out section of garland or suspend them beneath using a short wire loop. Choose packs with flat profiles and fabric covers for easier concealment. If placing outdoors, ensure the pack is housed in a waterproof container with drainage holes to prevent moisture buildup.
“Professional decorators don’t hide flaws—they redirect attention. A well-routed wire disappears not because it’s invisible, but because the eye follows the light, not the path.” — Daniel Reyes, Event Lighting Designer
Real Example: Holiday Mantel Transformation
A homeowner in Portland, Oregon, wanted to illuminate a 12-foot Douglas fir garland across her living room mantel for Christmas. She initially tried double-sided tape, which failed within two days, leaving sticky patches and fallen lights.
She switched to a combination of floral wire and monofilament thread. Using 24-gauge green floral wire, she secured each of the 18 tea lights at intervals matching the garland’s natural clusters. Main wiring was routed underneath and fastened every 8 inches with twisted wire anchors. Battery packs were hidden behind a decorative wooden sign mounted just above the garland.
The result lasted five weeks with no maintenance. After the holidays, the entire setup was removed in under 20 minutes, with no damage to the mantel or garland. Leftover greenery was composted without contamination from glue or plastic residue.
Step-by-Step Installation Guide
Follow this sequence for flawless, residue-free LED tea light integration:
- Assess your garland: Determine thickness, flexibility, and structural integrity. Thicker stems support heavier attachments.
- Lay out lights: Position tea lights along the garland to plan spacing (6–10 inches apart is ideal).
- Prepare materials: Gather floral wire, scissors, light-colored gloves (to avoid staining), and a needle-nose pliers for tight twists.
- Attach first light: Use floral wire to secure the initial unit near the power source. Leave slack for adjustment.
- Route the wire: Run the connecting strand along the back of the garland, securing it every 8 inches with small wire wraps.
- Install remaining lights: Attach each subsequent tea light using the same wire-loop technique, ensuring alignment.
- Conceal the battery pack: Nestle it behind or beneath the garland, anchored with a single zip tie or wire sling.
- Test the circuit: Turn on the lights to verify all function and adjust positioning if needed.
- Final inspection: View from multiple angles to confirm wires and lights are hidden from sightlines.
Avoid Common Mistakes
Even experienced decorators make errors that compromise both appearance and longevity. Steer clear of these pitfalls:
- Using hot glue: It seeps into foliage, leaves brittle residue, and damages delicate needles. Never apply directly to greenery.
- Over-tightening fasteners: Excessive pressure crushes stems and accelerates drying. Apply just enough tension to hold.
- Ignoring wire color: Silver or bright wires reflect light and draw attention. Use green, brown, or black to blend in.
- Skipping the test phase: Installing all lights before testing risks discovering dead circuits too late.
- Routing cords over top: Wires along the upper edge catch light and become focal points. Always route underneath.
FAQ
Can I reuse the same tea lights on different garlands?
Yes. Since these methods don’t rely on permanent adhesives, lights can be detached and reinstalled on future projects. Just inspect wires and connections for wear before reuse.
What if my garland is mostly loose foliage with no strong stems?
Incorporate a hidden support wire. Run a thin, bendable metal armature (like a clothes hanger cut and shaped) through the center of the garland. Attach lights to this backbone instead of fragile stems.
Are there glue alternatives that won’t leave residue?
Removable adhesive putty (such as museum gel or poster tack) can work temporarily, but it may attract dust and degrade in heat. It’s safer for indoor, short-term use only—and always test on a small area first.
Conclusion: Light Up Your Space Without the Mess
Attaching LED tea lights to garlands doesn’t require compromise between beauty and practicality. With thoughtful material selection, strategic fastening, and careful wire management, you can achieve a luminous display that enhances your decor—not detracts from it. The absence of visible hardware and sticky cleanup isn’t just convenient; it reflects attention to detail that elevates any setting.
Whether for a holiday centerpiece or a wedding backdrop, these techniques empower you to create lasting ambiance without lasting damage. Start small, refine your method, and soon you’ll be lighting up spaces with confidence and precision.


 浙公网安备
33010002000092号
浙公网安备
33010002000092号 浙B2-20120091-4
Comments
No comments yet. Why don't you start the discussion?