
Preserving your memories starts with reliable photo backups. While Apple promotes iCloud and Mac integration, many users rely on Windows PCs or want more control over their data. If you're looking to securely store your iPhone photos on an external hard drive—without touching a Mac—you’re in the right place. This guide walks through practical, proven methods that work seamlessly across devices, ensuring your photos are safe, organized, and accessible for years to come.
Why Back Up iPhone Photos Externally?
Smartphones have become our primary cameras, capturing thousands of moments—from vacations to milestones. Relying solely on iCloud or device storage is risky. iCloud subscriptions cost money, and free tiers offer only 5GB. Phones can be lost, damaged, or wiped accidentally. An external hard drive gives you full ownership of your data, no recurring fees, and long-term reliability when properly maintained.
Backing up to physical storage also allows for faster access, bulk management, and compatibility across operating systems. Whether you're using a Windows PC, Android tablet, or even a smart TV, your backed-up photos remain usable without vendor lock-in.
What You’ll Need Before Starting
To successfully transfer and back up your iPhone photos, gather these essentials:
- iPhone with charged battery – Ensure at least 50% charge or connect to power during transfer.
- USB cable (Lightning or USB-C) – Use Apple-certified cables for stable connections.
- Windows PC or laptop – Must support file transfer via USB.
- External hard drive – Preferably formatted as NTFS (for Windows) or exFAT (cross-platform).
- File explorer access – No special software required unless automating backups.
If your external drive uses a non-compatible format (like HFS+), reformatting may be necessary. Choose exFAT if you plan to use the drive with both Windows and future Macs.
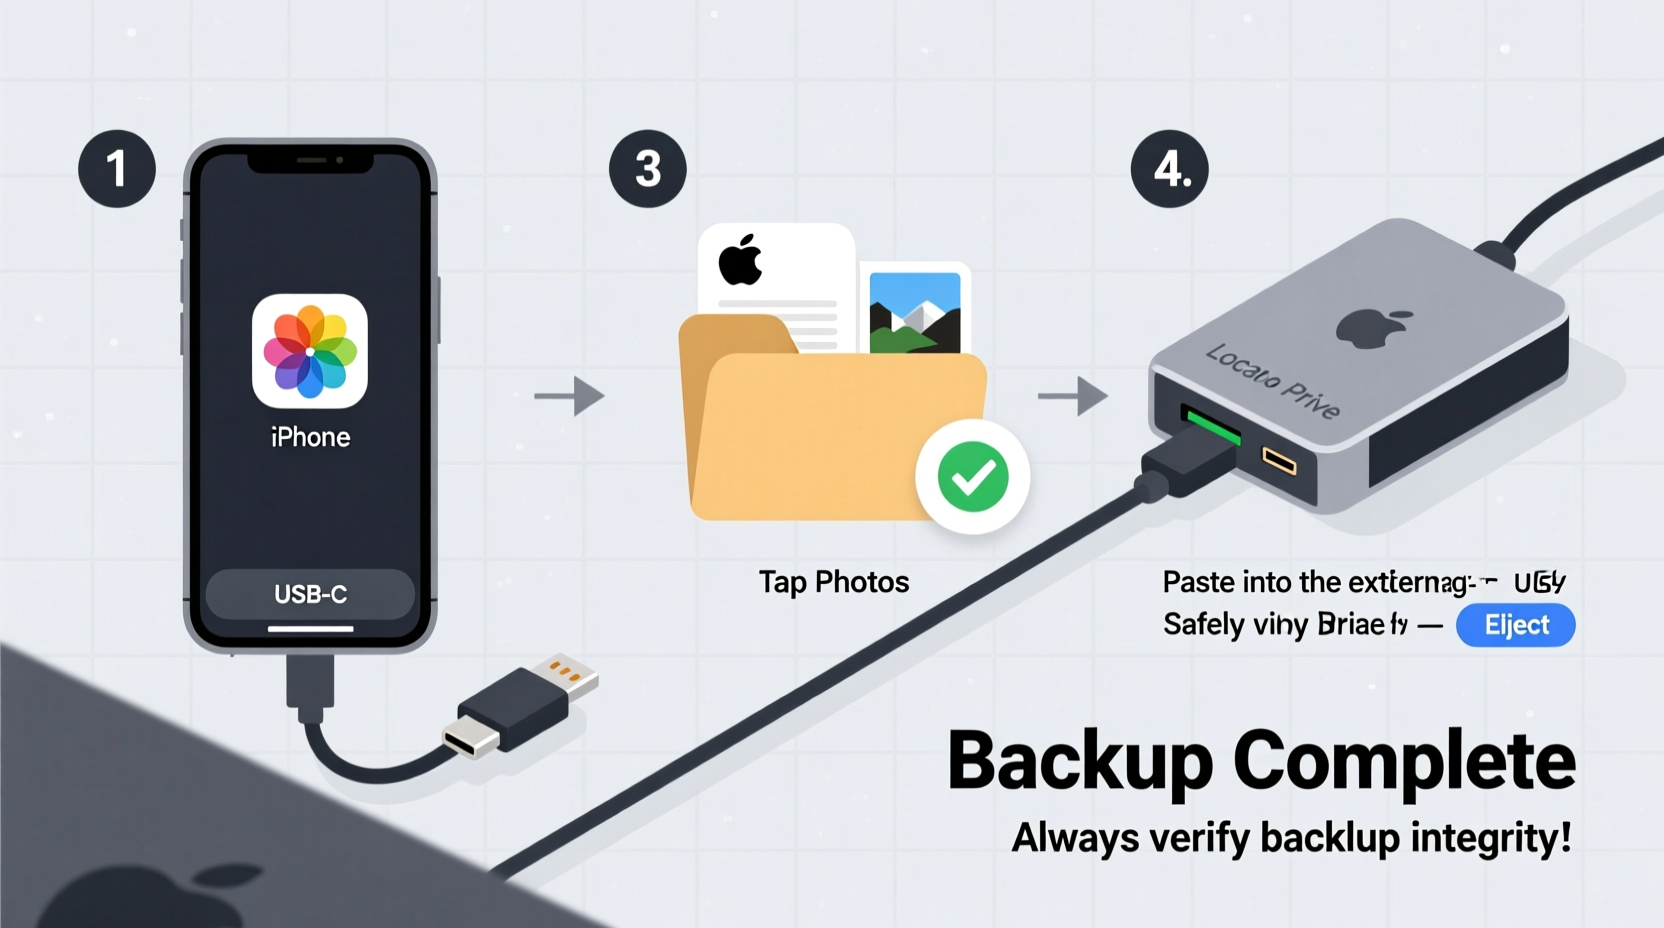
Method 1: Direct Transfer via Windows File Explorer
This is the most straightforward way to move photos from your iPhone to an external hard drive using a Windows computer. It requires no third-party apps and maintains original image quality.
- Connect your iPhone to your Windows PC using a USB cable.
- Unlock your iPhone and tap “Trust This Computer” when prompted.
- On your PC, open File Explorer and locate your iPhone under “This PC.”
- Navigate to
Internal Storage > DCIMfolder, where all camera photos are stored. - Select the folders or individual photos you want to back up.
- Copy them (Ctrl+C) and paste (Ctrl+V) directly onto your connected external hard drive.
- Safely eject both the external drive and iPhone after completion.
The DCIM folder contains subfolders like 100APPLE, 101APPLE, etc., each holding batches of photos. Transferring entire folders ensures nothing is missed.
Limitations of Direct Transfer
This method does not automatically sync new photos. You must repeat the process manually every time you take new pictures. Also, Live Photos and videos transfer as separate files, so ensure you copy all related assets.
Method 2: Use Google Photos + Download to External Drive
If manual transfers feel tedious, cloud-assisted backup offers automation and peace of mind. Google Photos provides free high-quality backup (up to 15GB shared across Gmail, Drive, and Photos). Here's how to use it as a bridge to your external drive.
Step-by-Step Cloud Bridge Process
- Install the Google Photos app on your iPhone from the App Store.
- Sign in with your Google account and enable Backup & Sync.
- Wait for all photos and videos to upload. Check progress in Settings > Backup.
- On your Windows PC, go to photos.google.com and log in.
- Select all albums or specific dates, then click the download icon.
- Choose the destination as your external hard drive (e.g.,
E:\\iPhone_Backup\\Photos). - Verify downloaded files match originals in count and resolution.
This approach is ideal for users who frequently capture photos and want automatic daily syncing. Once uploaded, your images are immune to phone loss and ready for permanent archival.
“Cloud services act as a safety net, but true data security comes from owning physical copies.” — Daniel Reeves, Digital Archivist & Data Preservation Specialist
Pro Tips for Google Photos Users
- Switch to “Original Quality” if you have enough storage—it preserves full-resolution images.
- Use filters like “Videos,” “Selfies,” or “Screenshots” to selectively download content.
- Create a batch script or scheduled task in Windows to automate future downloads.
Method 3: Third-Party Tools for Enhanced Control
For advanced users seeking better file management, metadata retention, or scheduled backups, dedicated tools simplify the workflow. Two reliable options include:
| Tool | Platform | Key Features | Cost |
|---|---|---|---|
| iMazing | Windows | Export photos with timestamps, albums preserved, selective export | Paid (free trial available) |
| FonePaw Phone Transfer | Windows/macOS | Direct phone-to-drive transfer, supports large volumes | Paid (limited free version) |
iMazing stands out by letting you export photos while preserving folder structure, creation dates, and album groupings. After installation:
- Launch iMazing and connect your iPhone via USB.
- Select your device, then go to Photos in the sidebar.
- Choose which albums or time ranges to export.
- Click “Export To” and browse to your external hard drive location.
- Select naming conventions (e.g., “YYYY-MM-DD_HHMMSS”) and click Export.
These tools reduce human error and speed up repetitive tasks, especially useful for annual photo dumps or family archives.
Real-World Example: Sarah’s Family Photo Rescue
Sarah, a teacher from Austin, upgraded her iPhone but forgot to back up six years of family photos. Her old phone died before she could set up iCloud. With no Mac, she turned to a Windows laptop and a 1TB external drive.
She used the direct File Explorer method to extract over 8,000 photos from her old iPhone. Some were corrupted due to incomplete syncs, so she supplemented missing ones from her daughter’s iPad using AirDrop. She then imported everything into Google Photos for redundancy and organized yearly folders on the external drive. Today, her digital archive spans 2017–2024, fully accessible and duplicated across two locations.
Her experience highlights the importance of proactive planning—and proves that Mac-free backup is not only possible but effective.
Best Practices for Long-Term Photo Storage
Transferring photos is just the first step. Ensuring they remain intact for decades requires thoughtful habits.
Do’s and Don’ts of Photo Archiving
| Do’s | Don’ts |
|---|---|
| Label folders clearly (e.g., “Italy_Trip_2023”) | Store all photos in one giant folder |
| Keep checksums or verify file integrity annually | Assume files won’t degrade over time |
| Store the drive in a cool, dry place away from magnets | Leave the drive plugged in 24/7 |
| Update storage media every 3–5 years | Use outdated formats like FAT32 for drives over 32GB |
Hard drives have a typical lifespan of 3–5 years under regular use. Rotate your drives periodically and migrate data to newer models before failure occurs.
Checklist: Secure Your iPhone Photo Backup
- ✅ Connect iPhone to Windows PC with trusted cable
- ✅ Trust the computer on your iPhone when prompted
- ✅ Open File Explorer and navigate to DCIM folder
- ✅ Copy selected photos to external hard drive
- ✅ Verify copied files open correctly
- ✅ Eject hardware safely before disconnecting
- ✅ Repeat monthly or after major photo events (weddings, trips)
- ✅ Maintain a second copy in the cloud (Google Photos, Dropbox)
Frequently Asked Questions
Can I back up iPhone photos without a computer?
Yes, but not directly to an external hard drive. You can use wireless solutions like Wi-Fi-enabled portable SSDs (e.g., SanDisk Wireless Drive) that create local networks. Connect your iPhone to the drive’s hotspot and transfer photos via a companion app. These devices often double as power banks and support automatic syncing.
Will my Live Photos and videos transfer properly?
Yes, but they require careful handling. Live Photos consist of a .jpg and a .mov file. When copying manually, ensure both files are present and named identically. In File Explorer, sort by name to pair them. Cloud services like Google Photos preserve Live functionality on compatible devices.
What if my external drive isn’t showing up in File Explorer?
First, test the drive on another port or computer. If it still doesn’t appear, check Disk Management in Windows to see if it needs formatting. Avoid formatting if it contains existing data. Also, ensure your iPhone is unlocked and trusted—otherwise, it may not mount as a camera device.
Final Thoughts: Take Control of Your Digital Memories
Your photos are more than pixels—they’re personal history. Relying on a single device or subscription service puts them at risk. By backing up your iPhone photos to an external hard drive without a Mac, you reclaim control, avoid recurring costs, and build a resilient archive.
Whether you choose manual transfer, cloud bridging, or specialized software, consistency matters most. Schedule quarterly backups like you would change smoke detector batteries. Label folders thoughtfully. Test restores occasionally. Over time, you’ll build a library that future generations can explore.


 浙公网安备
33010002000092号
浙公网安备
33010002000092号 浙B2-20120091-4
Comments
No comments yet. Why don't you start the discussion?