
Preserving your memories is more important than ever in the digital age. With thousands of photos stored on your iPhone, losing them due to device failure, accidental deletion, or storage limits can be devastating. While Apple’s iCloud offers cloud-based backup, it comes with subscription costs and limited free storage. A more permanent, cost-effective solution is backing up directly to an external hard drive—especially if you don’t own a Mac.
The good news: You don’t need a Mac to securely transfer your iPhone photos to an external drive. Whether you're using a Windows PC, Android tablet, or standalone hardware device, multiple reliable methods exist. This guide walks you through practical, step-by-step approaches that ensure your photo library remains safe, organized, and fully under your control.
Why Backup iPhone Photos to an External Hard Drive?
Smartphones are not designed for long-term data storage. Internal memory wears out over time, devices get lost or damaged, and software updates occasionally trigger unexpected data loss. Relying solely on your iPhone or even iCloud puts your visual history at risk.
An external hard drive gives you full ownership of your data. No monthly fees, no sync delays, and no reliance on internet connectivity. Once backed up, your photos remain accessible offline and can be restored quickly if needed. For users who take hundreds or thousands of photos annually, this method provides peace of mind—and massive savings compared to expanding iCloud storage.
“Physical backups are still the most reliable way to preserve digital memories long-term.” — David Lin, Data Preservation Specialist
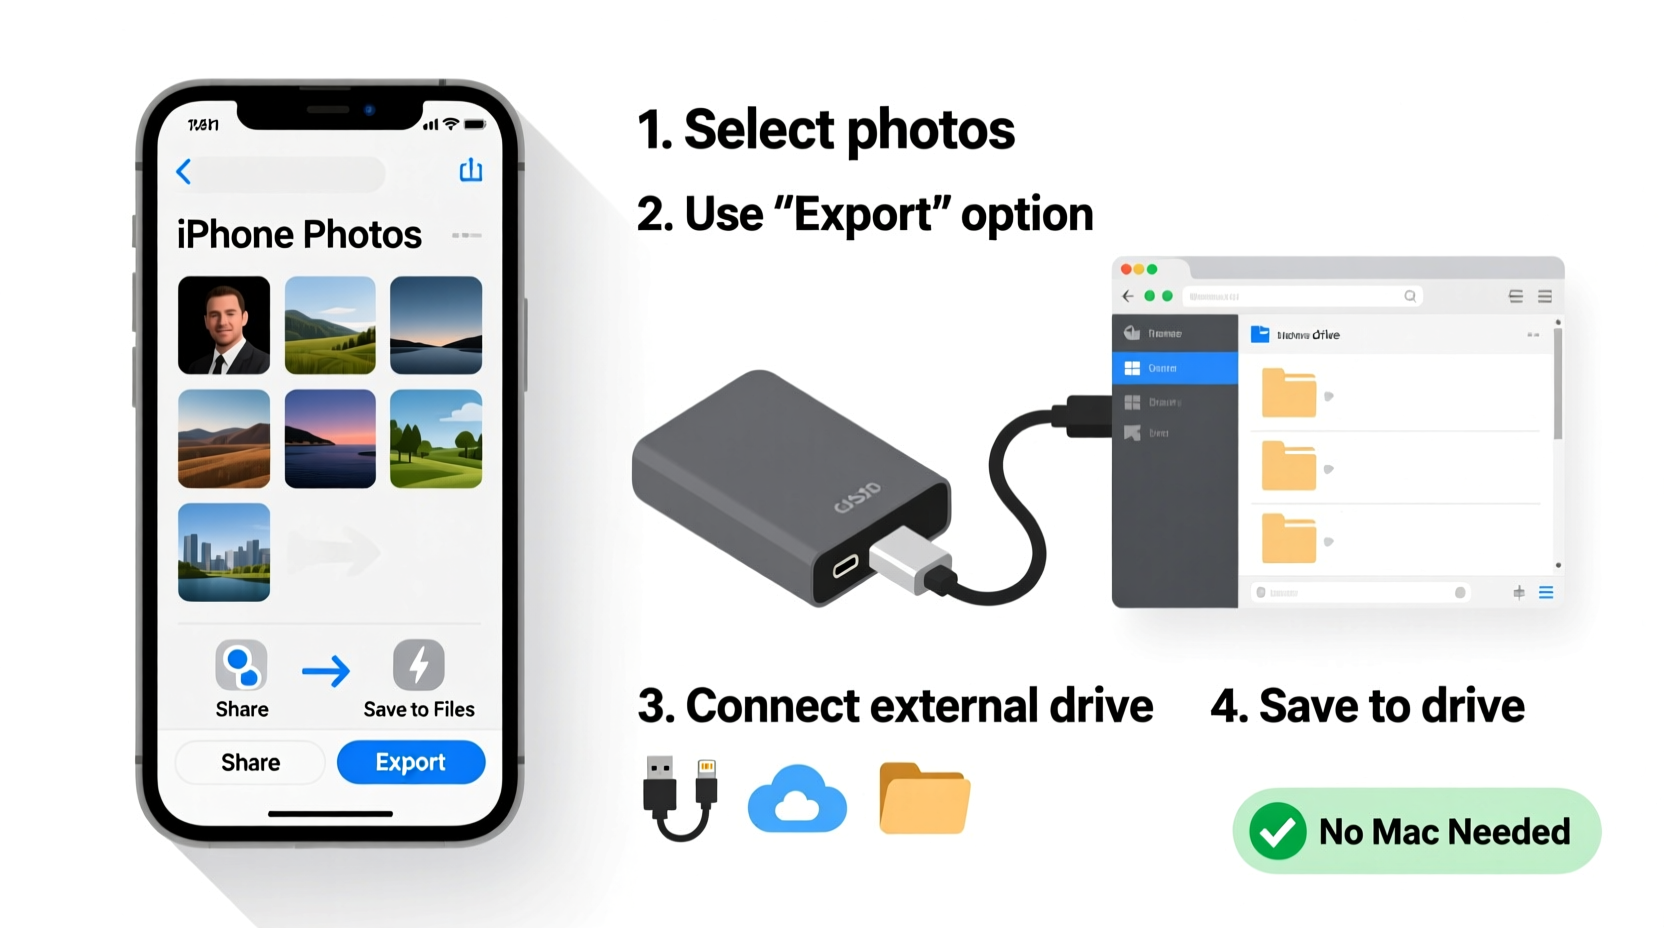
Method 1: Using a Windows PC and USB Cable
This is the most straightforward and widely compatible approach. All you need is a Windows computer, a Lightning-to-USB cable (or USB-C for newer iPhones), and your external hard drive.
Step-by-Step Guide
- Connect your external hard drive to your Windows PC via USB.
- Open File Explorer and confirm the drive appears under “This PC.” Note its assigned drive letter (e.g., E:, F:).
- Unlock your iPhone and connect it to the PC using the charging cable.
- When prompted on your iPhone, tap “Trust This Computer” and enter your passcode.
- On your PC, open File Explorer again. Your iPhone should appear under “Devices and drives.”
- Navigate to: Internal Storage > DCIM. This folder contains all camera photos and videos.
- Select the folders you want to back up (you may see multiple numbered folders like 100APPLE, 101APPLE).
- Copy these folders (Ctrl+C) and paste them (Ctrl+V) into a new folder on your external hard drive (e.g., “iPhone_Photos_Backup_2024”).
- Wait for the transfer to complete. Large libraries may take several minutes.
- Safely eject both your iPhone and external drive when finished.
This method preserves original file names, dates, and quality. It also allows selective transfers—you can choose specific albums or time periods by sorting files by date in File Explorer.
Method 2: Using Third-Party Software (EaseUS MobiMover, iMazing)
If navigating file directories feels technical or you want advanced features like filtering by date or media type, dedicated software simplifies the process.
Tools like EaseUS MobiMover Free and iMazing Express offer intuitive interfaces for transferring photos from iPhone to external storage via a Windows PC. They support batch operations, preview options, and metadata preservation.
Using EaseUS MobiMover (Free Version)
- Download and install EaseUS MobiMover from the official website.
- Launch the program and connect your iPhone via USB.
- Select “Phone to Computer” mode.
- Choose “Photos” as the content type and click “Transfer.”
- In the pop-up window, browse and select your external hard drive as the destination folder.
- Click “OK” and wait for the transfer to finish.
iMazing offers similar functionality with additional capabilities like exporting only photos from certain dates or excluding screenshots. The free version allows limited exports, while the paid license unlocks full access.
“Third-party tools reduce human error during transfers and help maintain photo organization.” — Sarah Kim, Digital Archivist
Method 3: Standalone Hardware Solutions (Dedicated Photo Backup Devices)
For those who prefer not to involve a computer at all, portable hardware devices provide a direct iPhone-to-drive solution. These gadgets act as self-contained backup stations powered by batteries and support SD cards or USB drives.
Popular options include:
- SanDisk Memory Vault: Connects directly to your iPhone via Lightning port and copies photos to an attached USB drive.
- HyperDrive Hub Duo: Combines a USB-C hub with SD card reader and direct iOS photo import via app.
- WD My Passport Wireless Pro: Features built-in Wi-Fi and mobile app support for wireless transfers from iPhone to drive.
Real Example: Travel Photographer’s Workflow
Lena, a freelance travel photographer, shoots extensively on her iPhone while touring remote regions with spotty internet. She uses a SanDisk Memory Vault during trips. Each evening, she plugs her iPhone into the device, selects “Backup Photos,” and within minutes, her day’s captures are safely stored on a rugged microSD card inside the vault. When she returns home, she moves the files to her desktop’s external hard drive for archival. This system ensures zero reliance on cloud services and protects against phone loss in unpredictable environments.
Comparison Table: Backup Methods Overview
| Method | Required Tools | Speed | Technical Skill | Best For |
|---|---|---|---|---|
| Windows + USB Cable | PC, USB cable, external drive | Medium-Fast | Beginner | Users comfortable with File Explorer |
| Third-Party Software | PC, software license, cable | Fast | Intermediate | Organized backups with filters |
| Standalone Device | Hardware unit, external drive | Slow-Medium | Beginner | On-the-go travelers, non-tech users |
| Wireless Transfer (via App) | External drive with Wi-Fi, iOS app | Slow | Beginner | Wireless convenience, small batches |
Common Pitfalls to Avoid
Even with the right tools, mistakes can compromise your backup integrity. Here are key issues and how to prevent them:
- Interrupting Transfers: Never unplug your iPhone or external drive mid-transfer. This risks corrupting files or creating incomplete copies.
- Ignoring File Dates: Some apps rename photos upon export. Use tools that preserve EXIF data (date, location, camera settings) for accurate archiving.
- Skipping Verification: After copying, open a few random photos on the external drive to confirm they’re viewable and intact.
- Using NTFS on Cross-Platform Drives: NTFS is read-only on iOS-connected devices. Format drives as exFAT for seamless two-way access.
Checklist: Secure iPhone Photo Backup Routine
- Charge your iPhone and external drive (if battery-powered)
- Ensure enough free space on the hard drive
- Update iOS and computer operating system
- Unlock iPhone and trust connected devices
- Create a dated folder on the external drive (e.g., “iPhone_Backup_Nov2024”)
Frequently Asked Questions
Can I backup iPhone photos without iTunes or iCloud?
Yes. You can use File Explorer on Windows, third-party software, or standalone hardware devices to copy photos directly to an external drive—no iCloud or iTunes required.
Will my Live Photos and HEIC images transfer correctly?
Yes, when using direct file transfer via USB or trusted software. Live Photos appear as .MOV video clips paired with .HEIC images. Most modern systems support HEIC playback, but you can convert to JPEG later if needed.
How often should I backup my iPhone photos?
Experts recommend weekly backups for active photographers and monthly for casual users. If you’ve just returned from a trip or event, back up immediately to avoid accidental loss.
Final Tips for Long-Term Photo Preservation
Backing up once isn't enough. Digital preservation requires ongoing attention. Consider implementing a tiered strategy: keep one copy on an external drive at home, another in a secure offsite location (like a safety deposit box), and optionally, a private cloud service such as Synology or NAS for redundancy.
Regularly audit your backups—at least twice a year. Plug in your drives, verify file accessibility, and check for disk errors. Hard drives fail silently; proactive monitoring prevents surprise data loss.
Also, consider organizing your backed-up photos by year and event (e.g., “2024_Family_Reunion”, “Italy_Trip_2024”) rather than leaving them in default DCIM folders. This makes future retrieval much easier, especially as your collection grows.
Conclusion
Backing up your iPhone photos to an external hard drive without a Mac is not only possible—it's simple, affordable, and highly effective. Whether you use a Windows PC, specialized software, or portable hardware, taking control of your photo archive empowers you to protect what matters most: your memories.
You don’t need expensive subscriptions or proprietary ecosystems to keep your digital life safe. With the right tools and a consistent routine, your photos can last decades, untouched by glitches, outages, or forgotten passwords.


 浙公网安备
33010002000092号
浙公网安备
33010002000092号 浙B2-20120091-4
Comments
No comments yet. Why don't you start the discussion?