
For streamers, clear communication is just as important as high-quality video. Discord has become the go-to platform for real-time voice interaction during live streams, whether coordinating with co-hosts, engaging with a community, or managing behind-the-scenes teams. Yet, poor audio can undermine even the most polished broadcast. Muffled voices, echo, background noise, or lagging audio don’t just distract viewers—they erode credibility. The good news: with the right setup and adjustments, you can dramatically improve your Discord voice chat quality to ensure crisp, professional-grade clarity during every stream.
Optimize Your Audio Hardware
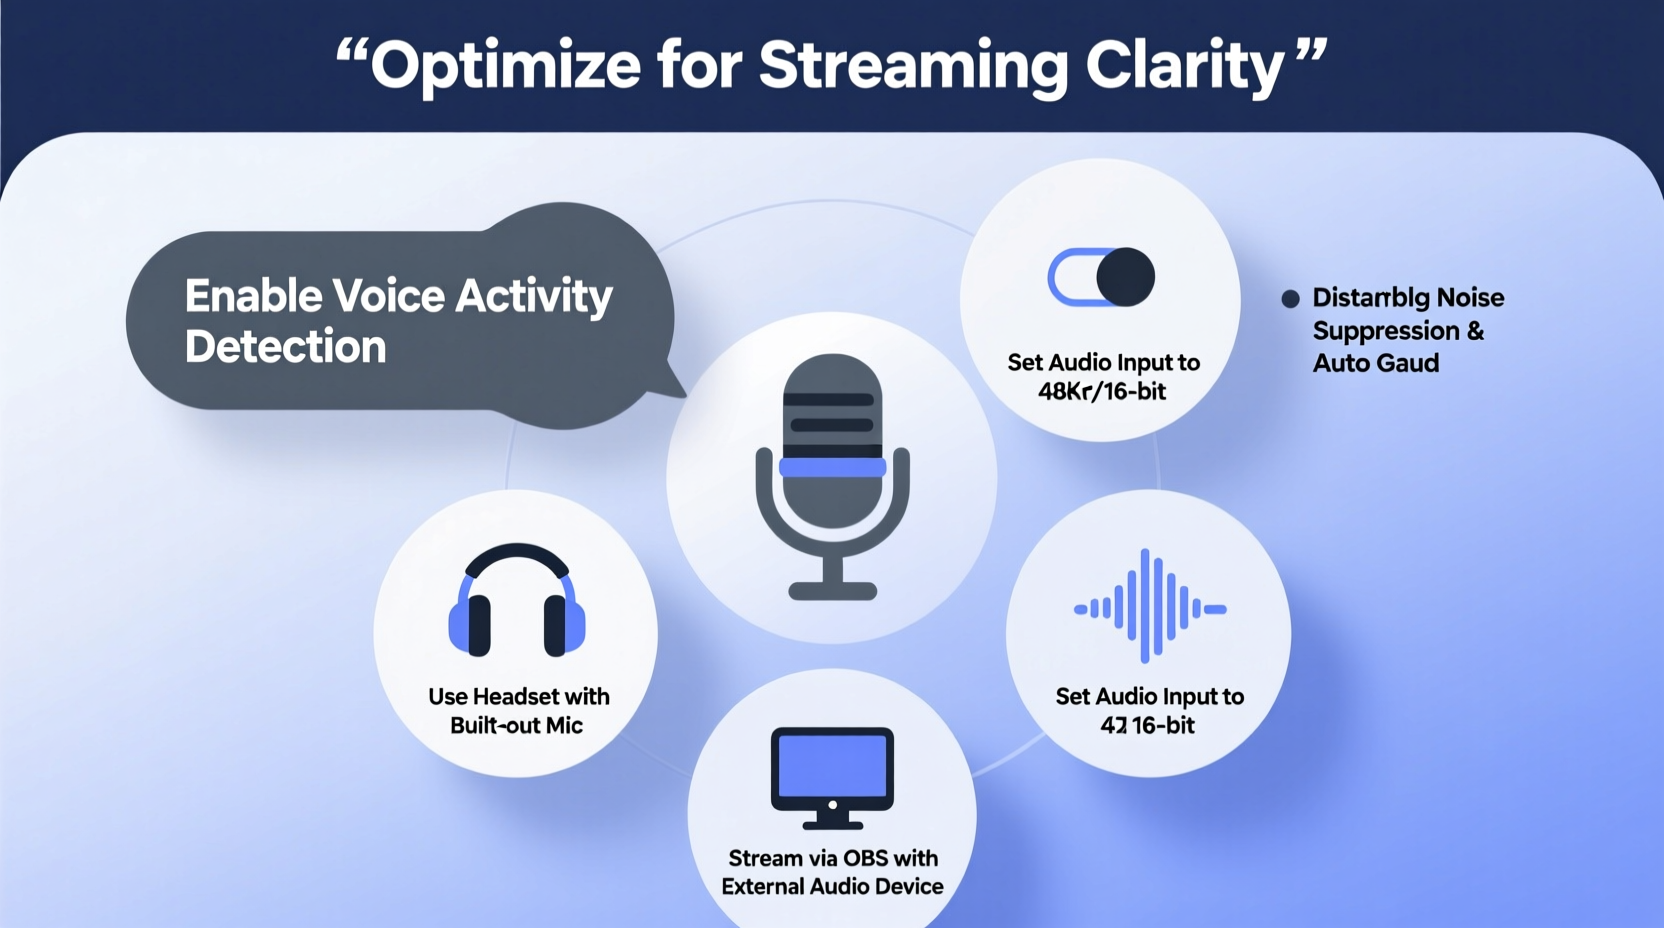
The foundation of excellent voice quality begins with your microphone and headphones. Even the best software settings can't compensate for subpar hardware. A dedicated streaming microphone, such as the Shure MV7, Audio-Technica AT2020, or Rode NT-USB, captures clean, full-range audio far more effectively than built-in laptop mics or low-end headsets.
Equally important is using closed-back headphones. Open-back models may sound spacious, but they leak sound—your game audio or voice could be picked up by your mic, creating feedback or bleed into the stream. Closed-back headphones like the Beyerdynamic DT 770 Pro or Sony MDR-7506 isolate audio and prevent this issue.
Mic Placement and Environment
Where you place your microphone matters. Keep it 4–6 inches from your mouth and use a boom arm to maintain consistent positioning. Avoid placing it near reflective surfaces like glass or bare walls, which can cause reverb. If possible, record in a carpeted room with soft furnishings or acoustic panels to dampen ambient noise.
A quiet environment is non-negotiable. Turn off fans, close windows, and mute system notifications before going live. Background noise doesn’t just annoy listeners—it forces Discord’s noise suppression to work harder, potentially distorting your voice.
Configure Discord Voice Settings for Clarity
Discord offers robust voice settings that, when tuned correctly, enhance clarity while minimizing distractions. Navigate to User Settings > Voice & Video to begin optimizing.
- Input Device: Select your primary microphone. Test input levels to ensure your voice registers clearly without peaking.
- Output Device: Choose headphones or studio monitors for accurate monitoring.
- Input Volume: Aim for peaks around -12dB to -6dB. Consistently hitting 0dB causes clipping and distortion.
- Automatic Gain: Disable this. It amplifies both your voice and background noise unpredictably.
Enable Advanced Voice Processing
Discord includes powerful noise suppression tools powered by machine learning. Under “Noise Reduction,” select “High” to eliminate keyboard clicks, fan hum, and other ambient sounds. For users with high-end GPUs, enabling “Experimental Acoustic Noise Suppression” can further refine audio by isolating vocal frequencies.
Use Voice Activity Detection (VAD) wisely. Set sensitivity so your mic triggers only when you speak—not when you breathe or shift in your chair. Adjust the slider until Discord detects your speech reliably without false activations.
“Streamers who invest time in tuning their Discord audio settings see a measurable increase in audience retention. Clear voice communication keeps viewers engaged.” — Jordan Lee, Streaming Audio Consultant at StreamOps
Advanced Audio Routing with Virtual Cables and DAWs
For maximum control, route your audio through external software like Voicemeeter Banana or OBS Studio before sending it to Discord. This allows you to apply compression, EQ, and gain staging—tools typically missing in Discord’s native interface.
Using virtual audio cables (e.g., VB-Audio Cable), you can create a custom signal chain:
- Your microphone enters Voicemeeter.
- Apply a high-pass filter (cut below 80Hz) to remove rumble.
- Add light compression to balance volume spikes.
- Route the processed signal to Discord as a virtual input.
This method ensures consistent tone and volume, especially useful if you switch between speaking softly and projecting during energetic segments.
Monitor Latency and Sample Rates
Ensure your sample rate is set to 48kHz in both your operating system and Discord. This matches standard streaming and recording rates, reducing resampling artifacts. High latency (>150ms) causes echo and delays. In Discord, enable “Use Legacy Audio Subsystem” if you experience crackling or delay on Windows.
| Setting | Recommended Value | Purpose |
|---|---|---|
| Input Sensitivity | -18dB to -12dB | Prevents clipping while maintaining clarity |
| Noise Reduction | High (or Experimental) | Removes background interference |
| Sample Rate | 48 kHz | Matches streaming standards |
| Bitrate | 32 kbps (up to 128 kbps for Nitro) | Balances quality and bandwidth |
| VAD Sensitivity | Medium-High | Reduces false triggers |
Minimize System Interference and Bandwidth Conflicts
Streaming consumes significant CPU, GPU, and network resources. When Discord competes for bandwidth, voice quality suffers. To prevent this, prioritize your audio traffic.
In your router settings, enable Quality of Service (QoS) and assign higher priority to your streaming PC or IP address. This ensures Discord packets are delivered promptly, reducing jitter and dropouts.
On your computer, limit background applications. Browsers with multiple tabs, cloud sync tools, and automatic updates consume bandwidth and processing power. Close unnecessary programs before streaming.
Separate Game and Voice Audio
If you're sharing game audio with your team via Discord, avoid using “All Audio” mode unless necessary. Instead, use “Push-to-Talk” for voice and route game sound separately through your streaming software. This prevents Discord from compressing your entire audio mix, preserving voice clarity.
Alternatively, use two separate Discord instances—one for voice chat (with optimized settings) and another for media sharing—using multi-account tools or virtual machines.
Real-World Example: Fixing a Streamer’s Audio Issues
Consider Alex, a weekly Twitch streamer hosting multiplayer games with friends over Discord. Viewers frequently complained about muffled voices and keyboard noise. Despite using a decent headset, the audio lacked professionalism.
After analysis, three issues were identified:
- The microphone was set to automatic gain, amplifying keyboard clatter.
- Discord was using a 24kHz sample rate, causing resampling distortion.
- Wi-Fi interference caused intermittent packet loss during peak hours.
The fix was straightforward:
- Switched to a dynamic XLR microphone with a USB interface.
- Set sample rate to 48kHz and disabled automatic gain.
- Ran a Cat 6 cable from the router to the streaming PC.
- Enabled High Noise Suppression in Discord.
Within one stream, viewer comments shifted from “hard to hear” to “your audio sounds studio-level now.” The change wasn’t due to expensive gear—it came from deliberate configuration.
Step-by-Step Guide to Optimizing Discord Voice for Streaming
Follow this checklist before every stream to ensure peak voice quality:
- Test Your Equipment: Speak into your mic and verify input levels in Discord. Adjust gain so peaks stay below -6dB.
- Disable Automatic Gain: Go to Voice & Video > Input Mode > Manual. Lock your input volume.
- Enable Noise Suppression: Set to “High” or “Experimental” if available.
- Set Sample Rate: Choose 48 kHz under Audio Subsystem settings.
- Use Push-to-Talk: Assign a key (e.g., Caps Lock) to avoid background noise pickup.
- Check Internet Connection: Run a speed test. Upload speed should be at least 5 Mbps for stable streaming and voice.
- Close Background Apps: Shut down browsers, download managers, and update services.
- Wear Closed-Back Headphones: Prevent audio leakage and monitor your voice accurately.
- Conduct a Dry Run: Join a test server with a friend to evaluate clarity, echo, and latency.
- Monitor During Stream: Keep an ear out for distortion or sudden drops in volume.
Frequently Asked Questions
Does Discord Nitro improve voice quality?
Yes. Discord Nitro subscribers can enable 128 kbps voice bitrate in servers that support it, compared to the standard 32 kbps. This results in fuller, more natural-sounding audio, especially noticeable in music or detailed speech.
Why does my voice sound robotic on Discord?
A robotic tone usually indicates packet loss, aggressive noise suppression, or incorrect sample rate conversion. Check your internet stability, disable experimental features temporarily, and ensure your system and Discord are both using 48 kHz.
Can I use OBS to improve Discord voice quality?
Absolutely. Route your microphone through OBS, apply filters like noise gate and compressor, then send the clean output to Discord via a virtual audio cable. This gives you professional-grade control over your vocal tone.
Final Checklist: Ensure Every Stream Sounds Professional
- ✅ Microphone positioned correctly, 4–6 inches from mouth
- ✅ Headphones are closed-back and properly connected
- ✅ Discord input sensitivity set manually (no auto-gain)
- ✅ Noise suppression enabled (High or Experimental)
- ✅ Sample rate set to 48 kHz
- ✅ Push-to-talk configured and tested
- ✅ Wired internet connection confirmed
- ✅ Background apps and browser tabs closed
- ✅ Audio levels tested with a friend before going live
- ✅ Room is quiet and acoustically treated if possible
Conclusion
Crystal-clear voice chat isn’t a luxury—it’s a necessity for modern streamers. Discord provides the tools, but it’s up to you to configure them with intention. From selecting the right microphone to fine-tuning noise suppression and managing system resources, each step contributes to a seamless auditory experience. When your voice comes through sharp and distraction-free, your audience listens longer, engages more, and returns for future streams. Don’t let poor audio hold you back. Implement these strategies today, and transform your Discord voice chat into a professional-grade communication channel that enhances every broadcast.


 浙公网安备
33010002000092号
浙公网安备
33010002000092号 浙B2-20120091-4
Comments
No comments yet. Why don't you start the discussion?