
Flocked Christmas trees offer the enchanting illusion of freshly fallen snow, but their beauty comes with added weight. The artificial snow coating, combined with lights, ornaments, and a full-bodied tree frame, significantly increases the load on a standard stand. Many commercial stands aren’t designed to handle this extra mass, leading to instability, wobbling, or even tipping—especially in homes with pets or active children. While you can purchase high-capacity stands, building your own ensures a perfect fit, superior stability, and long-term reusability. This guide walks through the process of constructing a custom, rock-solid stand tailored for heavy flocked trees.
Understanding the Challenge: Why Flocked Trees Need Extra Support
Flocking adds between 5 to 15 pounds of additional weight depending on tree size and coverage density. When combined with metal frames, dense PVC branches, water reservoirs, and hundreds of ornaments, a six- to seven-foot flocked tree can easily weigh over 70 pounds. Most store-bought stands are engineered for lightweight pre-lit trees and fail under such loads. The central bolt may strip, the base may flex, or the legs may splay outward under pressure.
A well-built DIY stand addresses these weaknesses by reinforcing structural joints, widening the base footprint, and using materials that resist compression and fatigue. Unlike generic models, a custom stand can be sized precisely to your tree’s trunk diameter and weight distribution, ensuring maximum contact and balance.
“Stability isn’t just about weight capacity—it’s about center of gravity and base geometry. A wider, lower-profile stand prevents torque from top-heavy ornamentation.” — Daniel Reeves, Furniture Engineer & Woodworking Instructor
Materials and Tools You’ll Need
Building a stable Christmas tree stand requires durable components and precision assembly. The goal is rigidity, so material choice is critical. Avoid plastic or thin sheet metal; opt for hardwoods or steel where possible.
Recommended Materials
- Wood Option: ¾-inch birch or oak plywood (for base), 2x4 hardwood (for support frame)
- Metal Option: 1/8-inch steel plate (base), angle iron (supports)
- Central bolt: 5/16-inch or 3/8-inch threaded rod, at least 8 inches long
- Nut and washer set (steel, matching bolt size)
- Three 3/8-inch lag screws (for tree grip)
- Heavy-duty rubber feet or felt pads (4 pieces)
- Wood glue (if using wood), metal epoxy (if welding isn’t available)
- Sandpaper (medium grit)
Essential Tools
- Drill with wood/metal bits
- Hole saw or spade bit (size matches tree trunk)
- Wrench or socket set
- Jigsaw or angle grinder (for shaping)
- Tape measure and carpenter’s square
- Clamps
- Safety gear (gloves, goggles)
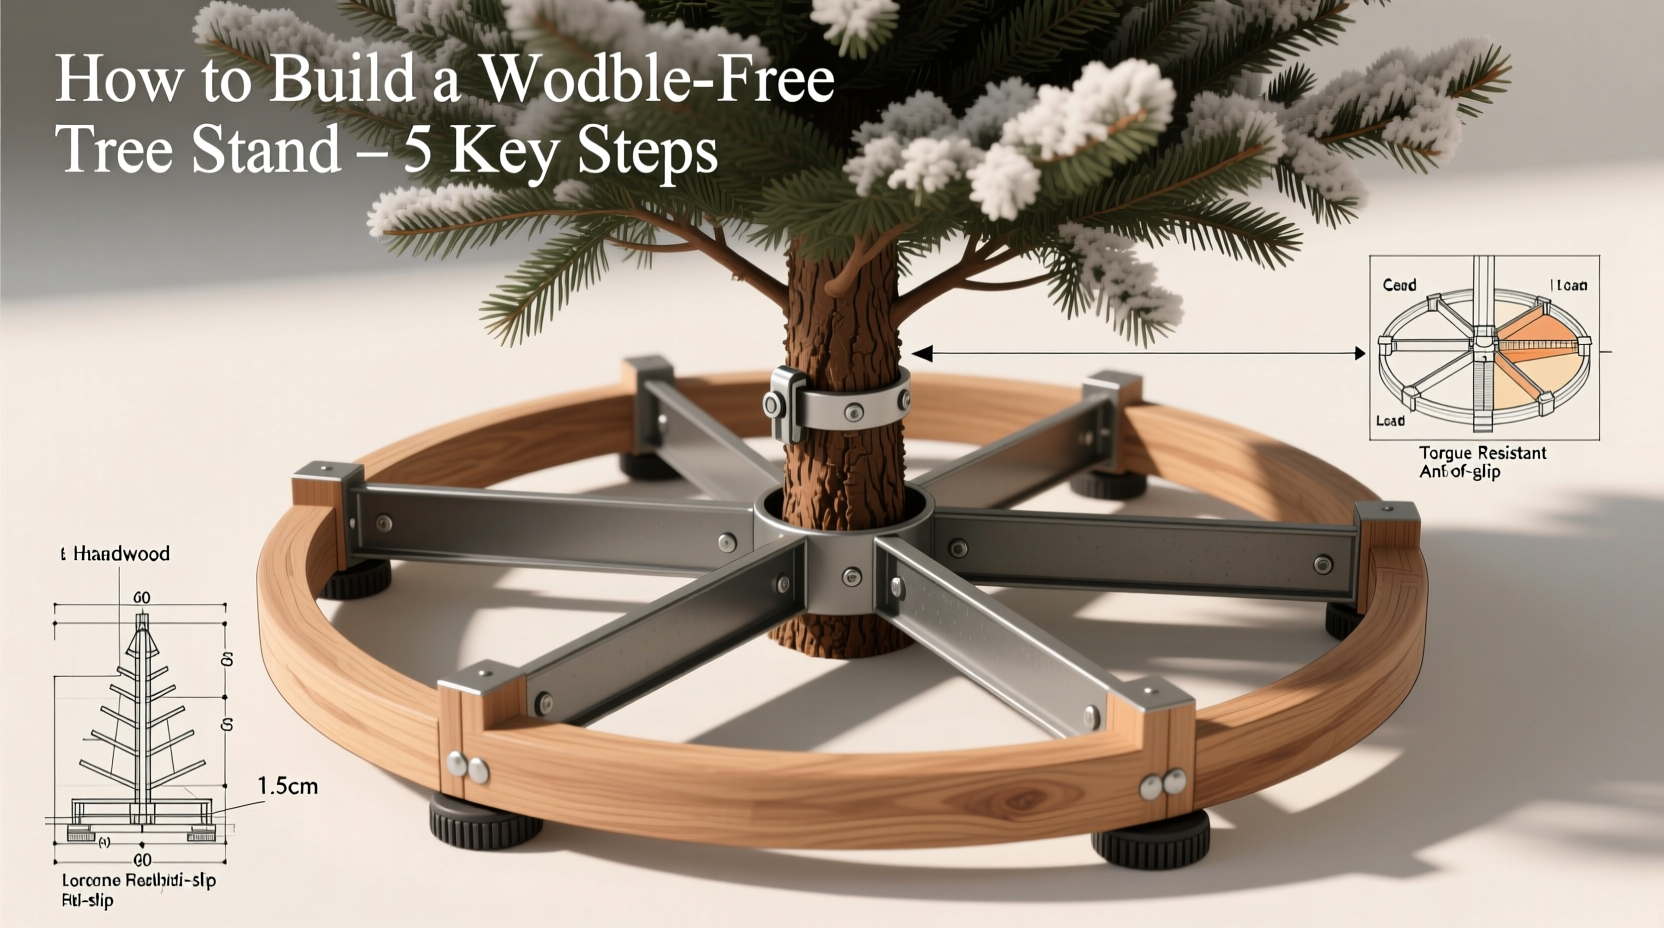
Step-by-Step Construction Guide
Follow this sequence to assemble a stand capable of supporting up to 100 pounds with zero wobble. This design uses wood for accessibility, but steel alternatives are noted.
- Design the Base (Diameter: 18–24 inches)
Cut a circular or hexagonal base from ¾-inch plywood. Larger trees (7+ feet) need a 24-inch base; smaller ones can use 18 inches. Sand edges smooth. For steel, cut a disc from 1/8-inch plate using a plasma cutter. - Drill the Central Trunk Hole
Measure your tree trunk’s diameter. Use a hole saw to drill a centered hole in the base. For irregular trunks, drill slightly undersized and widen gradually. The fit should allow the trunk to sit snugly with no lateral play. - Install the Center Bolt Mechanism
Below the base, attach a 3/8-inch nut to the underside using epoxy or weld it in place (wood: embed in recessed pocket). Insert the threaded rod upward through the trunk hole. On top, place a large washer and hand-tighten a second nut to act as the tightening knob. As you screw it down, it presses against the trunk, securing it vertically. - Add Lateral Grip with Lag Screws
Drill three equidistant pilot holes around the trunk opening, angled slightly inward. Insert 3/8-inch lag screws with winged knobs. These provide side-to-side stabilization and can be adjusted as the tree settles. - Reinforce with a Support Frame (Optional but Recommended)
Attach a triangular 2x4 frame beneath the base for larger trees. This lowers the center of gravity and resists tipping. In metal builds, weld angle iron supports radiating from the center. - Attach Non-Slip Feet
Glue or screw rubber pads to the bottom corners of the base. This prevents sliding on hardwood or tile floors and dampens vibrations. - Test Before Final Use
Assemble the tree without ornaments first. Apply gentle side pressure to check for movement. Adjust lag screws or add shims if needed.
Do’s and Don’ts: Building for Maximum Stability
| Do’s | Don’ts |
|---|---|
| Use a base diameter at least 1/3 the height of the tree | Use flimsy particle board or MDF |
| Pre-drill all screw and bolt holes to prevent splitting | Overtighten the central bolt, which may crush the trunk |
| Balance the tree before adding heavy ornaments | Place the tree near high-traffic areas without anchoring |
| Add water reservoir via a separate bucket inside the base (if real tree) | Ignore floor surface—always test on the actual flooring |
| Inspect annually for wear, especially bolt threads and leg joints | Reuse stripped lag screws; replace them yearly |
Real-World Example: The Johnson Family’s 8-Foot Flocked Spruce
The Johnsons purchased an 8-foot flocked pre-lit tree weighing nearly 80 pounds. Their previous metal stand wobbled during their toddler’s play sessions and once tipped over after a pet bumped it. They built a custom wooden stand using ¾-inch birch plywood and 2x4 supports, following the steps above. The base was 24 inches in diameter with three adjustable lag screws. After installation, they tested stability by gently pushing from different angles—no movement occurred. Over three holiday seasons, the stand has held firm, even when fully decorated with glass ornaments and LED icicles. They now disassemble and store the stand in a closet, reusing it each year with minor bolt maintenance.
Enhancing Longevity and Safety
A well-built stand should last decades with proper care. To maximize lifespan:
- Store indoors in a dry place—avoid garages or sheds where moisture causes warping or rust.
- Check bolt threads annually; apply light machine oil to prevent seizing.
- Replace rubber feet every 2–3 years as they degrade.
- If using wood, apply a clear polyurethane coat to protect against spills and humidity.
- For families with pets or small children, consider tethering the tree to a wall anchor as a secondary safety measure—even the best stand can’t eliminate all risk.
“The best tree stand doesn’t just hold weight—it anticipates movement. Think like an engineer: distribute load, minimize leverage, and always overbuild for safety.” — Maria Tran, Structural Designer & Holiday Display Consultant
Frequently Asked Questions
Can I use this design for both artificial and real trees?
Yes. The stand works for both, but with real trees, ensure the central bolt doesn’t block water absorption. Either elevate the tree slightly above the base using small blocks or incorporate a separate water reservoir bucket inside the stand that doesn’t interfere with the bolt mechanism.
How tight should the lag screws be?
Tighten until you feel resistance, then a quarter-turn more. The goal is firm contact without denting or crushing the trunk. Over time, wood trunks may compress slightly—check and readjust after 24 hours.
Is metal better than wood for heavy trees?
Metal offers higher compressive strength and durability, but wood is easier to work with using basic tools. A properly constructed wooden stand with adequate thickness and reinforcement will safely support most residential flocked trees. For commercial displays or trees over 9 feet, steel is recommended.
Final Checklist Before Assembly
- Measure tree trunk diameter accurately
- Select base material based on expected load (wood for ≤80 lbs, steel for >80 lbs)
- Cut base with diameter ≥1/3 of tree height
- Drill centered trunk hole with snug fit
- Secure central bolt with fixed bottom nut and adjustable top nut
- Install three lag screws at 120-degree intervals
- Add non-slip feet to bottom
- Test stability with tree before decorating
- Inspect annually and maintain moving parts
Conclusion: Build Once, Enjoy for Years
A wobble-free Christmas tree isn’t a luxury—it’s a necessity for safety, aesthetics, and peace of mind. Commercial stands often fall short when faced with the unique demands of flocked trees. By investing a few hours in building a custom stand, you gain unmatched stability, perfect fit, and the satisfaction of a job well done. Whether you choose wood or metal, the principles remain the same: wide base, secure fastening, and thoughtful reinforcement. This holiday season, skip the shaky tripod and embrace a foundation as strong as your traditions.


 浙公网安备
33010002000092号
浙公网安备
33010002000092号 浙B2-20120091-4
Comments
No comments yet. Why don't you start the discussion?