
Transforming your home into a holiday spectacle no longer requires stringing hundreds of static lights. With the rise of programmable LED technology, creating a synchronized, dynamic Christmas light display has become accessible—even for hobbyists without an engineering degree. From twinkling patterns to music-synced animations, customizable LEDs let you design a unique visual experience that captures attention and spreads cheer. This guide walks through everything you need to know: selecting components, planning layouts, programming effects, and bringing your vision to life.
Understanding Programmable LEDs: The Foundation of Your Display
At the heart of any modern custom light display are programmable LEDs—tiny, addressable light units that can be individually controlled via microcontrollers. Unlike traditional Christmas lights where all bulbs behave uniformly, these smart LEDs allow precise control over color, brightness, timing, and animation sequences.
The most common type used in DIY holiday displays is the WS2812B (often sold under the NeoPixel brand by Adafruit). Each LED contains a built-in driver chip, enabling it to receive digital signals and pass them along the chain. They operate on 5V DC power and communicate using a single data line, making wiring relatively simple.
Other variants include SK6812 (which supports RGBW—red, green, blue, white—for more natural whites) and APA102 (faster refresh rates, better for high-speed animations). While they differ slightly in performance, WS2812Bs remain the go-to choice due to their affordability and wide community support.
Essential Components and Tools Checklist
Before diving into coding or installation, gather all necessary hardware. A well-prepared setup prevents mid-project delays and ensures reliability during cold winter nights.
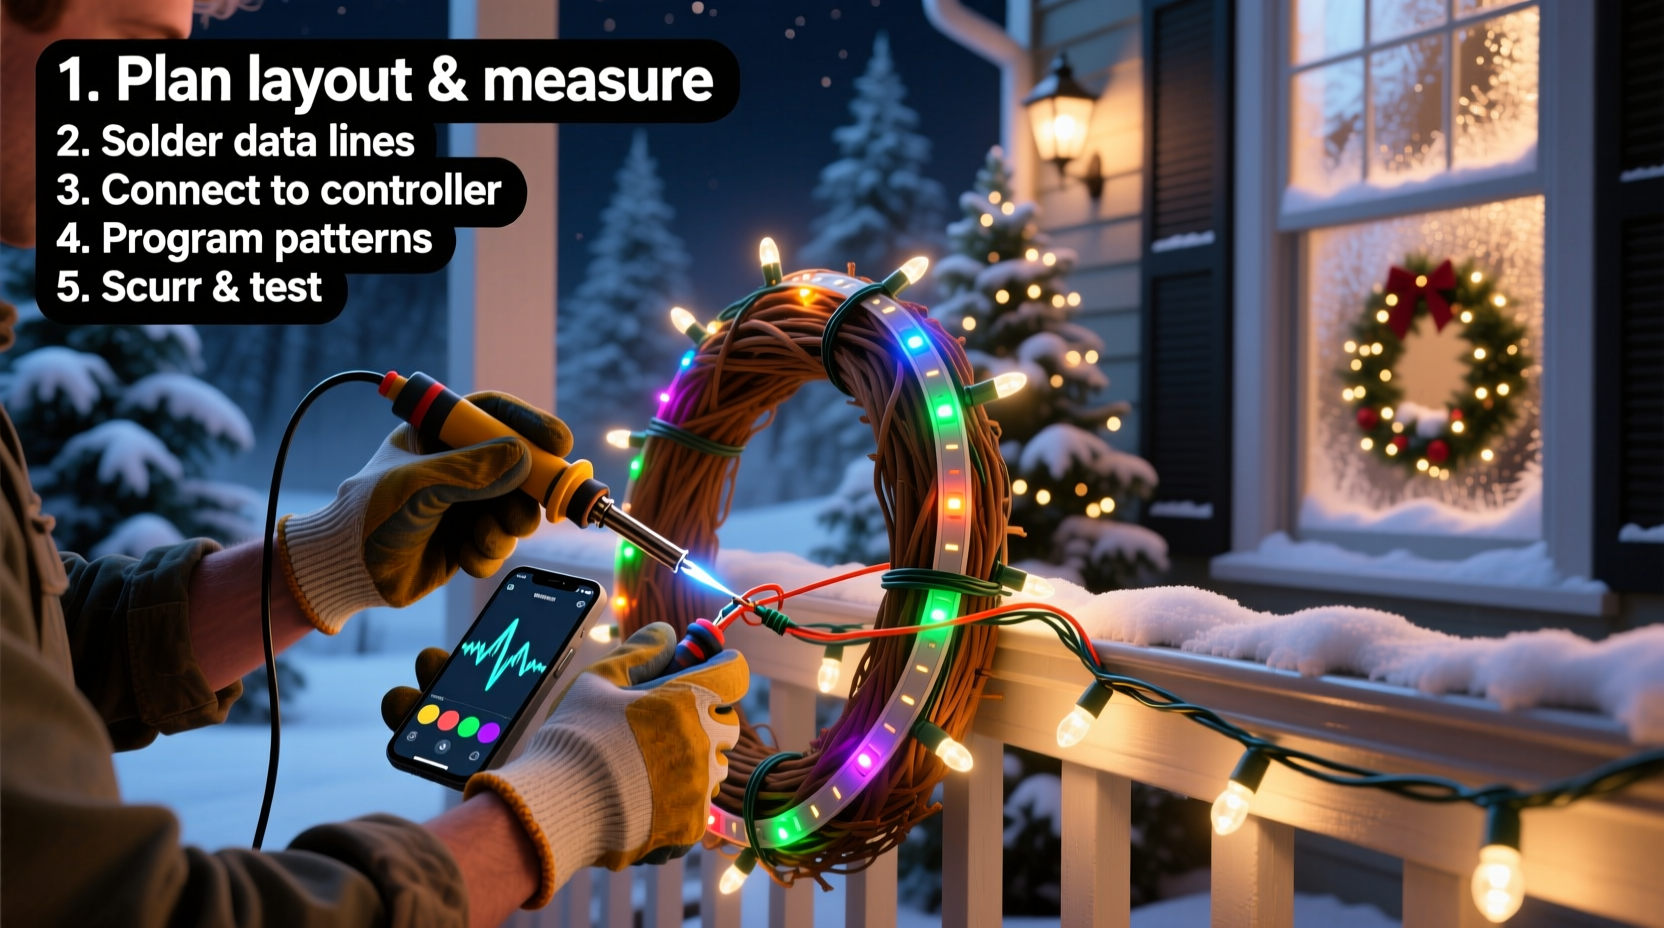
“Most failures in LED projects aren’t from bad code—they’re from poor power distribution.” — Mark Reynolds, Embedded Systems Engineer
Hardware Checklist
- Programmable LED strips or nodes: Choose density based on desired effect (e.g., 60 LEDs/meter for fine detail, 30 for general coverage).
- Microcontroller: ESP32 or Arduino Nano are ideal. ESP32 offers Wi-Fi capability for remote updates and audio streaming.
- Power supply: Use a regulated 5V DC power supply with sufficient amperage. Rule of thumb: 60mA per LED at full white brightness.
- Logic level shifter (optional): Needed when using 5V LEDs with 3.3V controllers like ESP32 to prevent signal issues.
- JST connectors, soldering iron, heat shrink tubing: For secure, weather-resistant connections.
- Diffusers or conduit: Milk-white PVC tubing or silicone diffusers soften individual points of light for a smoother look.
Software & Accessories
- Arduino IDE or PlatformIO: For writing and uploading code.
- FastLED or NeoPixel library: Simplifies animation programming.
- SD card module (optional): Stores multiple animation files for offline playback.
- Audio input circuit (for music sync): Electret microphone or line-in adapter connected to ADC pin.
Designing Your Layout: Planning Before You Plug In
A successful display starts with thoughtful planning. Consider visibility, symmetry, structural limitations, and electrical load distribution.
Begin by sketching your house or yard layout. Mark key features—rooflines, trees, walkways—and decide where lights will go. Think in zones: eaves, columns, fence lines, tree trunks. Assign approximate LED counts per zone to estimate total power needs.
For example, outlining a two-story home with 100 feet of eaves using 60 LEDs/meter (~20 LEDs/foot) requires about 2,000 LEDs. At 60mA each, that’s 120 amps at full white—a theoretical peak. In practice, animations rarely run all LEDs at full brightness simultaneously, but design for at least 60–70% of max load.
Use separate power supplies or inject power at multiple points along long runs to avoid voltage drop, which causes dimming at the end of strips.
| LED Count | Estimated Max Current | Recommended Power Supply |
|---|---|---|
| 100 | 6A | 5V 10A (50W) |
| 500 | 30A | 5V 40A (200W) with dual injection |
| 1000 | 60A | Multiple 5V 30A supplies or industrial-grade PSU |
Step-by-Step Guide to Building and Programming the Display
With materials gathered and layout planned, follow this sequence to assemble and program your system.
- Assemble the controller circuit: Connect the microcontroller to the first LED strip using data, power, and ground lines. Include a 470Ω resistor on the data line near the controller to reduce signal noise.
- Test a short segment: Upload a basic FastLED “color wipe” or “rainbow cycle” sketch to verify communication before expanding.
- Extend and inject power: Solder additional strips end-to-end as needed, but power each 50–100 LEDs directly from the supply. Never daisy-chain power over long distances.
- Mount securely: Use UV-resistant zip ties or aluminum channels with adhesive backing. Avoid staples or tight bends that damage internal traces.
- Write or import animations: Start with pre-built effects (pulse, twinkle, comet), then customize timing, colors, and transitions.
- Add music synchronization (optional): Sample audio input and map amplitude or frequency bands to brightness or hue shifts. Libraries like FFT (Fast Fourier Transform) enable beat detection.
- Deploy and refine: Run animations overnight to check stability, flickering, or overheating. Adjust brightness for nighttime visibility without blinding neighbors.
Programming doesn’t require mastery of C++. FastLED abstracts complexity with intuitive functions:
fill_solid(leds, NUM_LEDS, CRGB::Blue); // Set all blue
leds[50] = CRGB::Red;                    // Change one LED
fadeToBlackBy(leds, NUM_LEDS, 20);       // Dim gradually
Animations are loops updated at high frequency (typically 30–60 FPS). Frame consistency prevents strobing, especially in video recordings.
Real Example: The Johnson Family’s Synced Roofline Display
The Johnsons in Colorado Springs wanted more than just blinking lights. Their goal: a roofline display synced to classic holiday songs played through outdoor speakers.
They installed 1,200 WS2812B LEDs along gutters and gables, divided into four zones. An ESP32 read MP3 files from an SD card, decoded audio in real time, and triggered animations based on beat intensity. Red and green pulses followed drum hits; snowflake patterns faded in during quiet verses.
Initially, they experienced flickering during high-energy segments. Voltage drop was the culprit—power was only injected at the start. After adding three additional power injection points and upgrading to a 5V 60A server power supply, the display ran flawlessly throughout the season. Neighbors began stopping by, and local news featured their home in a \"Best Lights in Town\" segment.
Their secret? Testing early, iterating often, and prioritizing stable power over flashy effects.
Do’s and Don’ts of Custom LED Displays
| Do | Don’t |
|---|---|
| Plan power distribution meticulously | Daisy-chain power across long LED runs |
| Use weatherproof enclosures for electronics | Leave exposed solder joints outdoors |
| Label wires and zones for troubleshooting | Mix different LED types on one strip |
| Start with simple animations and scale up | Run full-brightness white on all LEDs continuously |
| Include a physical on/off switch | Ignore local lighting ordinances or neighbor concerns |
Frequently Asked Questions
Can I control my display from my phone?
Yes. Using an ESP32, you can create a local web server that hosts a control panel. Connect via Wi-Fi to change animations, brightness, or schedules without touching the hardware. Some builders integrate with Home Assistant or MQTT for smart home compatibility.
How do I sync lights to music accurately?
True synchronization requires low-latency audio processing. Pre-rendering animations to match specific songs yields the best results. Tools like xLights (a free desktop application) let you choreograph complex sequences visually and export them to your microcontroller. Real-time audio analysis works but may lag slightly depending on processing speed.
Are programmable LEDs safe for outdoor use?
Yes, provided they are properly sealed and powered with grounded, outdoor-rated supplies. Always use GFCI-protected outlets and keep junction boxes elevated and covered. Avoid contact between water and exposed circuitry.
Conclusion: Light Up the Season with Confidence
Building a custom Christmas light display with programmable LEDs blends artistry and technology in a deeply rewarding way. What begins as a technical project evolves into a neighborhood tradition, a canvas for creativity, and a source of joy for all who see it. The initial learning curve is balanced by endless possibilities—animated snowfall, responsive auroras, or even Morse-code holiday messages.
Success lies not in complexity, but in preparation: robust power, clean wiring, and iterative testing. Whether you're illuminating a single tree or transforming your entire facade, every connection soldered and every line of code refined brings you closer to something memorable.


 浙公网安备
33010002000092号
浙公网安备
33010002000092号 浙B2-20120091-4
Comments
No comments yet. Why don't you start the discussion?